The Customer Surveys tab in each institution allows you, the Institution Administrator, to create custom surveys to poll users in their experience with the core facilities at your institution. The customer survey tool will allow you to identify users of selected facilities over a selected period of time to survey or select specific service provided by core facilities to survey about. All survey results are saved and can be exported to a csv file.

- Navigate Customer Surveys Tab
- Create New Survey
- Add Survey Questions
- Create Survey Campaign
- Edit Customer Survey
- View Campaigns
- View Survey Reports
Navigate Customer Surveys Tab
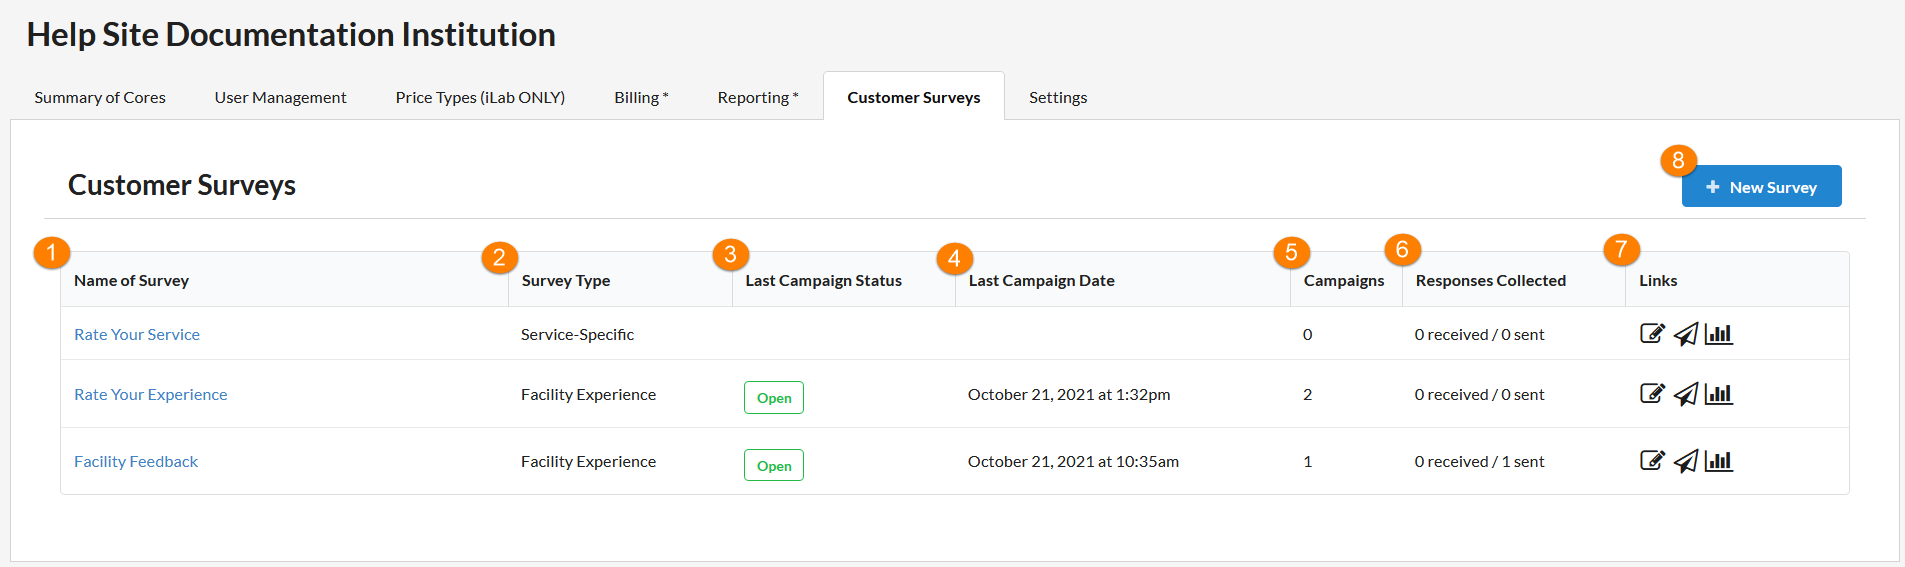
- Name of Survey: The name of the survey is for internal use to distinguish between surveys at your institution and not visible to customers.
- Survey Type: This indicates the type of survey, Service-Specific or Facility Experience.
- Last Campaign Status: This is the status of the most recent campaign you ran in the survey.
- Last Campaign Date: This is the date and time of the most recent campaign in the survey.
- Campaigns: The total number of campaigns that have ran in the survey.
- Responses Collected: The total number of responses collected from all campaigns.
-
Links: The links will take you to the three survey pages.
- Pencil Icon: This will take you to the survey design page where you can edit questions, the name of the survey and more.
- Plane Icon: This icon will take you to the campaigns page of the survey. Here you will be able to end campaigns and add new ones.
- Graph Icon: This icon will take you to survey reporting.
- New Survey Button: Click this button to begin creating a new survey.
Create New Survey
To create a new customer survey click on the button, + New Survey.

After clicking the + New Survey button a pop up will open to create a new survey.
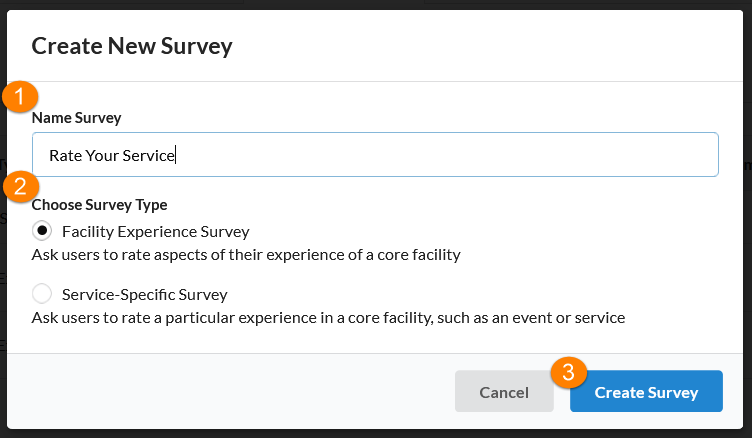
- Name Survey: Type the name of your new survey in this free text field. The name of the survey is for internal use to distinguish between surveys at your institution and not visible to customers.
- Choose Survey Type: Select the type of survey you want to create. The Facility Experience Survey allows you to poll users on their general experience with a core facility. The Service-Specific Survey allows you to continually poll users about specific experiences with equipment reservation and service requests.
- Create Survey: Click the create survey button once you have completed the survey name and type.
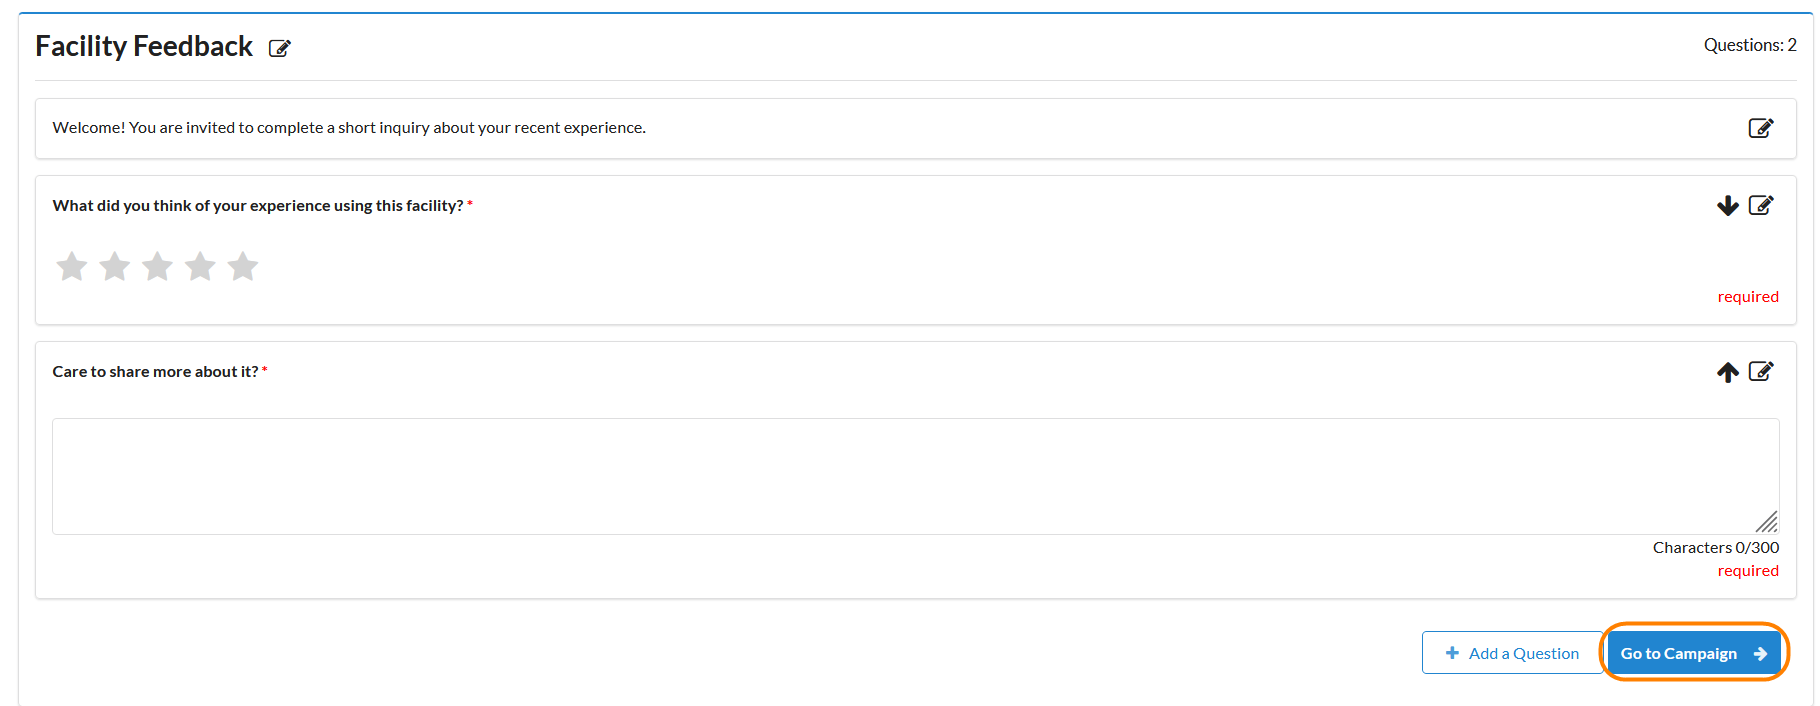
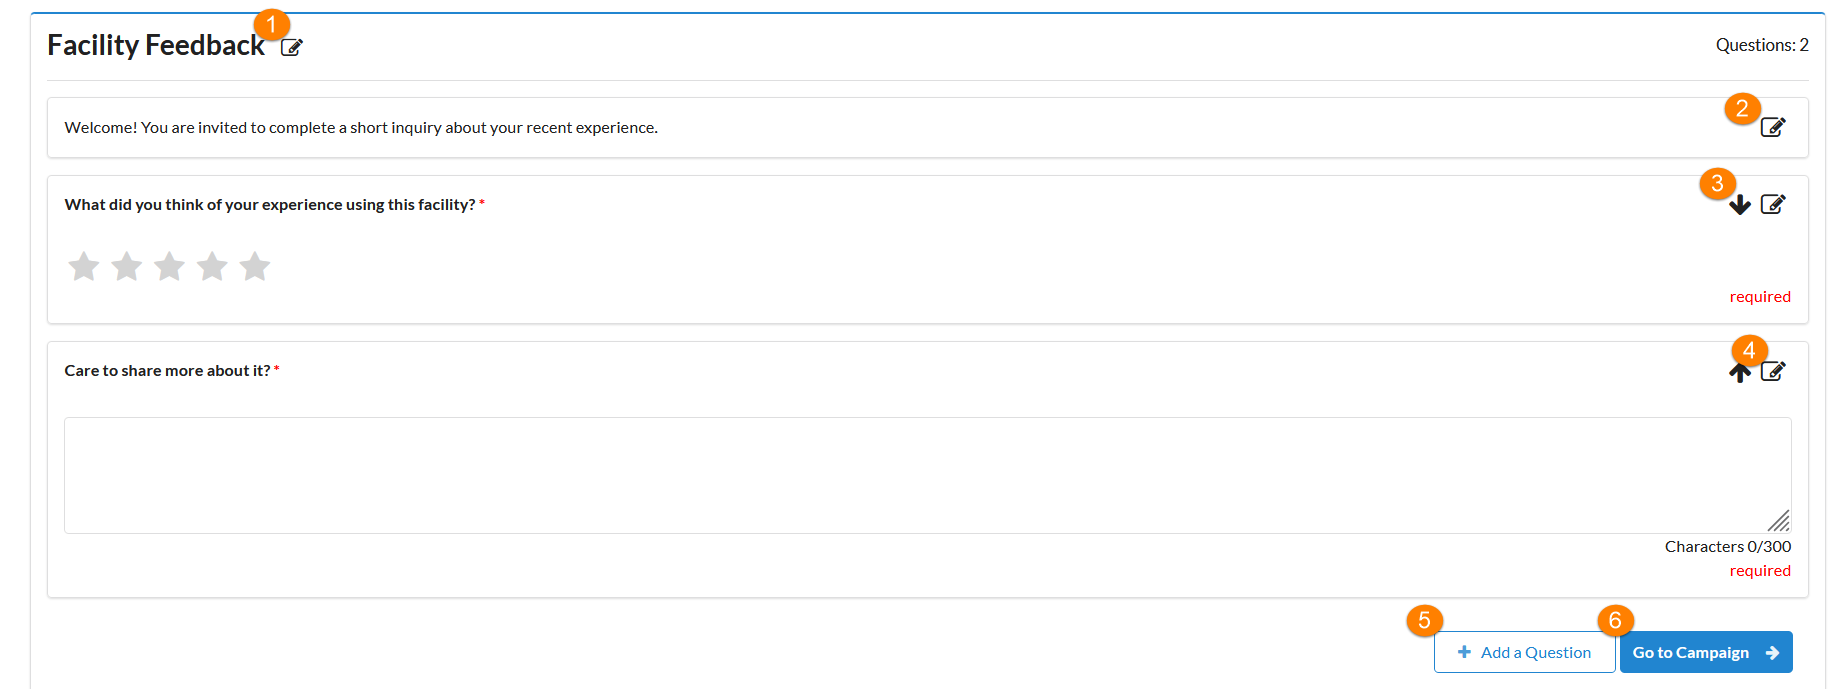
Add Survey Questions
Once you have created your survey you will be prompted to add questions to you customer survey. Up to 20 questions can be added per survey. To add a question, click on the + Add a Question button.
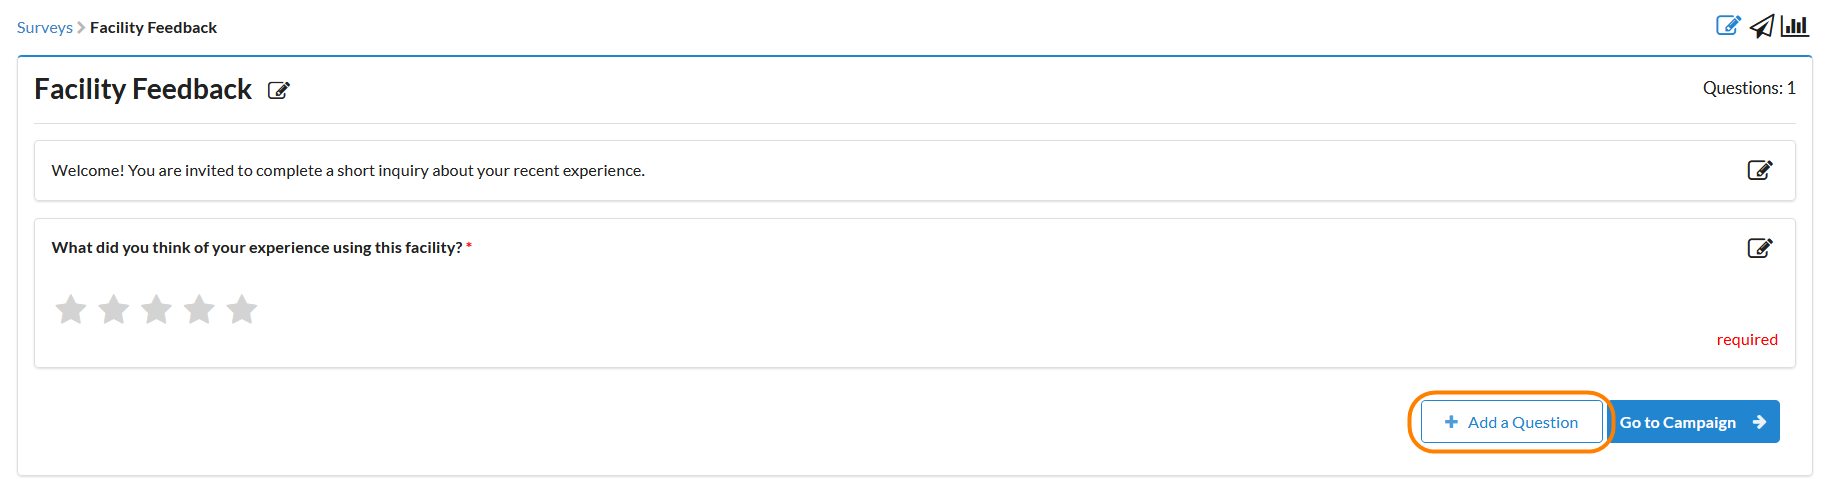
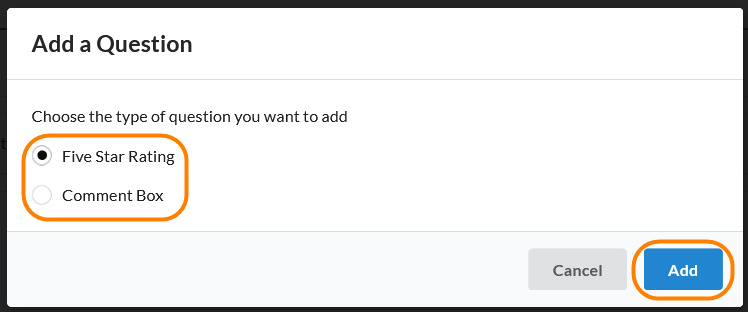
Once you click the + Add a Question button a pop up will open prompting you to select the type of question you would like to add. After selecting the question type click Add.
After clicking Add, your question will open in edit mode within your survey.
Five Star Rating

- Question Field: In this free text field type the question.
- Duplicate Icon: Click on this icon to duplicate the question you have in edit mode.
- Trash Icon: Click on the trash icon to remove the question. A pop up will open to confirm you would like to delete the question from the survey. If a question is deleted once a survey has been sent all responses to the question will be lost.
- Add 'Not Applicable' option: Mark this check box to add a 'Not Applicable' option as the answer to the current question.
- Required: Turn on the required to option to prevent customers from moving on to the next question without answering the current one. 'Not Applicable' is considered an answer and will allow a customer to proceed with the survey.
- Save: Click Save once you have made the needed edits to the question.
Comment Box

- Question Field: In this free text field type the question.
- Duplicate Icon: Click on this icon to duplicate the question you have in edit mode.
- Trash Icon: Click on the trash icon to remove the question. If a question is deleted once a survey has been sent all responses to the question will be lost.
- Required: Turn on the required to option to prevent customers from moving on to the next question without answering the current one.
- Save: Click Save once you have made the needed edits to the question.
Once you have saved your questions they will be added to your survey.
Create Survey Campaign
A campaign is defined as a period of time when users can respond to the survey. The campaign starts when the you send it out and can be ended manually when a sufficient number of responses have been received or a decided on amount of time has passed.
When the survey design is complete, click on the Go to Campaign button at the bottom of the survey.
On the Campaigns page of the survey click the + New Campaign button.

Once you click on the + New Campaign button, the Create Campaign page will open.
Facility Experience Survey Campaign
For a Facility Experience Survey, complete the campaign form which includes selecting the Core Facility(ies) you would like survey users about.
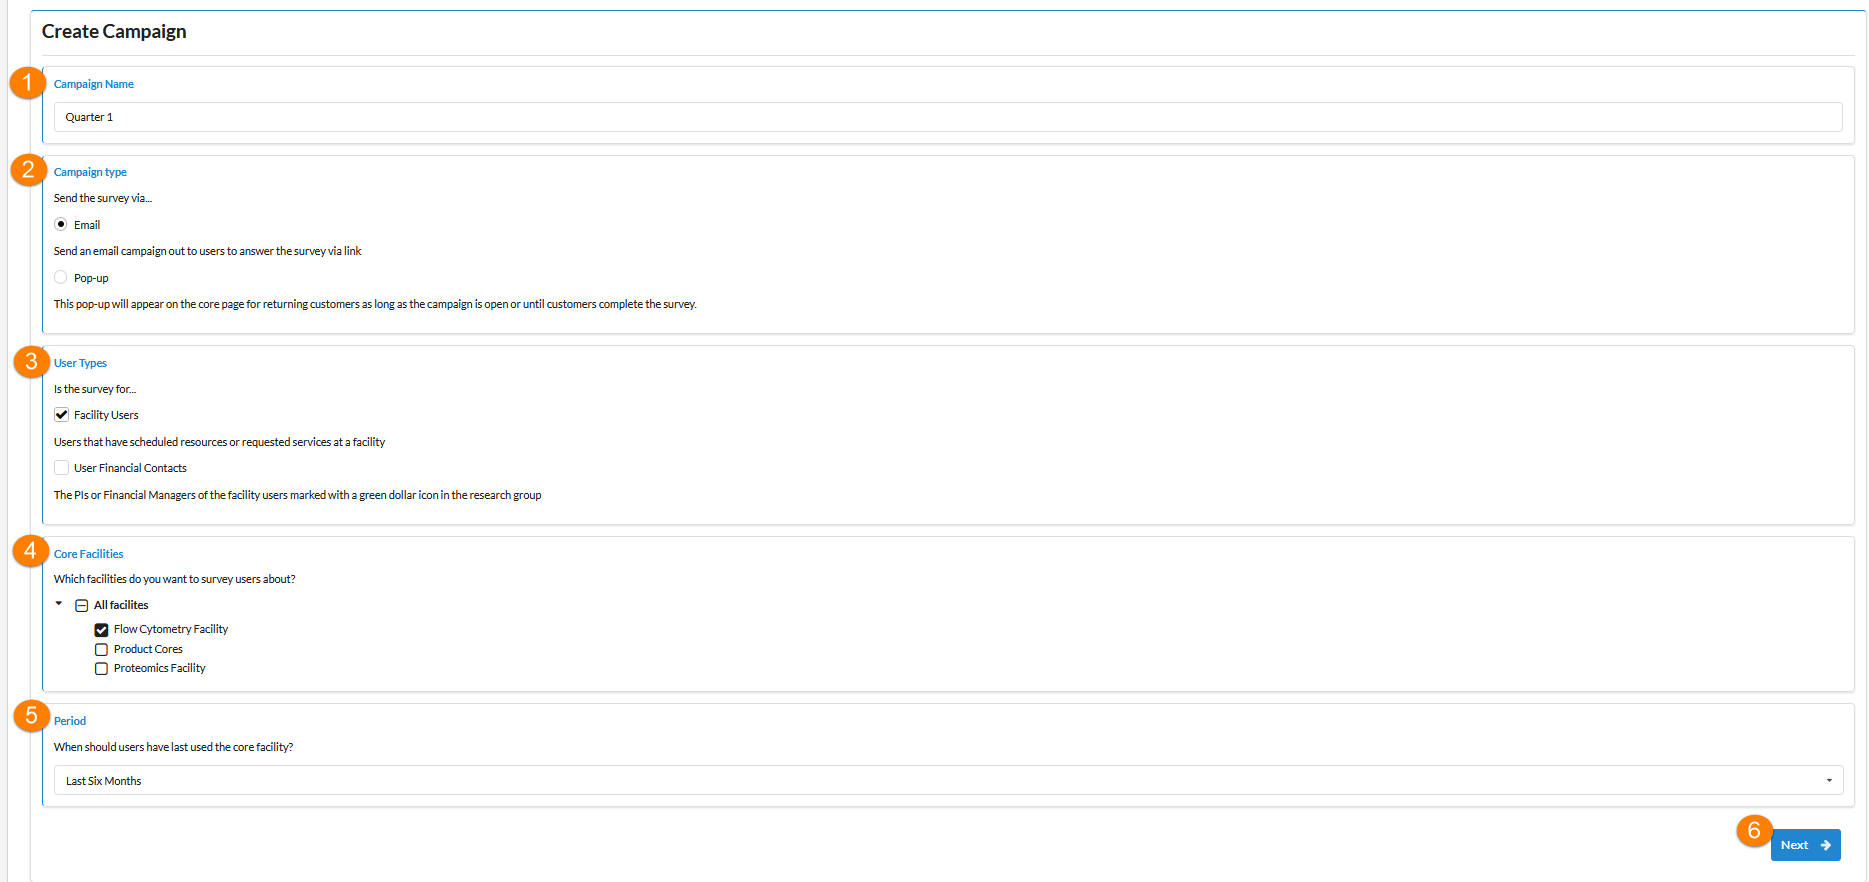
- Campaign Name: Type the name for the campaign in the free text field.
-
Campaign Type: There are two campaign types, Email and Pop-up. One survey can have both campaign types or campaigns but not running at the same time.
-
Email: The email campaign type will send out an email to the defined users with a link to access the survey.

-
Pop-up: The pop-up campaign type will appear on the core page for returning customers for as long as the campaign is open or until they complete the survey.
-
Email: The email campaign type will send out an email to the defined users with a link to access the survey.
- User Types: Click if the survey will be sent to facility user, user financial contacts, or you can select both user types.
- Core Facilities: Select specific core facilities or 'All Facilities' that the survey applies to.
- Period: From the drop down choose an option to indicate when the users being survey have lasted used the core facility.
- Next Button: After you have completed all sections click, Next.
After you click next you will be direct to create either the email to send out the survey or the wording in the survey pop-up.
Service-Specific Survey Campaign
For a Service-Specific Survey, complete the campaign form which includes selecting the service(s) you would like survey users about.

- Campaign Name: Type the name for the campaign in the free text field.
- Services: The services section contains the full list of services across facilities that you can include in the survey.
- Filter Service List: The filter will default to having all core facilities and service types selected. You can narrow the service list by unchecking core facilities and/or service types, then clicking Apply Filters.
- Service List: All services that meet the filters set will be displayed. Click the check box at the top of the list to include all shown services in the survey or check the individual checkboxes to select the services you would like to survey on.
- Add Selected Services: Click the Add Selected Services button to included the checked services in the survey.
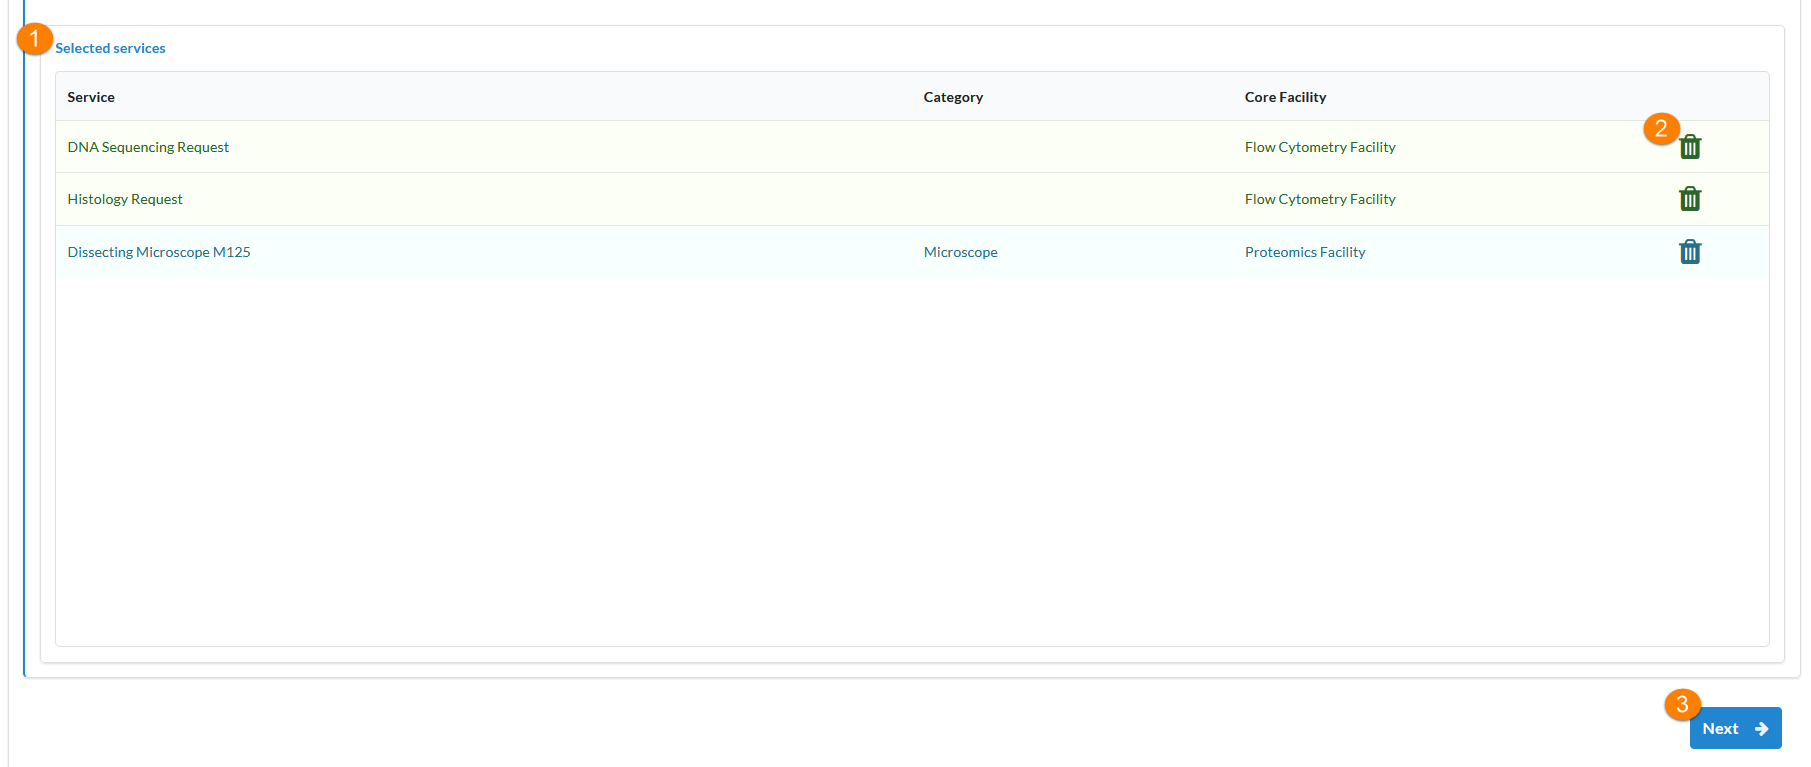
- Selected Services: All the services you checked to include in your survey will be shown in this list.
- Trash Icon: Click the trash icon to remove a service from the list.
- Next Button: After you have completed selecting the services, click Next.
After you click Next, you will be directed to create the survey email for your campaign. The email invitations for the survey are sent automatically only after users have completed the service – a reservation has ended, or a service request has been completed.
Survey Email
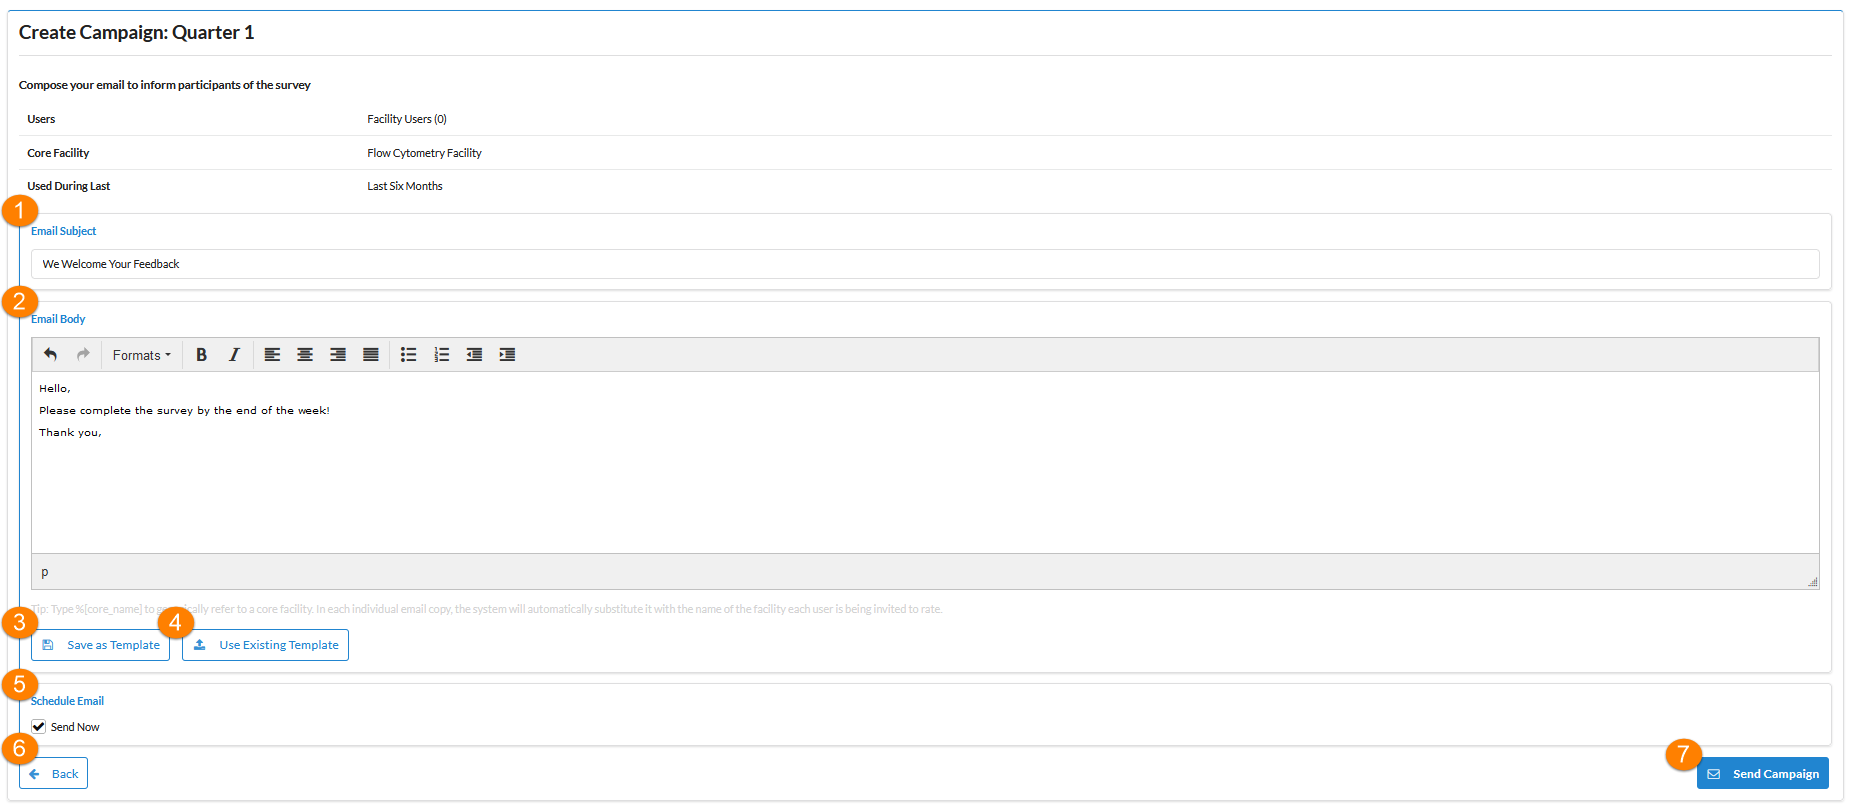
- Email Subject: Type the subject line in the free text field.
- Email Body: Compose the body of the survey email and the link back to the survey will be automatically added once sent. You can type %{core_name} to generically refer to a core facility. In each individual email copy, the system will automatically substitute it with the name of the facility each user is being invited to rate.
- Save as Template: You can save the email body as a template to use in future campaigns.
-
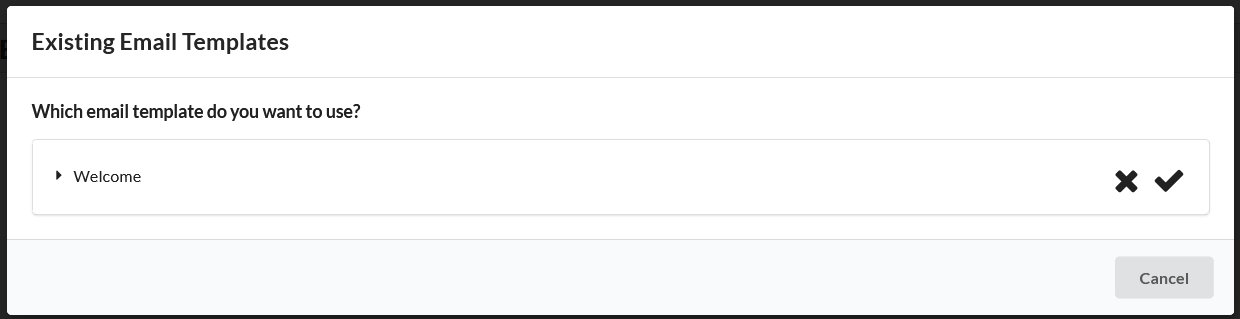
Use Existing Template: Click the Use Existing Template button to insert a saved email from a previous campaign.
-
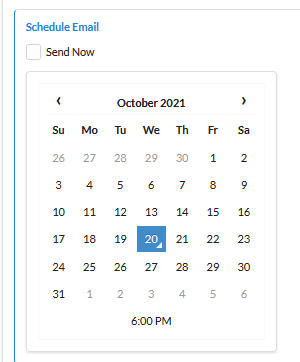
Schedule Email: Leave the box checked to send the email immediately, if there is a large number of users to survey the email may take a few minutes to complete sending. You can uncheck the box to schedule a date and time to have the email sent. This feature is only available for Facility Experience Surveys.
- Back: Click the Back button to return to the Create Campaign page.
- Send Campaign: Once you have completed your email, click Send Campaign.
Once you click the Send Campaign button the Status will show Sending if you checked the box Send Now.

If you selected a future date and time to send the email, the Status will show Scheduled.

After the survey email has been sent to users the status will update to Open.
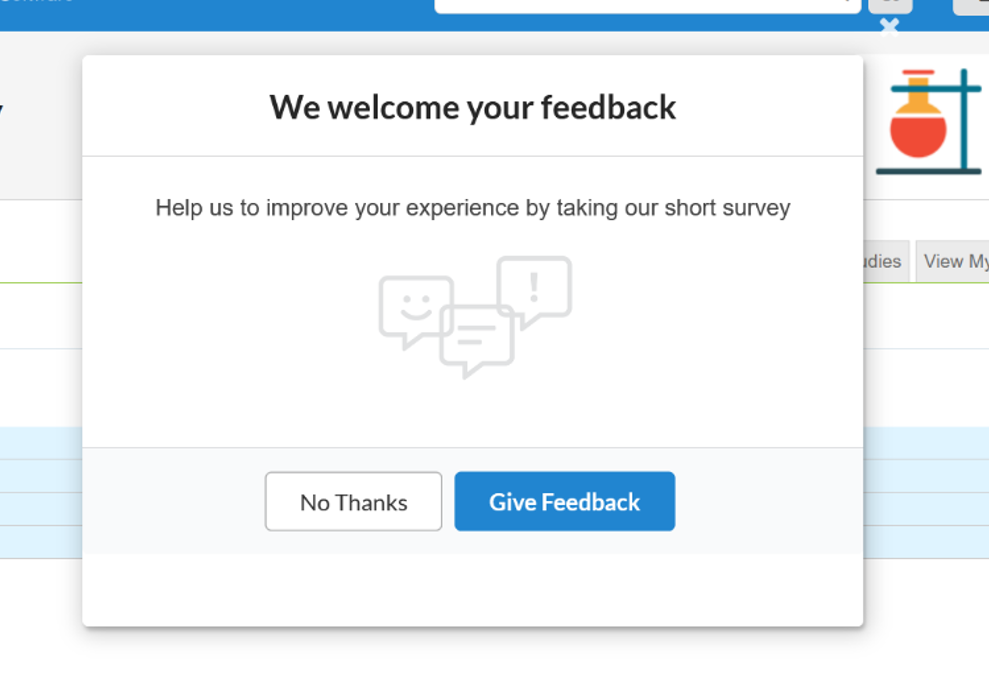
Survey Pop-up
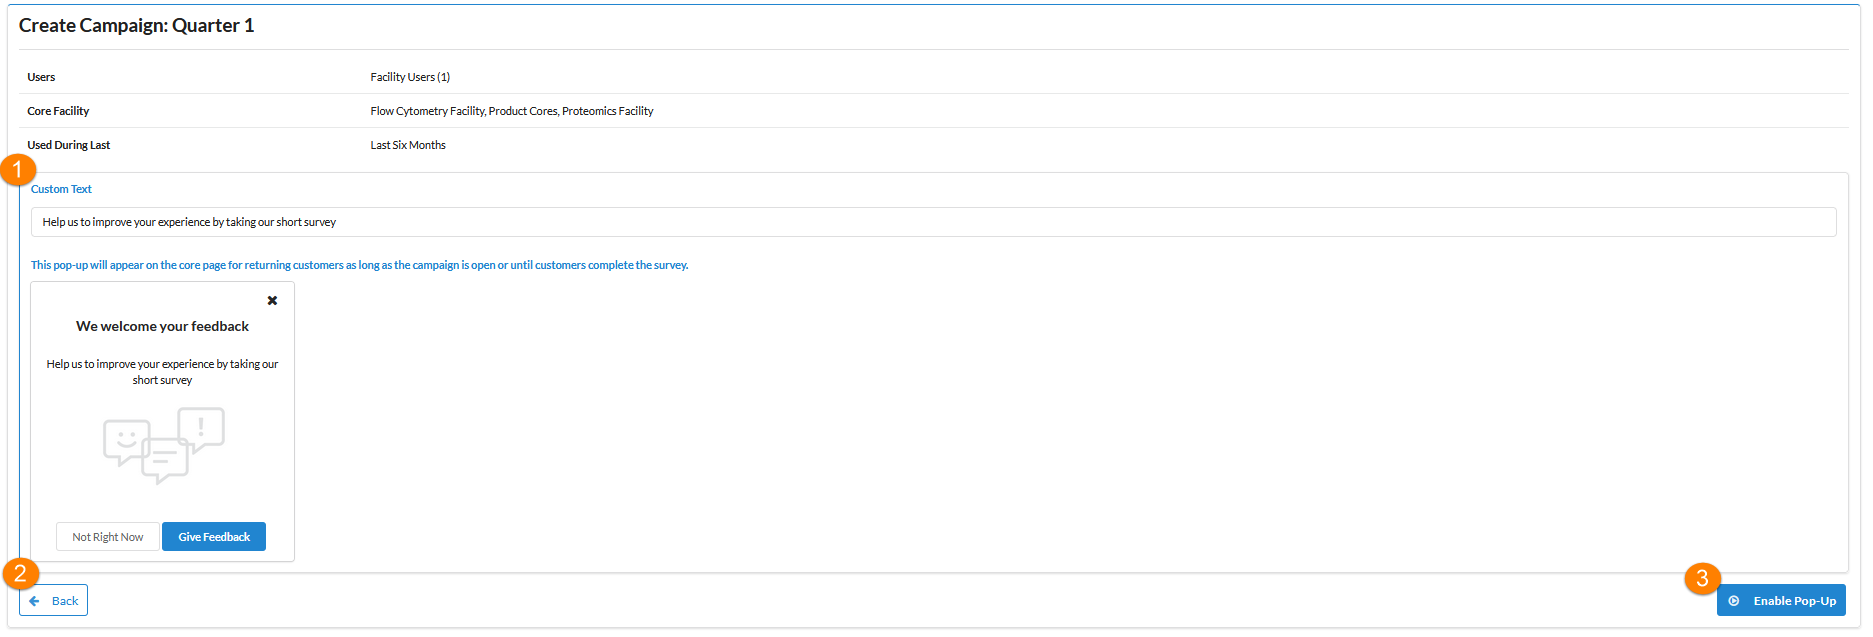
- Custom Text: Add text to the pop-up explaining the survey to users.
- Back: Click the Back button to return to the Create Campaign page.
- Enable Pop-Up: Click on the Enable Pop-Up button to start the survey campaign.
After clicking the Enable Pop-Up button the campaign status will be Open.

Edit Customer Survey
After creating a survey you can go back and edit it as needed. To edit the survey click on the pencil icon under the Links section.

After clicking on the pencil icon, the survey design page will open.
- Edit the survey name.
- Edit the survey greeting text.
- Use the arrows to move questions up or down in the survey.
- Edit a specific survey question.
- Add a question to the survey.
- Go to the campaign page of the survey.
View Campaigns
For a survey you can view all associated campaigns by clicking on the plane icon under the Links section.

After clicking on the plane icon you will be directed to the Campaigns page.
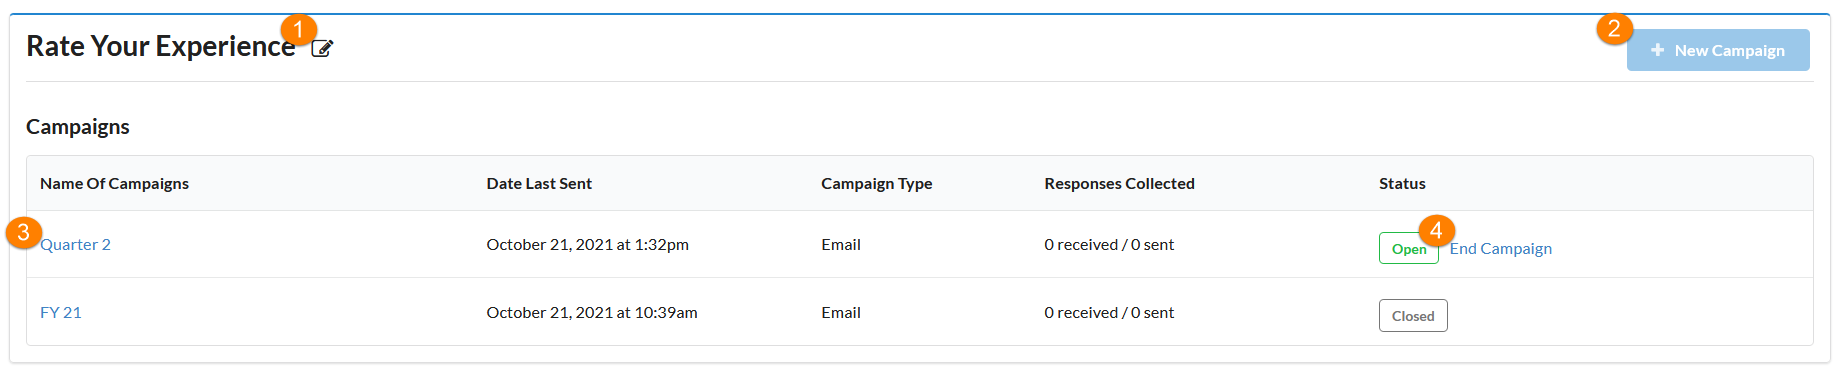
- Pencil Icon: This will allow you to edit the name of the survey.
- New Campaign Button: Click on the New Campaign button to create a campaign for the survey. The button will not be available if there is an open campaign.
-
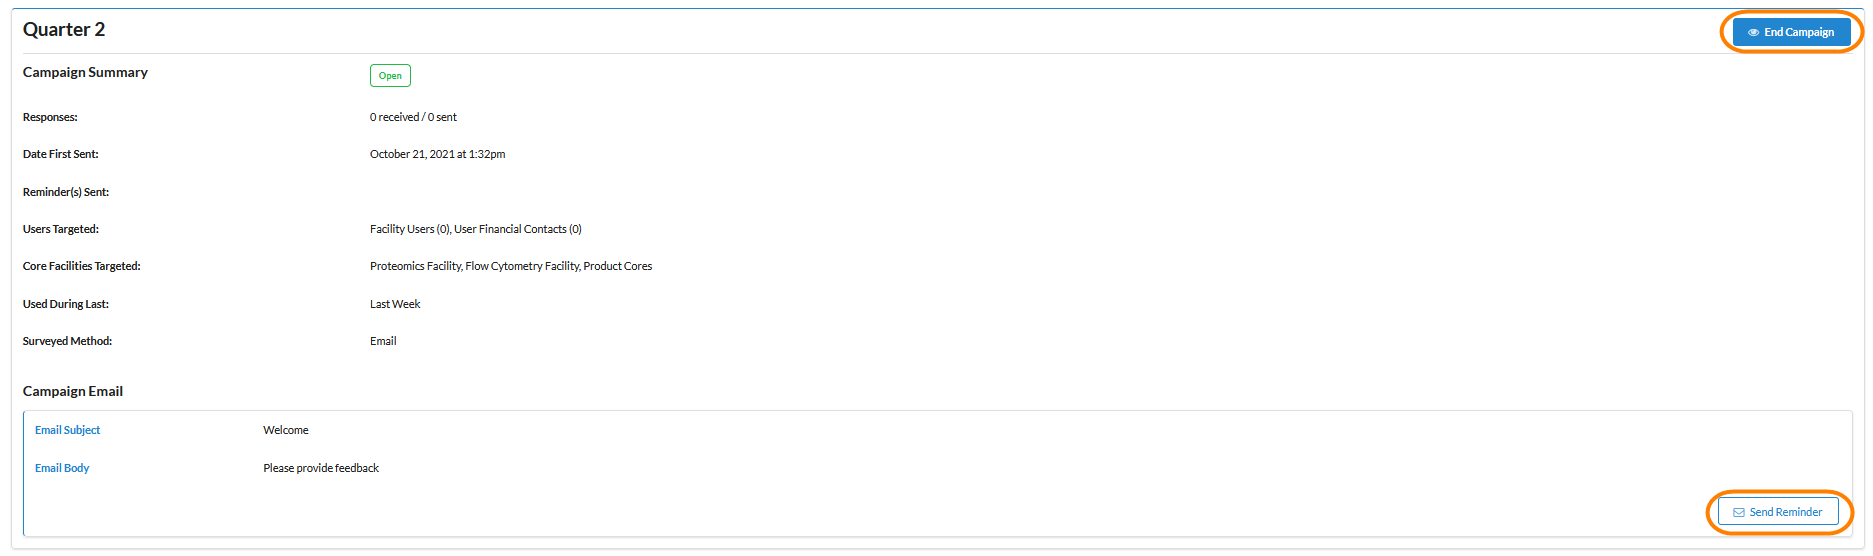
Campaign Name: Click on the hyperlink name to access the campaign summary. On the campaign summary page you can end the campaign and send a reminder email if the campaign type is email. The reminder email will only be sent to customers that have not completed the survey.
- Status: Under the status section you can see the current status of each campaign and will have a hyperlink to End Campaign of an open campaign.
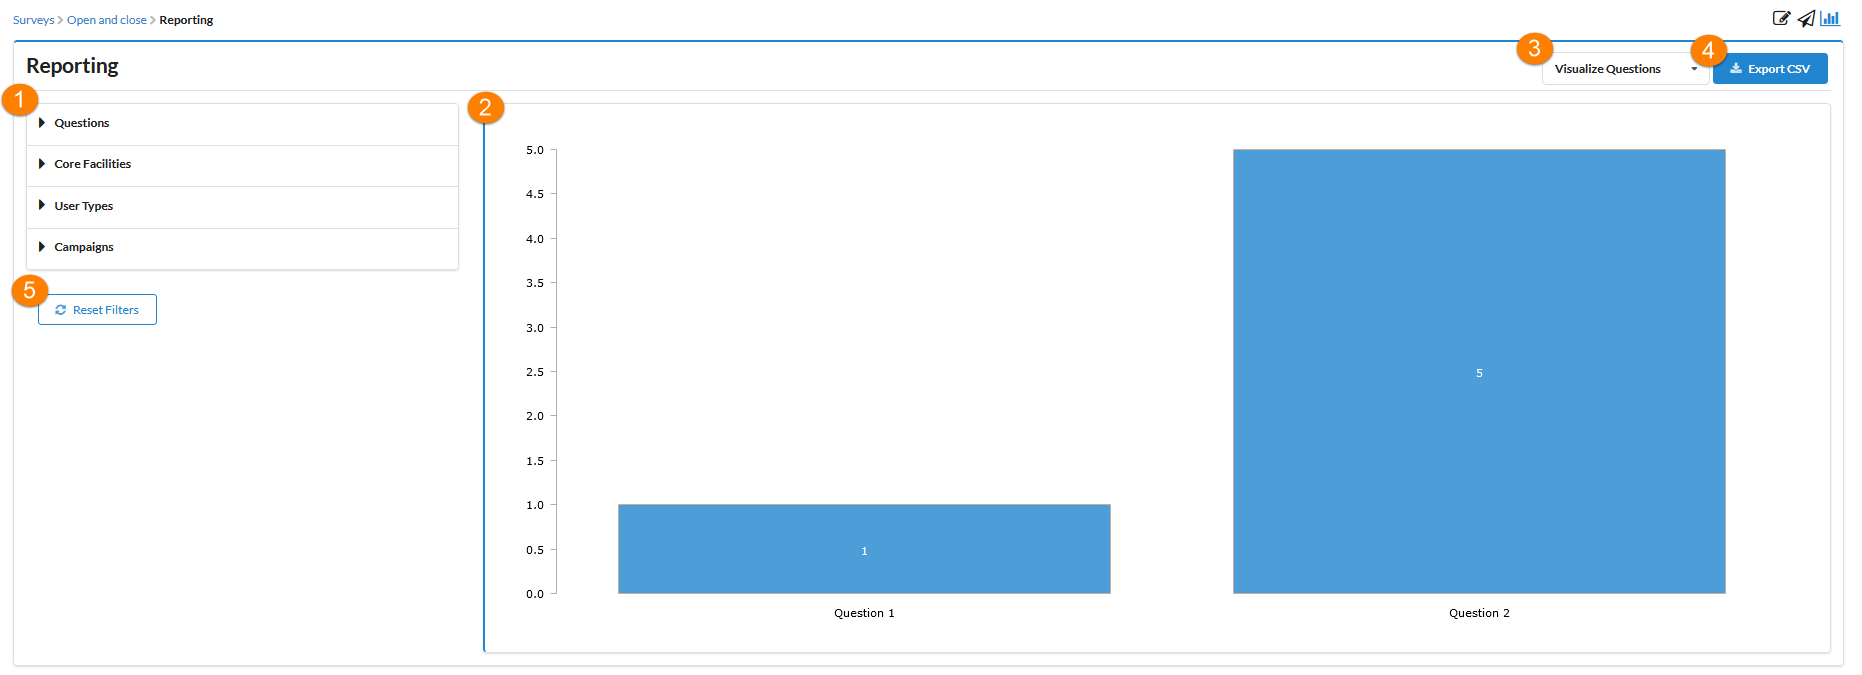
View Survey Reports
Survey reports can be viewed at any time by clicking on the graph icon to the right of the survey.

After clicking the graph icon the Reporting page will open.
-
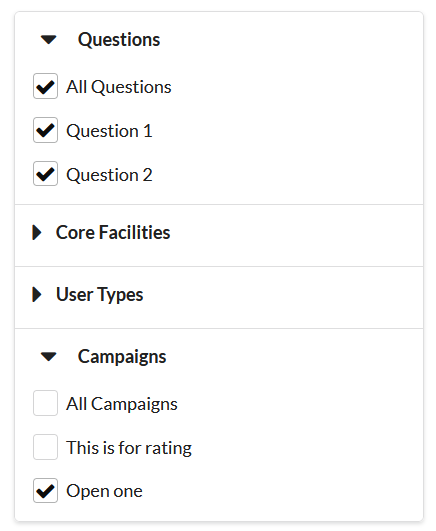
Filters: The filters will allow you to narrow the results shown in the graph and limit the data included if you choose to export to a csv. By default all filter values are selected except for Campaigns, where only the most recent campaign is selected.
- Graph: The graph shows the results for the filters applied and the option selected from the visualization drop down. The graph only shows averages and all response details can be reviewed by exporting a csv.
- Visualization Drop Down: The visualization drop down allows you to modify the graph to show the average scores per questions, campaigns, core facilities, or user types.
-
Export CSV: A csv can be exported to review all response details. The export will only contain the results from the applied filters. The available fields in the report are:
- Date of response
- Core rated
- User role
- User name, email, and institution
- Campaign start date
- One column for each question with the corresponding rating or response


- Reset Filters: The reset filter button will change all the filters back to the default.