- Plate List View
- Assigning No Charges and Sample Reruns
- Updating the Container Status
- Searching and Applying Filters
Once a customer has submitted their service request, their order will then populate your core’s View All Requests tab.
Plate List View
Within the Plate List View, you can: visualize all containers that have been created; view and update the status of the containers; open and interact further with existing containers; filter for specific containers using various search criteria.
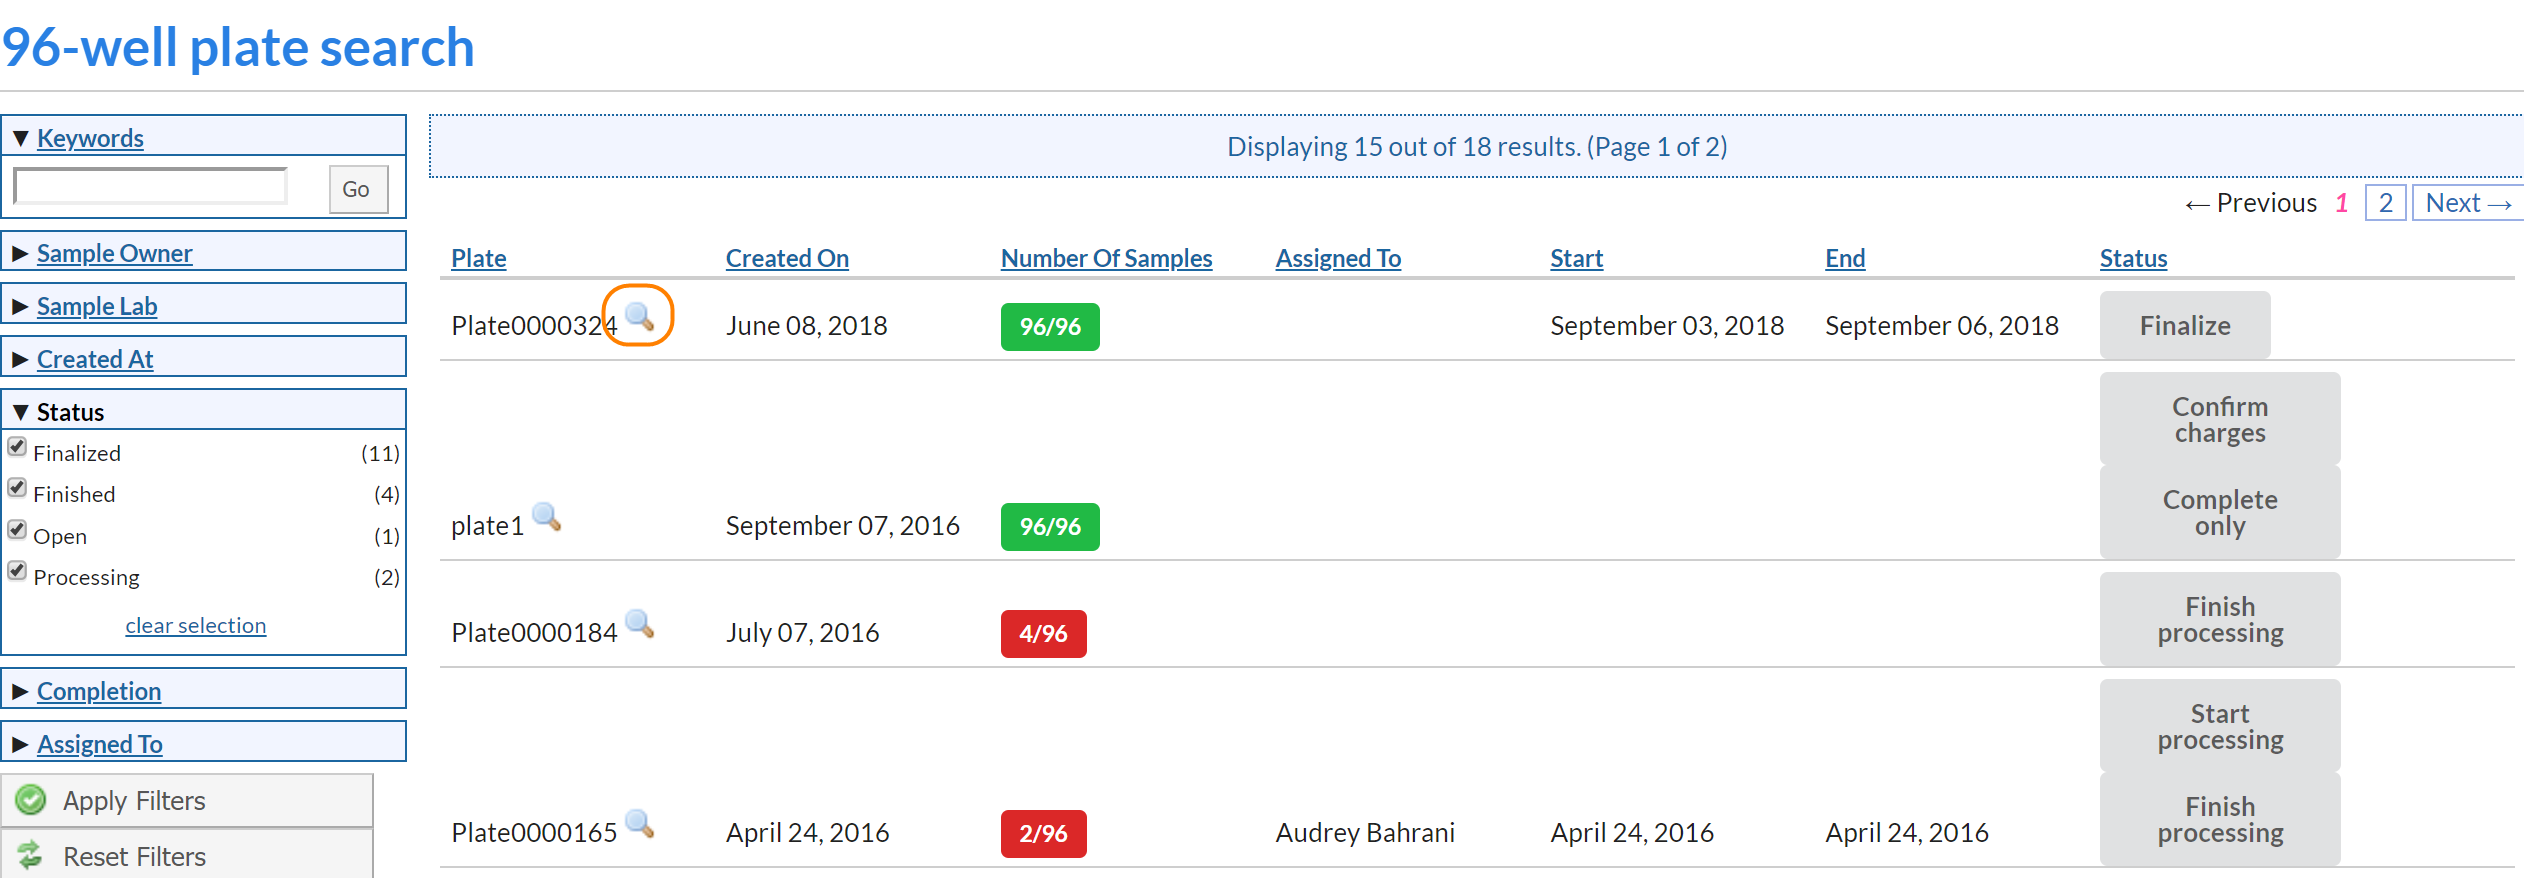
To open an existing container, click on the magnifying glass icon next to the plate name. This will open up a pop-up window where you can view the sample details and preform actions at both the container and sample levels.
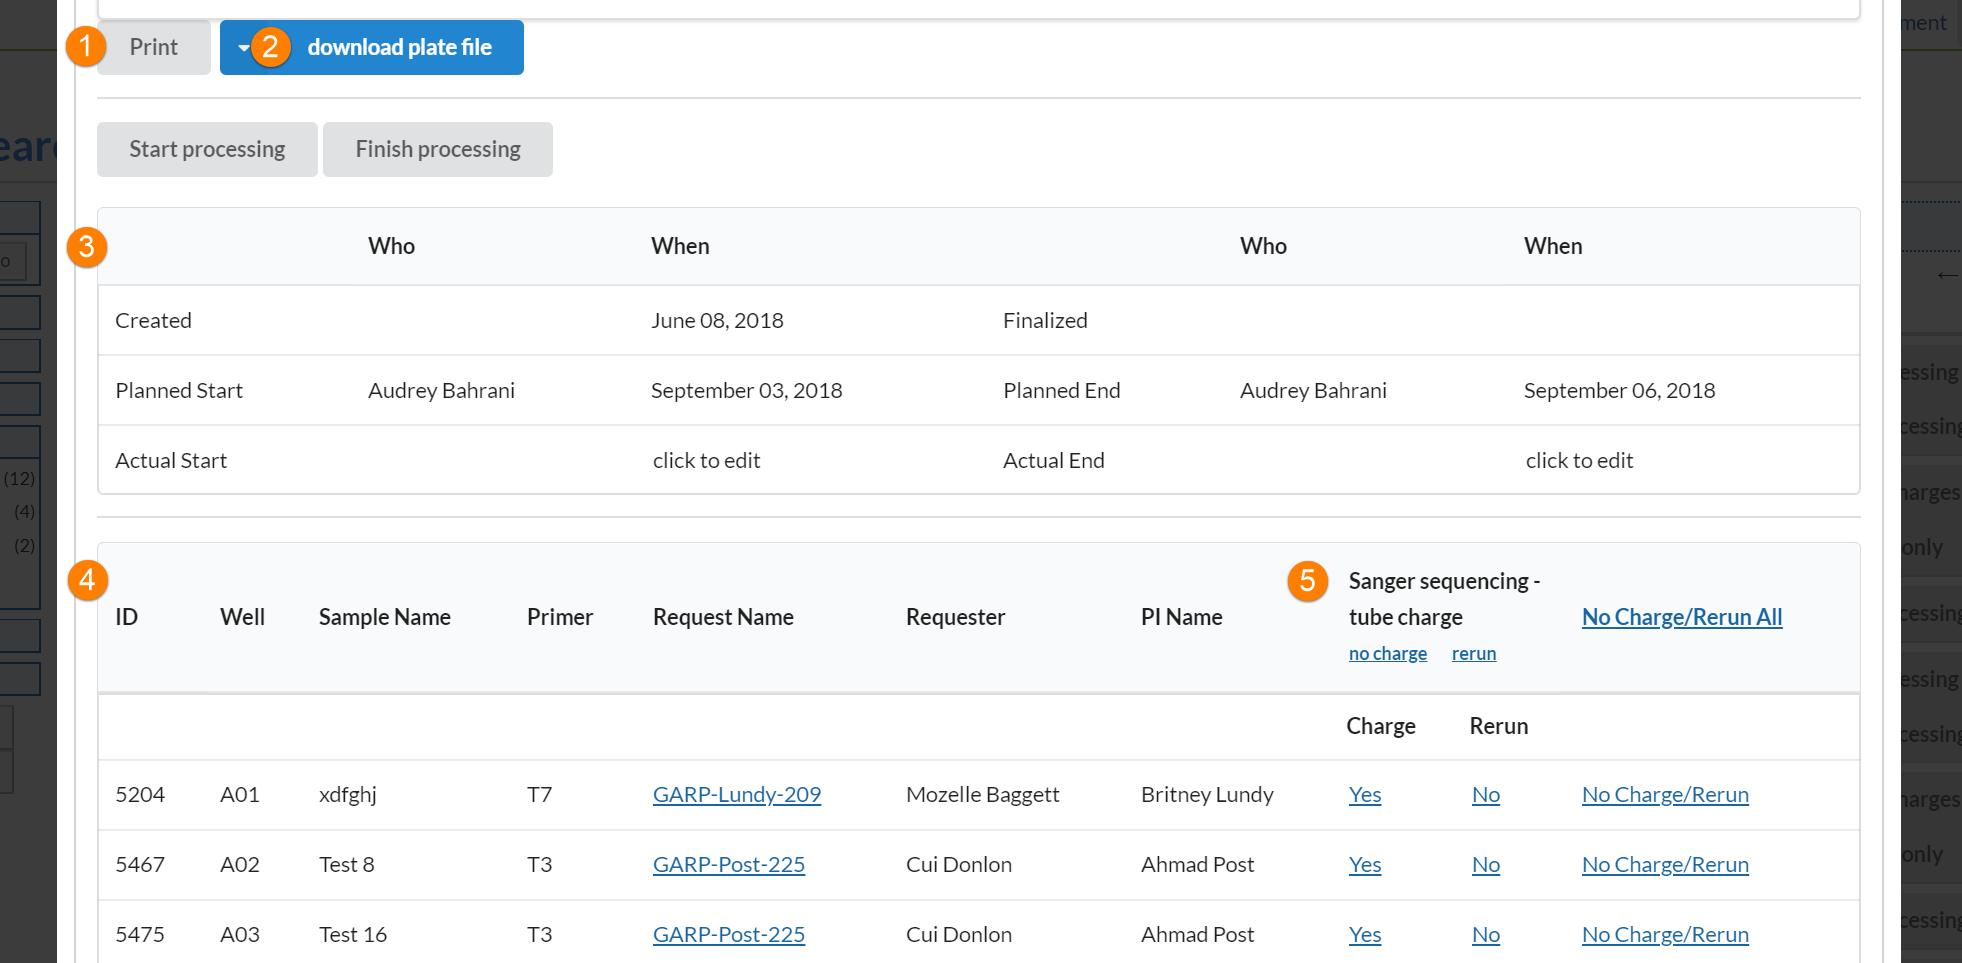
1. Print: select Print to download a printable copy of the container and its contents in a grid format
2. Download plate file: this will download the plate file that you configured in the File Template Builder section for upload into your instrument software
3. Container history: displays a history of attributes set on the container
4. Sample summary: a general summary of information about the container, including sample information, requester information, location of samples on a container, etc. In addition, you can a) decide whether you would like to rerun any samples and their corresponding services b) assign a status of “no charge” to any samples and their corresponding services
5. Assigning no charge and rerun status: you can mark individual samples or all samples on the plate as rerun, or you can designate them as no charge to the customer
Assigning No Charges and Sample Reruns
For each sample and service, you may decide to run it again, or to assign no charge for the sample or service.
Each Services column represents any service that has been associated with that container via a customer request. In the example below, there a "Sanger sequencing - tube charge" service associated with each sample.
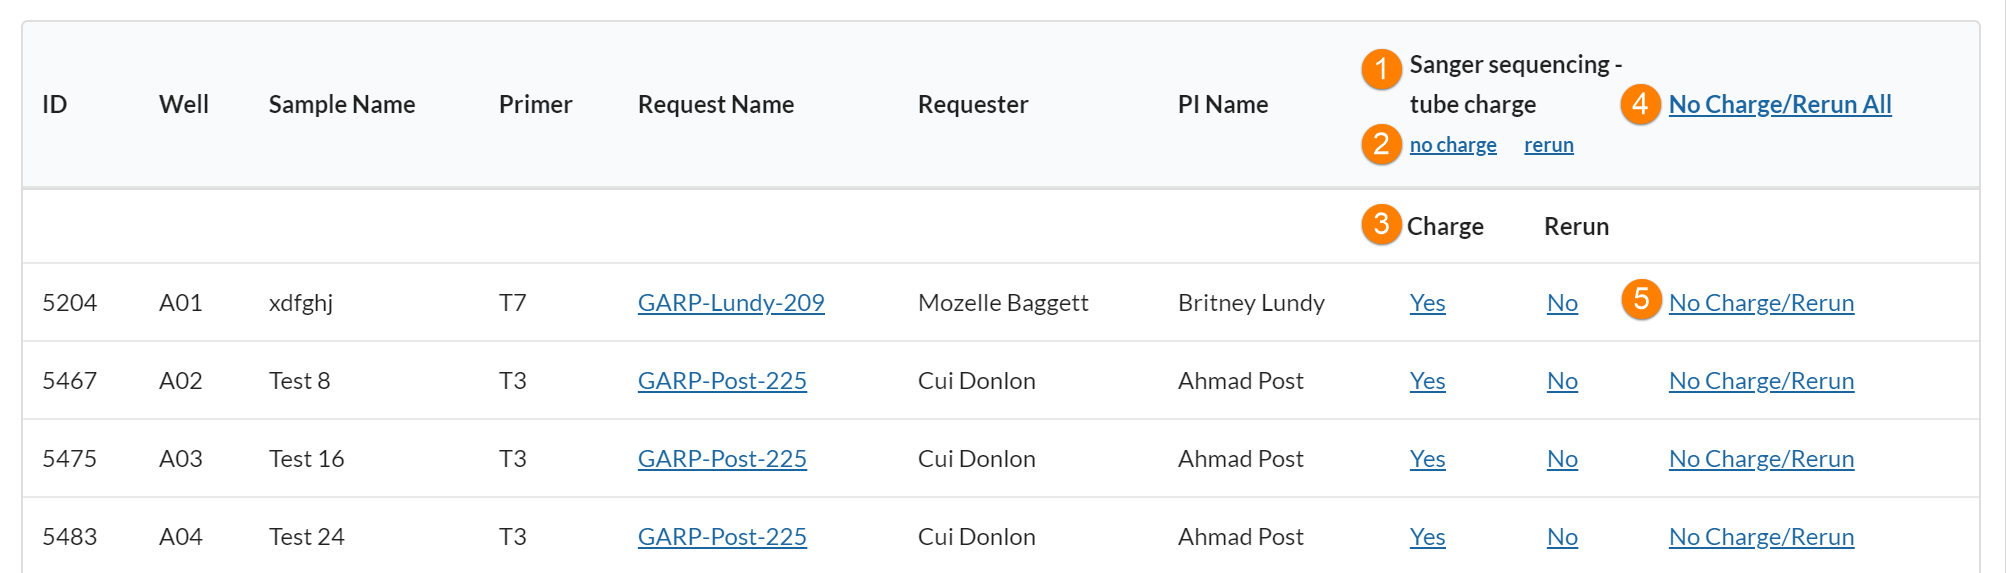
- The name of the charge associated with each sample.
- Selecting “no charge” or “rerun” at this level will assign a corresponding status to ALL samples in the container that had this particular service performed.
- Selecting “no charge” or “rerun” at this level will assign a corresponding status to the individual sample that had this particular service performed.
- Selecting “no charge” or “rerun” at this level will assign a corresponding status to ALL of the services to all of the samples in the container.
- Selecting “no charge” or “rerun” at this level will assign a corresponding status to all of the services performed on that individual sample.
Updating the status of containers
There are several different states a container may have, depending on where the container is in the core workflow.
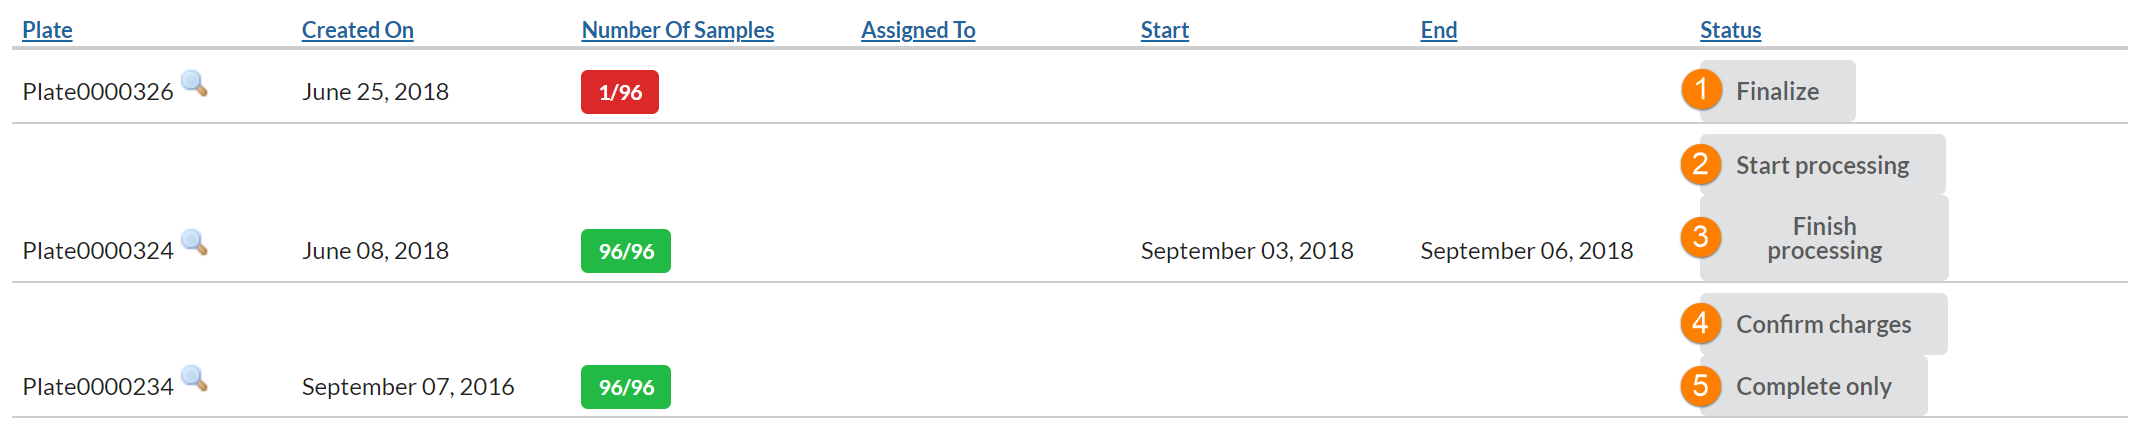
1) Finalize: select Finalize once all desired samples have been assigned to a container and all container attributes have been set.
2) Start processing: select Start Processing once a plate has been finalized and core staff have begun processing the plate. This is an optional selection.
3) Finish processing: once all services associated with a container have been completed, select Finish Processing. This is a mandatory step to move the status of the container to the next steps of Complete Only or Confirm Charges.
4) Confirm charges: select Confirm Charges if you wish to automatically mark off all requests on the container as ready for billing. Choosing Confirm Charges will update the Billing Status to Ready to Bill and the Work Status to Completed on the customer service request.
5) Complete only: select Complete Only if you wish to indicate that processing of the container is complete but prefer to manually update charges and services on the customer service request.
Note: if a customer request has samples on multiple containers, the Billing Status and Work status will not be updated until all containers have been marked Confirm Charges.
Searching and Applying Filters
You can filter containers on a variety of other attributes using the Filters panel. If the filter panel is not visible, click on the "Show filters" link in the upper-left. To use filters, use the black arrow to the left of each category to expand the filter you would like to search on. Then, select from the available entries.
You can search for specific containers using a variety of filtering and search options:
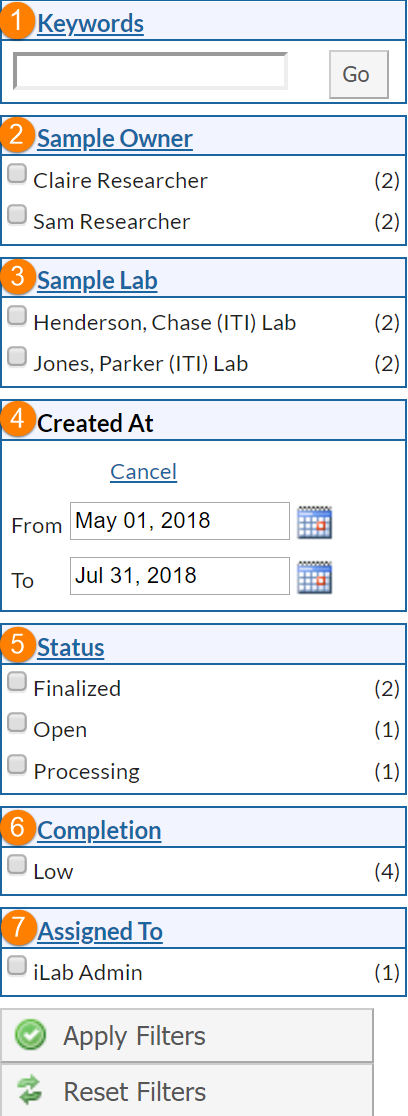
1) Keywords: the keyword field allows you to search for words not included in the other filters, such as plate name
2) Sample Owner: search by requester name
3) Sample Lab: search by PI or lab name
4) Created At: enter a date range to filter for all containers created in that time period
5) Status: filter by current status of containers
6) Completion: filter by plates that are either full or mostly fill vs. plates that have a low number of wells assigned
7) Assigned To: filter for containers assigned for processing by specific core staff members
With the appropriate criteria selected, click "Apply Filters" and your refined list will display. You can also reset all filters with the "Reset Filters" button.