The Request Services tab is where Core Customers can see the services a core provides, and where they can initiate service requests. Note: this tab may be named differently for each specific core.
- Layout of Request Services tab
- Initiate a service request
- Complete forms
- Enter payment information
- Request approval workflow
Layout of Request Services tab
The layout of the Request Services tab is illustrated below:
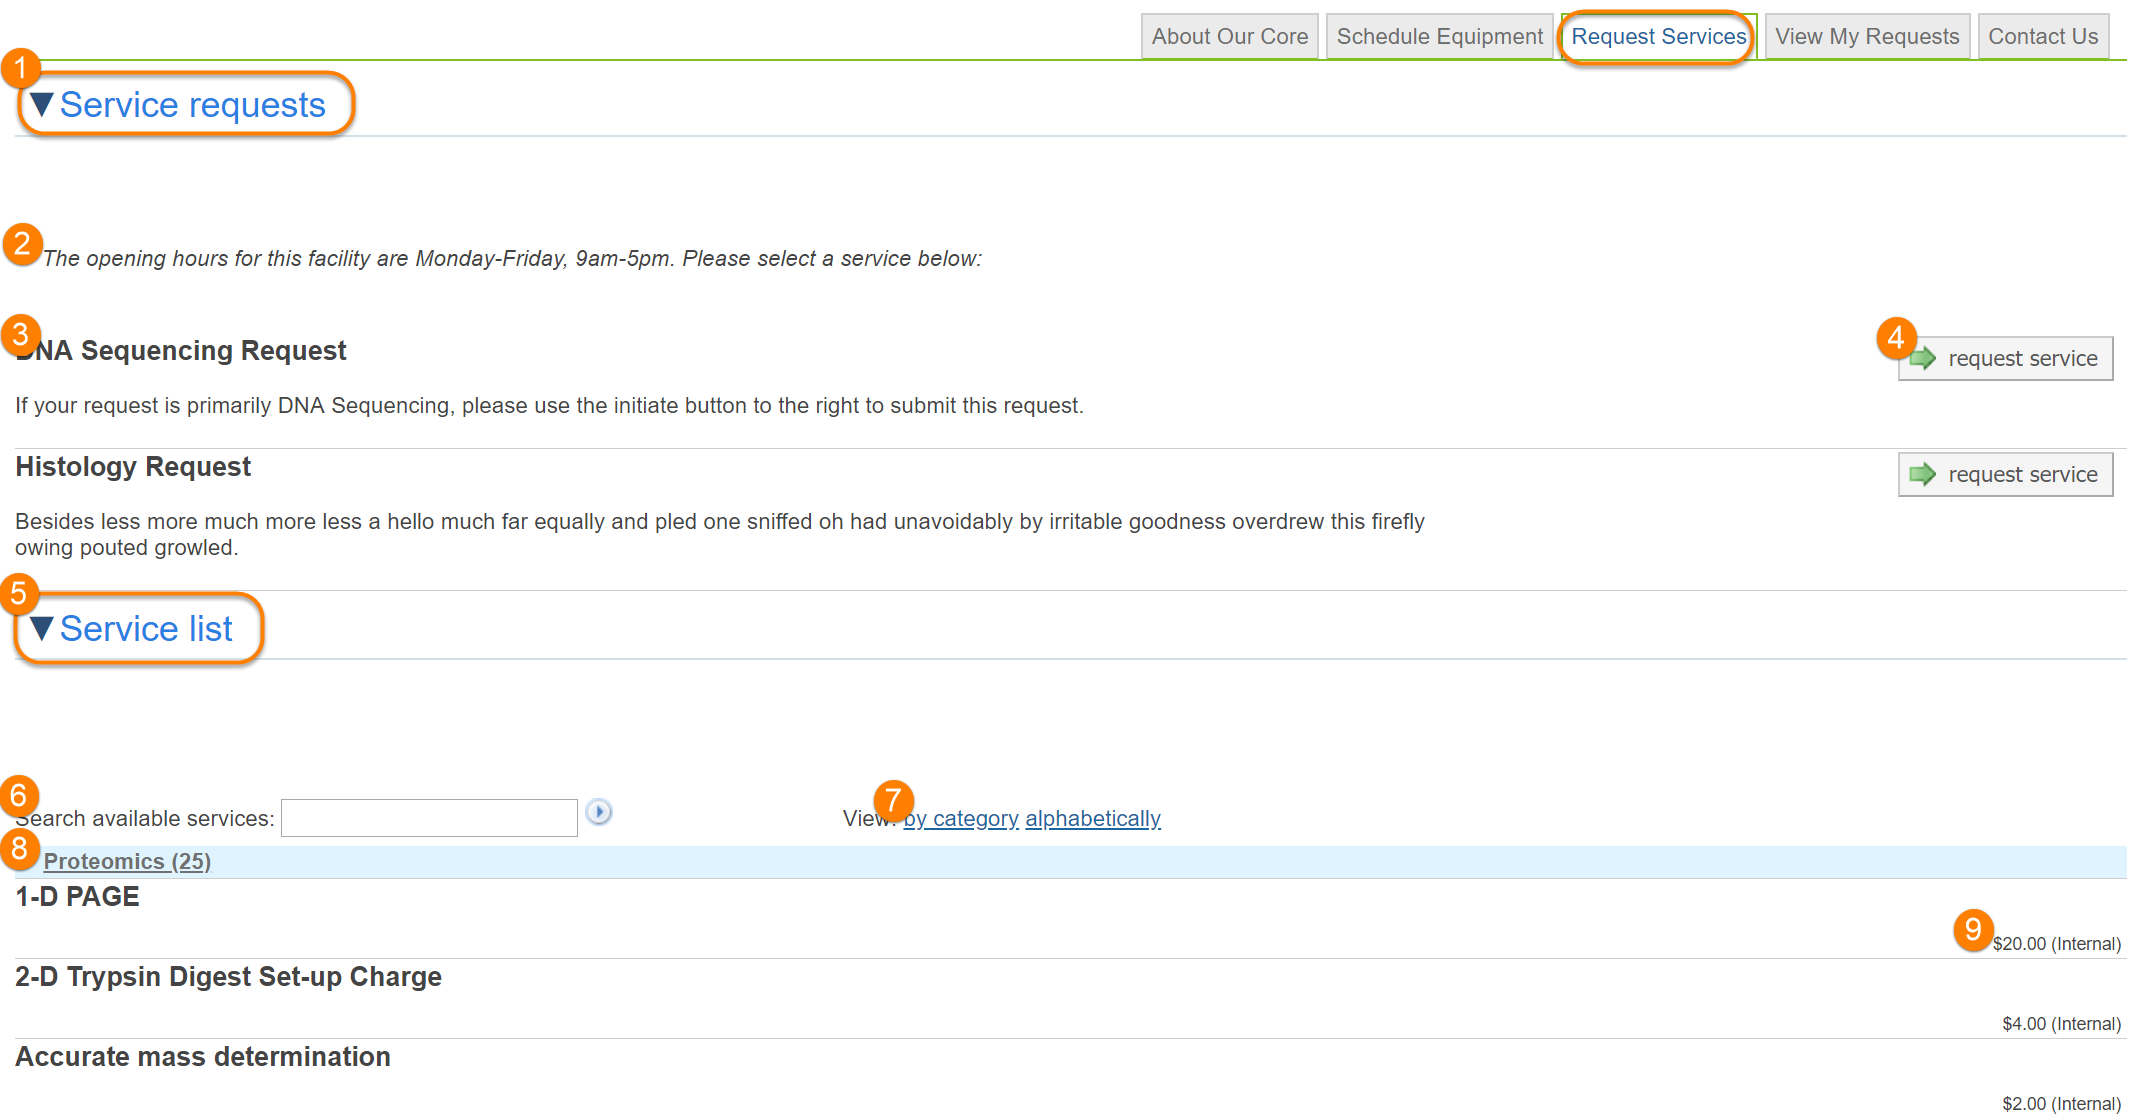
- Service requests panel: Note: this section may be named differently by the core. The main panel of the Request Services tab. Click on this header to open/close the panel (use this if you are not seeing any service request listed).
- General information: The core may include general information and instructions related to their service requests here.
- Service request titles and descriptions: All of the available Service Requests are listed here
- Initiate request: click the "Request service" button to initiate a request. Note: Core administrators see this button as 'Initiate Request'.
- Service list panel: Note: this section may be named differently by the core. If available (not all cores show this section), this panel lists the individual services that the core provides. It can be viewed as a price list of the various components that go into pricing a larger service request. In select cases, the core will allow Customers to directly order individual service items. Clicking on this header opens/closes the whole section below.
- Search available services: Enter (part of) a service and click the blue triangle to narrow down the list below to only items that match the search term.
- View by category / alphabetically: The first link shows the service items grouped by their category (default). The second link will show an alphabetical list of all items.
- Category header: Click on a category header (if services are categorized) to open/close the list below of all services that are part of that category.
- Price: This information may not be made available by each core. If available, you will see the price for the service items.
Initiate a Service Request
As discussed above, initiate a service request by clicking on the "request service" button of the appropriate request. This will open up the Service Request interface which contains several sections with important information and fields that need to be completed before submission to the core.
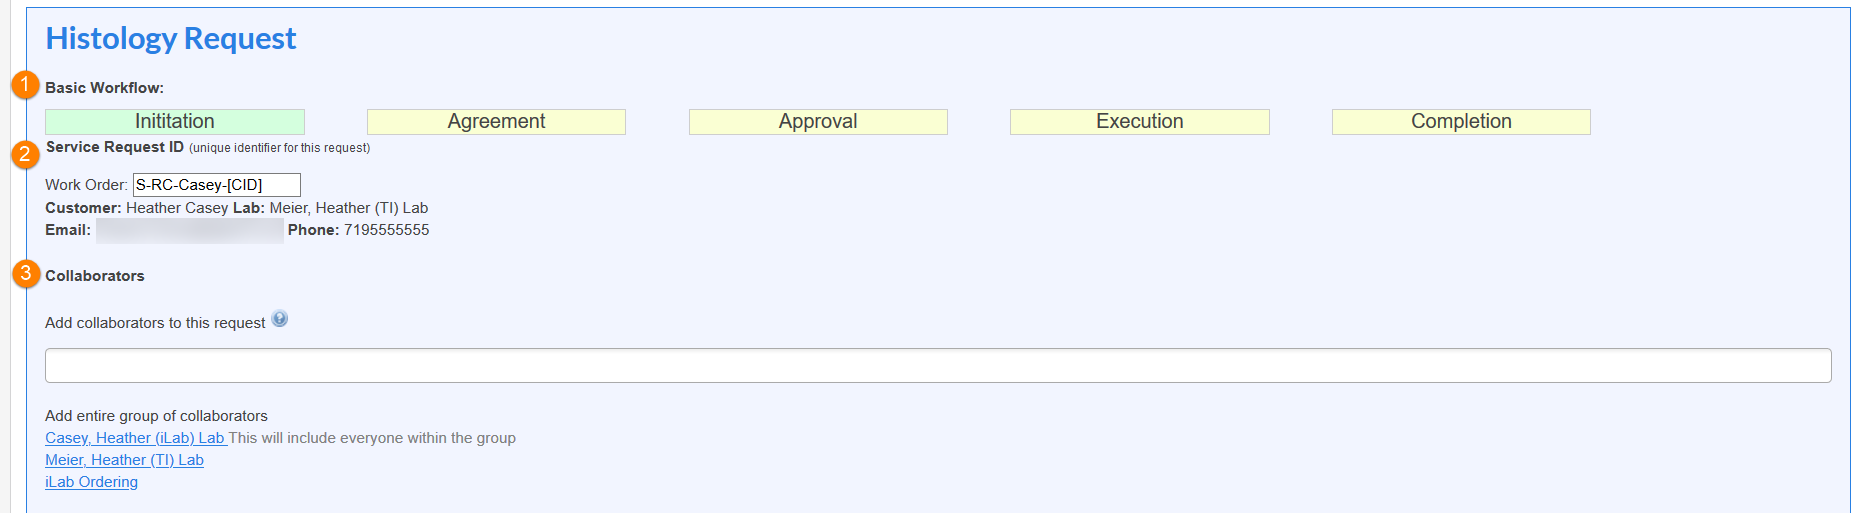
- Basic Workflow: Outlines the request approval workflow. You can hover over each step for additional information.
- Service Request ID and Customer Information: The service request ID is the identifier for your specific request. The customer information is your specific information captured from your account.
- Forms and Request Details: This section will contain any forms that need to be completed as part of the service requests, as discussed in more detail below.
- Costs: this section is for core use only, and may reflect an initial cost estimate for the service request, or it may be empty and get updated by the core after submission.
- Payment information: Here you select the payment information to be applied to this request, as discussed in more detail here.
-
Action Buttons:Once you have completed these sections, click one of the buttons at the bottom of the interface to proceed:
- Submit request to core: Submit the request for the core to review. See Approval Workflows for more information on the approvals needed before work can begin.
- Save draft request: Close the Service Request interface and save the current request as draft. It can be revisited and completed from the View My Requests tab.
- Cancel: Cancel the request. All completed information will be lost.
Note that if you (accidentally) refresh your browser while completing a service request, it will be saved as draft and can be found on the View My Requests tab.
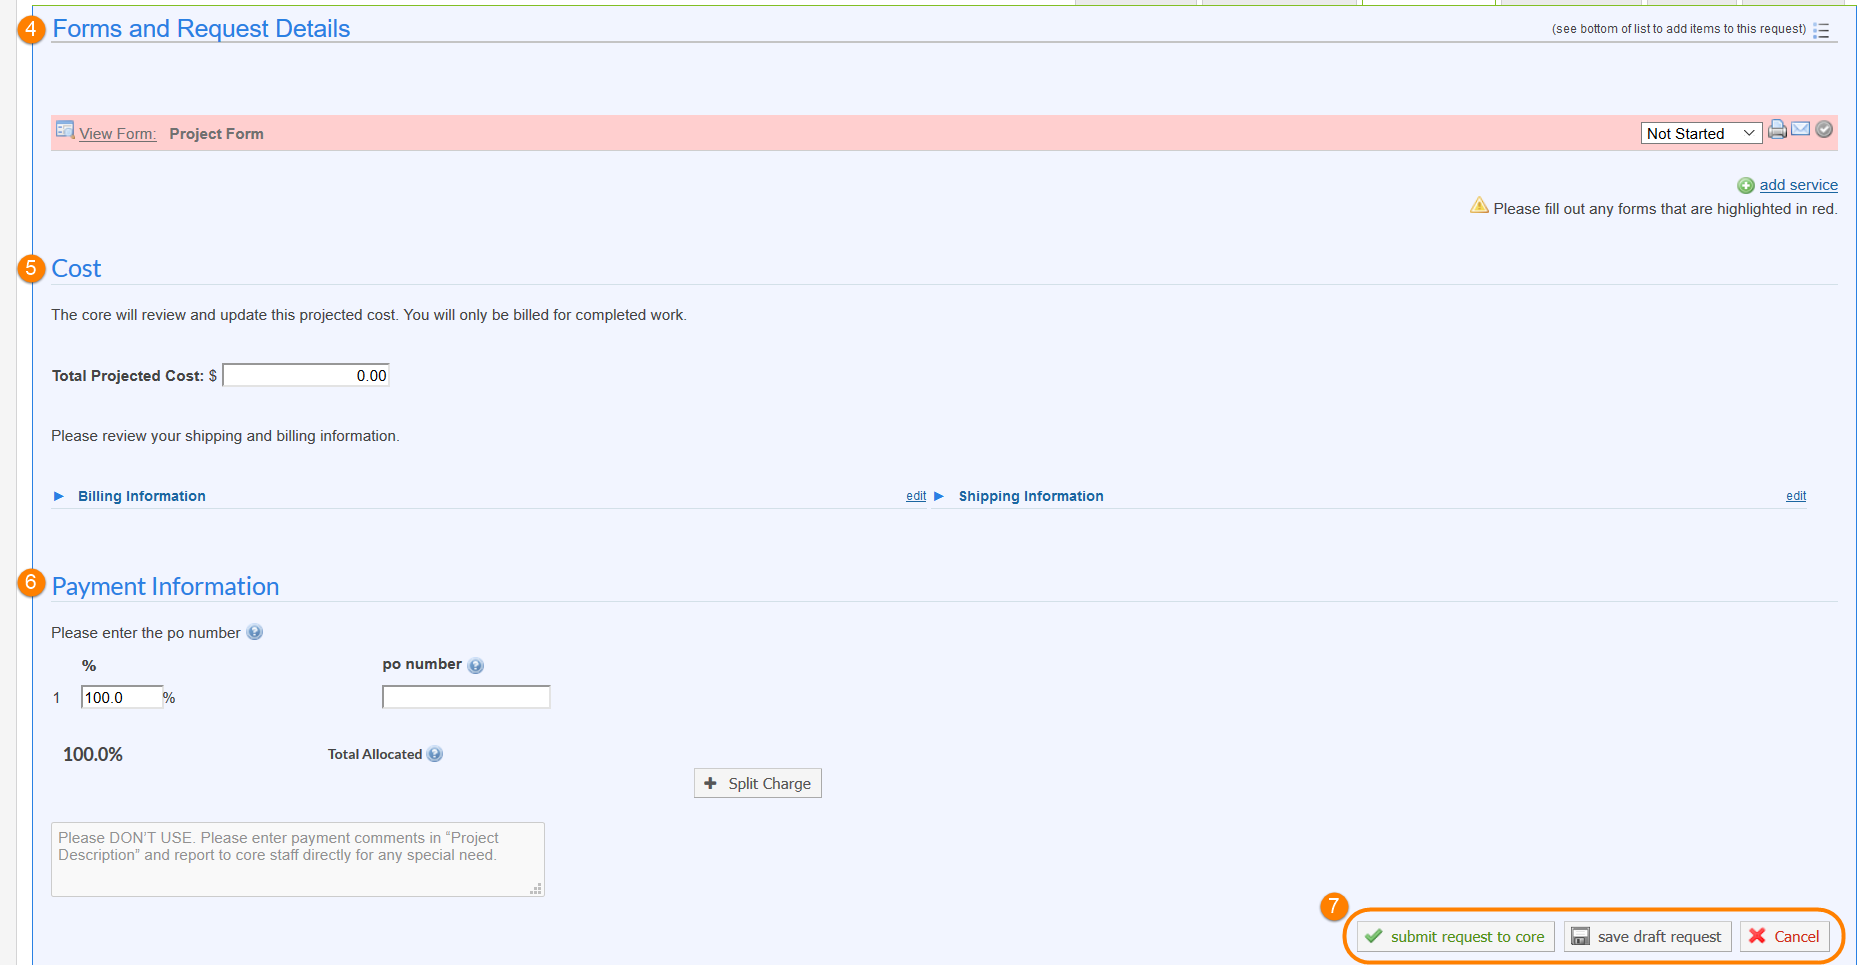
Complete Forms
As discussed above, a service request may require one or more form to be completed before it can be successfully submitted. Forms have the following structure:
- Form title bar: The first section of a form show the "View form" label and the name of the form. Clicking anywhere in this area toggles to form open/closed.
-
Form status and action: To the far right of the form title bar are the following fields/icons:
- Status name: Indicates if the form is Not started, In Progress or Completed (i.e. ready for submission). You can manually change this status, though changing it to Completed requires that all required fields have been completed.
- Print: Send a copy of the form to the printer. You can select which fields should be included before printing.
- E-mail: Send a PDF copy of the filled-out form to your e-mail account.
- Status icon: The check-mark icon changes from grey to green once the form is completed.
- Form field: The various input fields of the form. Fields with a red star are required fields (i.e. the form cannot be completed until these are filled out).
- Save Progress: Save all the information entered into the fields without changing the overall form status.
- Save Form: Save the form, either with the Completed status or the In Progress status. The form will then be toggled closed (and can be opened again by clicking on the form title bar).
Enter Payment Information
The final section of the Service Request interface ask for the payment information to be used for the request.
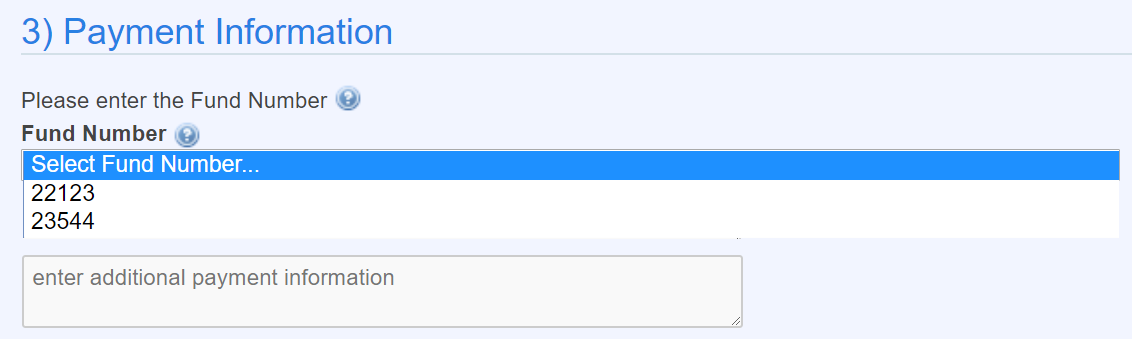
If you are using a core at your own organization, the Fund Number can be entered manually or in the case of a financial integration from a drop down that will contain all Funds assigned to you by your PI or Lab/Group manager. If no Funds are available, you should contact your PI or Lab/Group manager to assign you one or more Funds.
If you are using a core at another organization, you will typically enter a PO number or other payment method in this field (e.g. wire transfer, credit card, etc.). Available options are determined by the core.
The text field below the fund selection optionally let's you add any notes for the core.
For more information, please see the article on Payment Methods.
Request Approval Workflow
Once the request is successfully submitted by the Customer, it will follow the below approval workflow:

After the customer submits the request, the Core typically review it and put together a quote (proposal with scope of work and estimated cost). The quote is sent back to the Customer (notified by e-mail), who then agrees to the quote (or declines). Note that the quote generation and approval steps may be bypassed if the cost of the work is know at submission (or if there is no charge). After this step, the request needs to be approved by the Financial Approver. This is typically the Customer's PI or Lab/Group Manager, though in certain cases this responsibility is delegated to a Departmental Administrator. Only once the financial approval has been granted can the core start the work in iLab.
Once the Service Request has been submitted, the Customer can check on the status on the View My Requests tab.