The Upload Usage tool allows cores to upload their reservations in bulk. The Upload Usage tool is found under the Schedule Equipment tab. This can be helpful for cores that are preparing to go-live with iLab and need to input future reservations or for cores that use another usage tracking system on the instrument and need to match usage to existing reservations. Usage Uploads take place for only one piece of equipment at a time, and must be in a specific file format.
Prepare a File for Upload
When uploading a usage log file, you may choose between 4 options. Each option provides information on the format the file is required to be in for successful upload. When uploading usage using the iLab format, a template file can be downloaded from the Upload Usage interface (see Upload a Usage File). All other formats have help text explaining how to format the file.
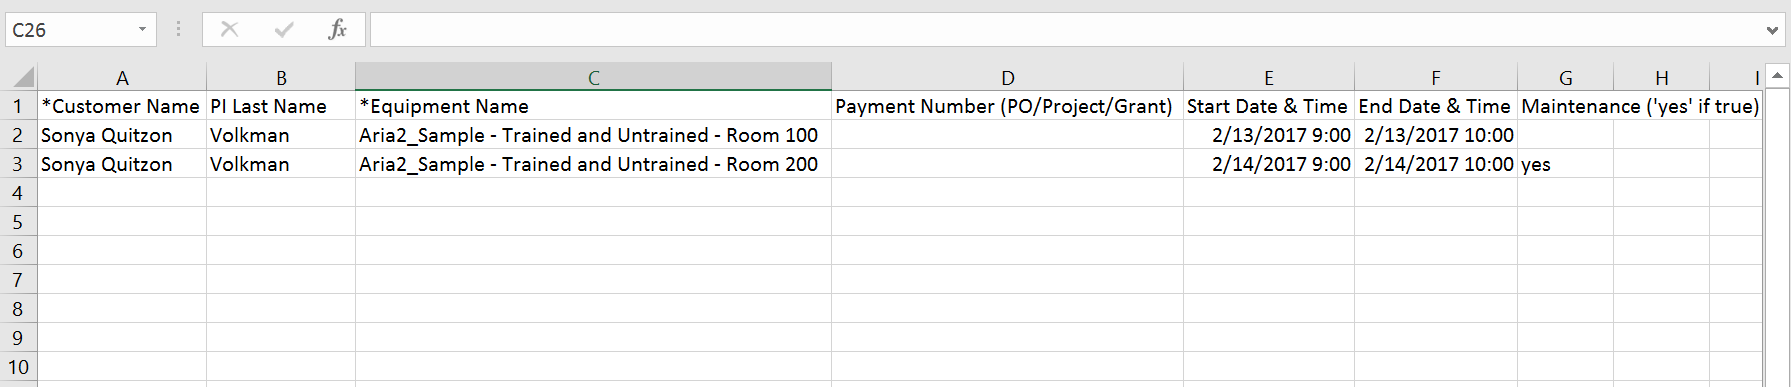
When using the iLab format, the required fields are the researcher's full name (must match the account name in iLab), Equipment name (as found in the Instance Name), Start Date and Time (mm/dd/yyyy h:mm), End Date and Time (mm/dd/yyyy h:mm). PI Last Name and Payment Number are optional fields.
An example of the iLab format is below. All other file types must be in the format specified in the help text to the right of the selection in iLab.
Once the template is ready, you may upload it to iLab.
Upload a Usage File
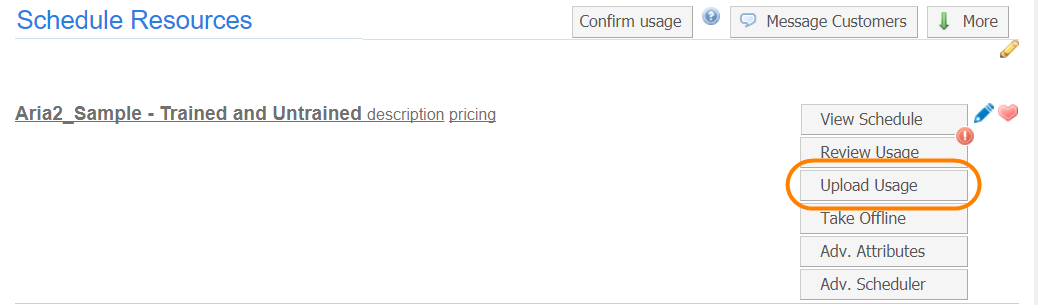
To begin the upload process, first click "Upload Usage" button beside the appropriate equipment.
A window will open and you will choose your options.
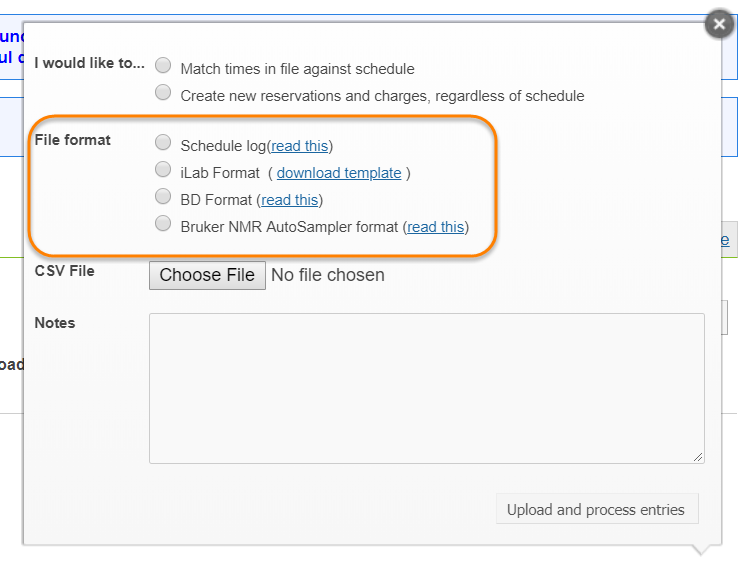
I would like to…
- Match times in file against schedule (Use this when you want the uploaded files to merge with existing reservations.)
- Create new reservations and charges, regardless of schedule (Use this when you want new entries to be created, regardless of existing reservations. Will have to manually link, when necessary.)
File format:
- Schedule log: Used with iLab’s offline usage tracker software. Take the .log usage file from the equipment HD and upload it using the Schedule log options. Keep the file format as .log. NOTE: This functionality is legacy and is no longer supported by iLab.
- iLab Format: Used for any type of upload. The file type must be .csv. A template file can be downloaded from the "download template" link.
- BD Format: Used for BD instruments; however, original log file still has to be altered to match our template fields. File format must be .csv.
- Bruker NMR AutoSampler format: Used for Bruker NMR instruments. No adjusting of the file is needed.
CSV File:
All files except the usage tracker software must be saved as a .csv to be valid for upload.
- Browse (Should have template saved on HD to choose for upload.)
- Click "Upload and process entries".
Notes:
- You may add a note to show on the event notes field when you upload.
Click the "Upload and process entries" button. Once you have uploaded and processed the file, you can check the status of the file.
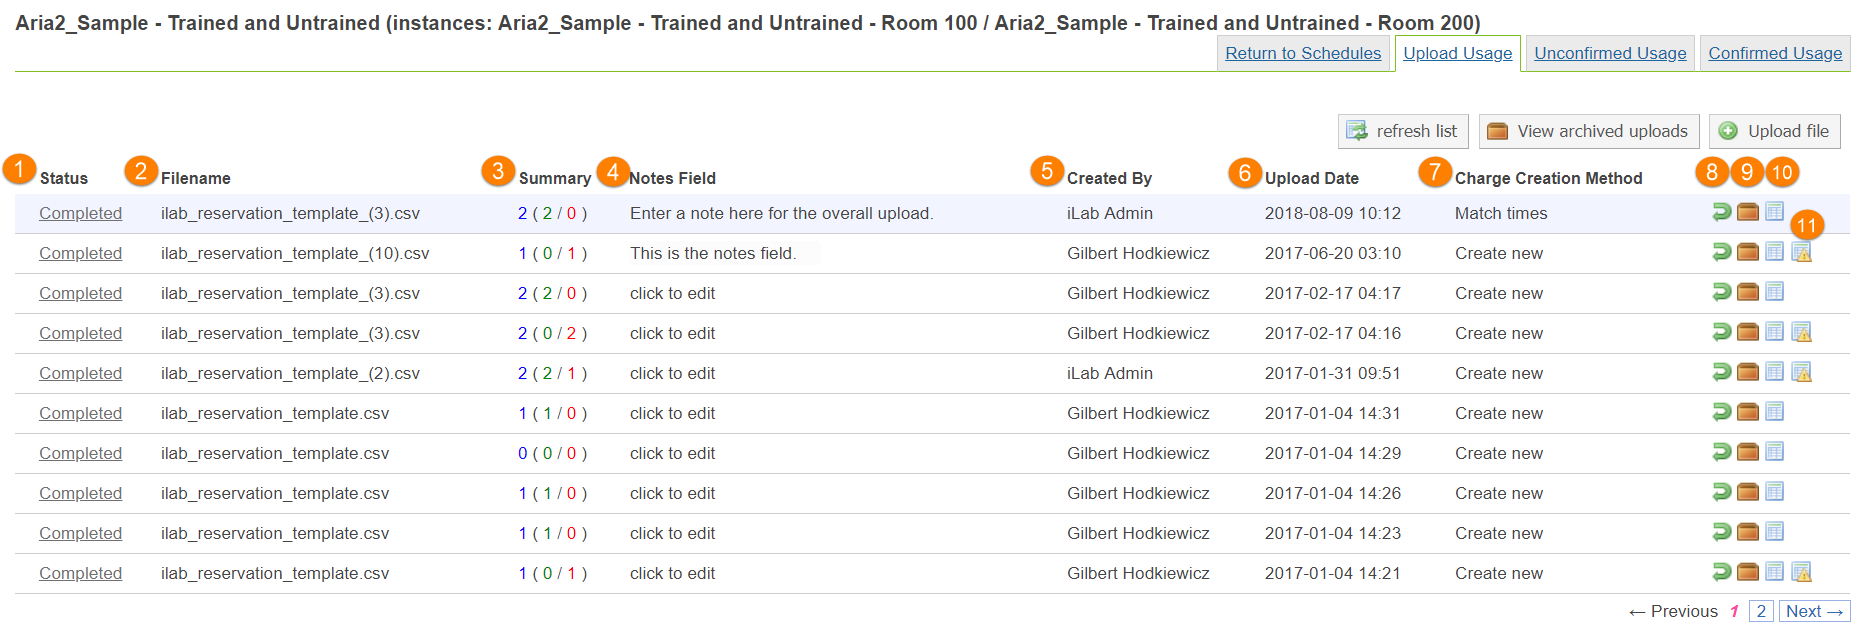
- Status: Status will start at "New", then it will change to "Processing", and then "Completed". It refreshes every few seconds automatically or you can manually refresh by clicking the refresh list button.
- File Name: This is the name of the file you chose to upload.
- Summary: The first number in blue is the total lines in the document. The second number is the number of reservations that were valid and created/matched. The third number is the number of error rows that did not process correctly. If errors are found an email will be sent to institution admins but can be adjusted to send
- Notes Field: Enter a note that relates to the overall upload.
- Created By: This is the person that created the upload.
- Upload Date: Date and time stamp of the upload.
- Charge Creation Method: This pulls from the selection made above and will say 'Match times' or 'Create New'.
- Green Arrow: Remove all reservation created by this upload (NOTE: This does not work for reservations that have been merged, meaning if you choose the first option to match reservations and you find a problem, all reservations will have to be manually adjust).
- Brown Folder: Archive this upload
- Template Image: Download the original file that was uploaded.
- Template Image with caution triangle: This is the error file if errors were found during the upload. Errors should be fixed and all successfully uploaded lines should be removed. Error lines should then be uploaded in a new upload.
Once usage is uploaded, it can be found in the Confirm Usage interface and can be edited and matched as needed.