Once the full Advanced Sample Processing workflow has been set up, the core is ready to receive and process requests with samples.
- Receive a Sample Processing request
- Set up containers
- Assign samples to a container
- Add controls to the plate
- Remove samples from the container
- Identify container attributes
- Finalize the Plate
Receive a Sample Processing Request
Once a customer has submitted their service request, their order will then populate in your core’s View All Requests tab. When the customer samples have been received into the lab, the core facility staff can then mark that request off as "Ready to Begin". This will change the status of the customer request to "Processing".
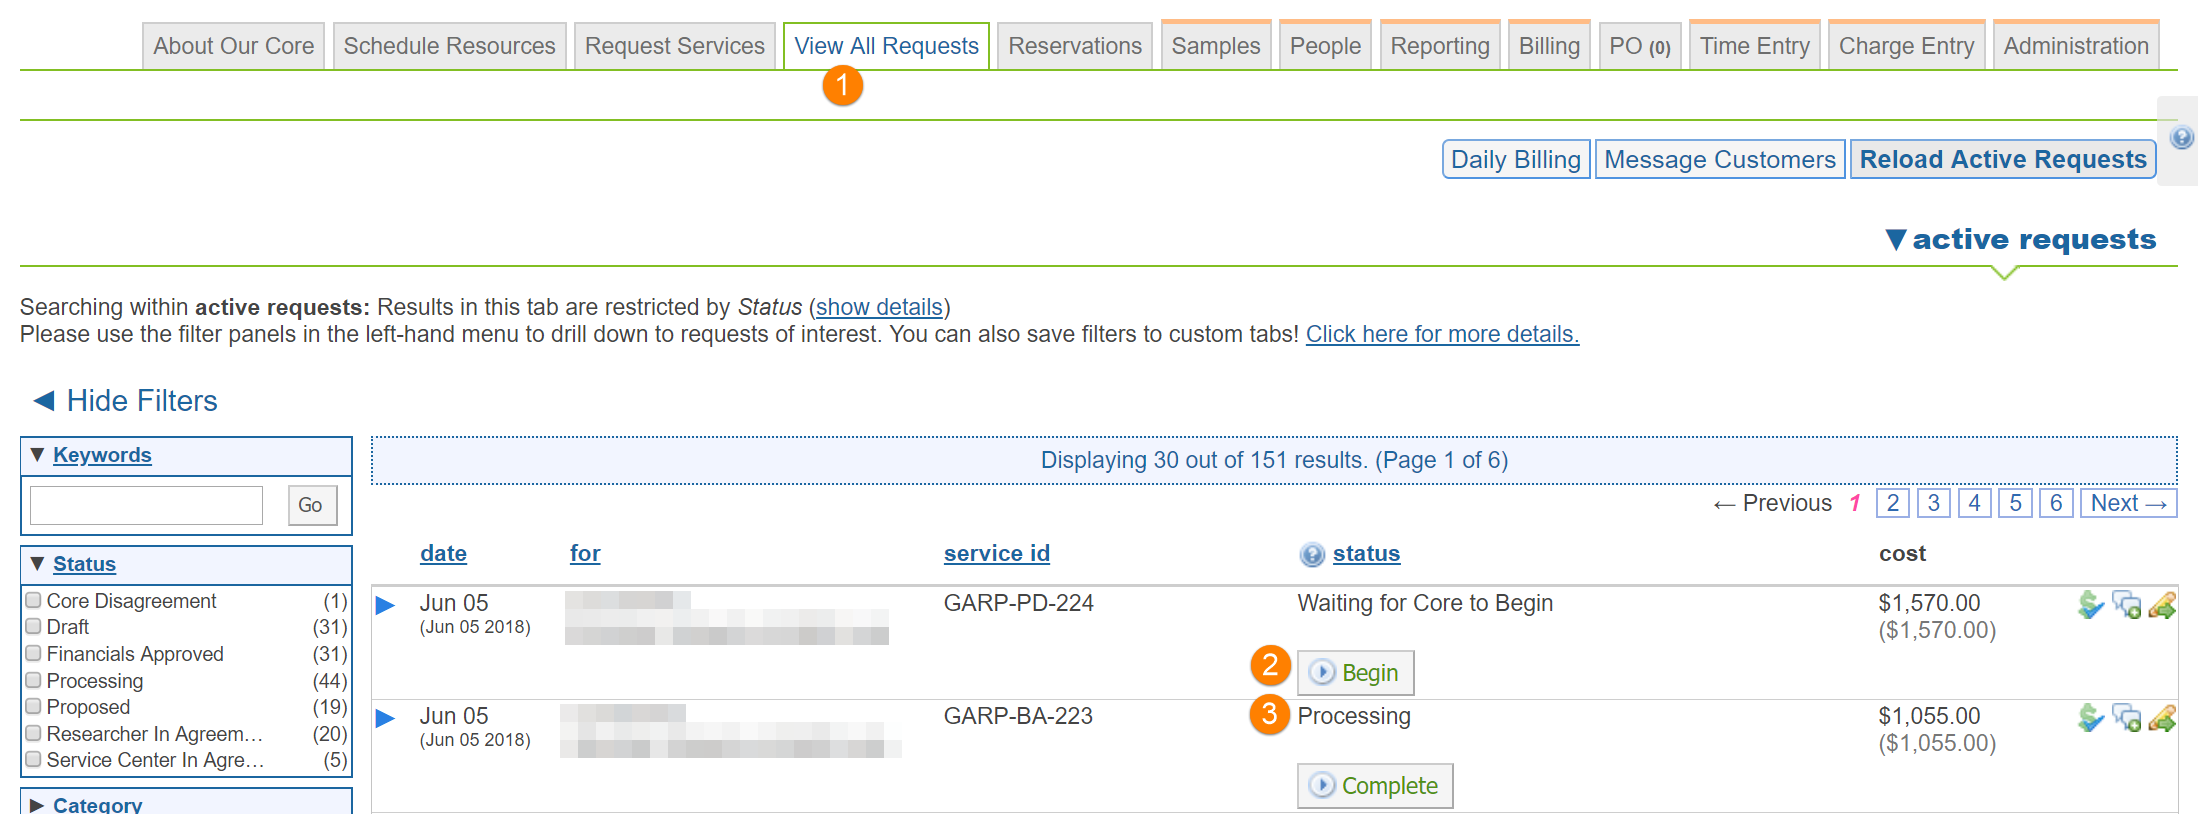
- View All Requests: You'll see all requests submitted to the core in this tab.
- Next step button of 'Begin': When you're ready to begin work on the request, click 'Begin.'
- 'Processing' status: Clicking 'Begin' will update the status of the customer request to Processing. The project MUST be in a status of Processing to assign any associated samples to a plate.
Once a request has assumed a status of Processing, all samples from that request will now be displayed in the Open Sample Submissions worklist and will be ready for assignment to a container.
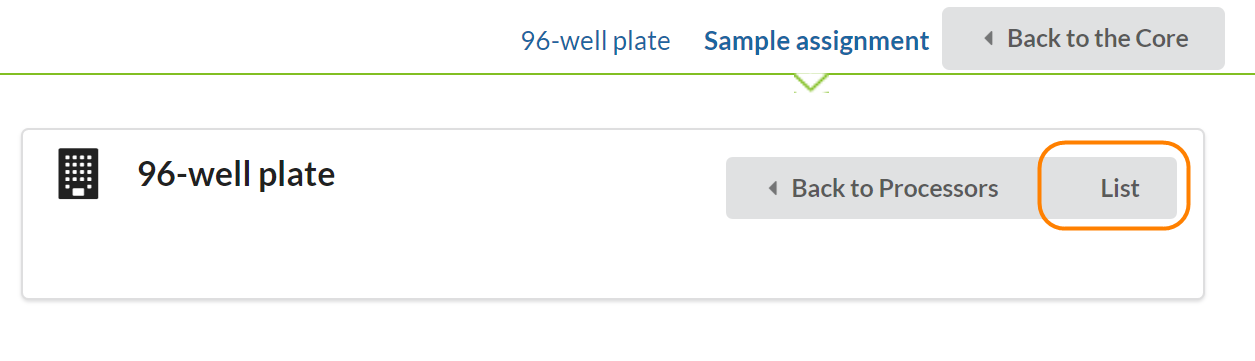
The Open Sample Submissions worklist and Container Loader view can be accessed by clicking the appropriate processor button, located within the Samples tab.
Here is an overview of the Open Sample Submissions and Container Loader page:
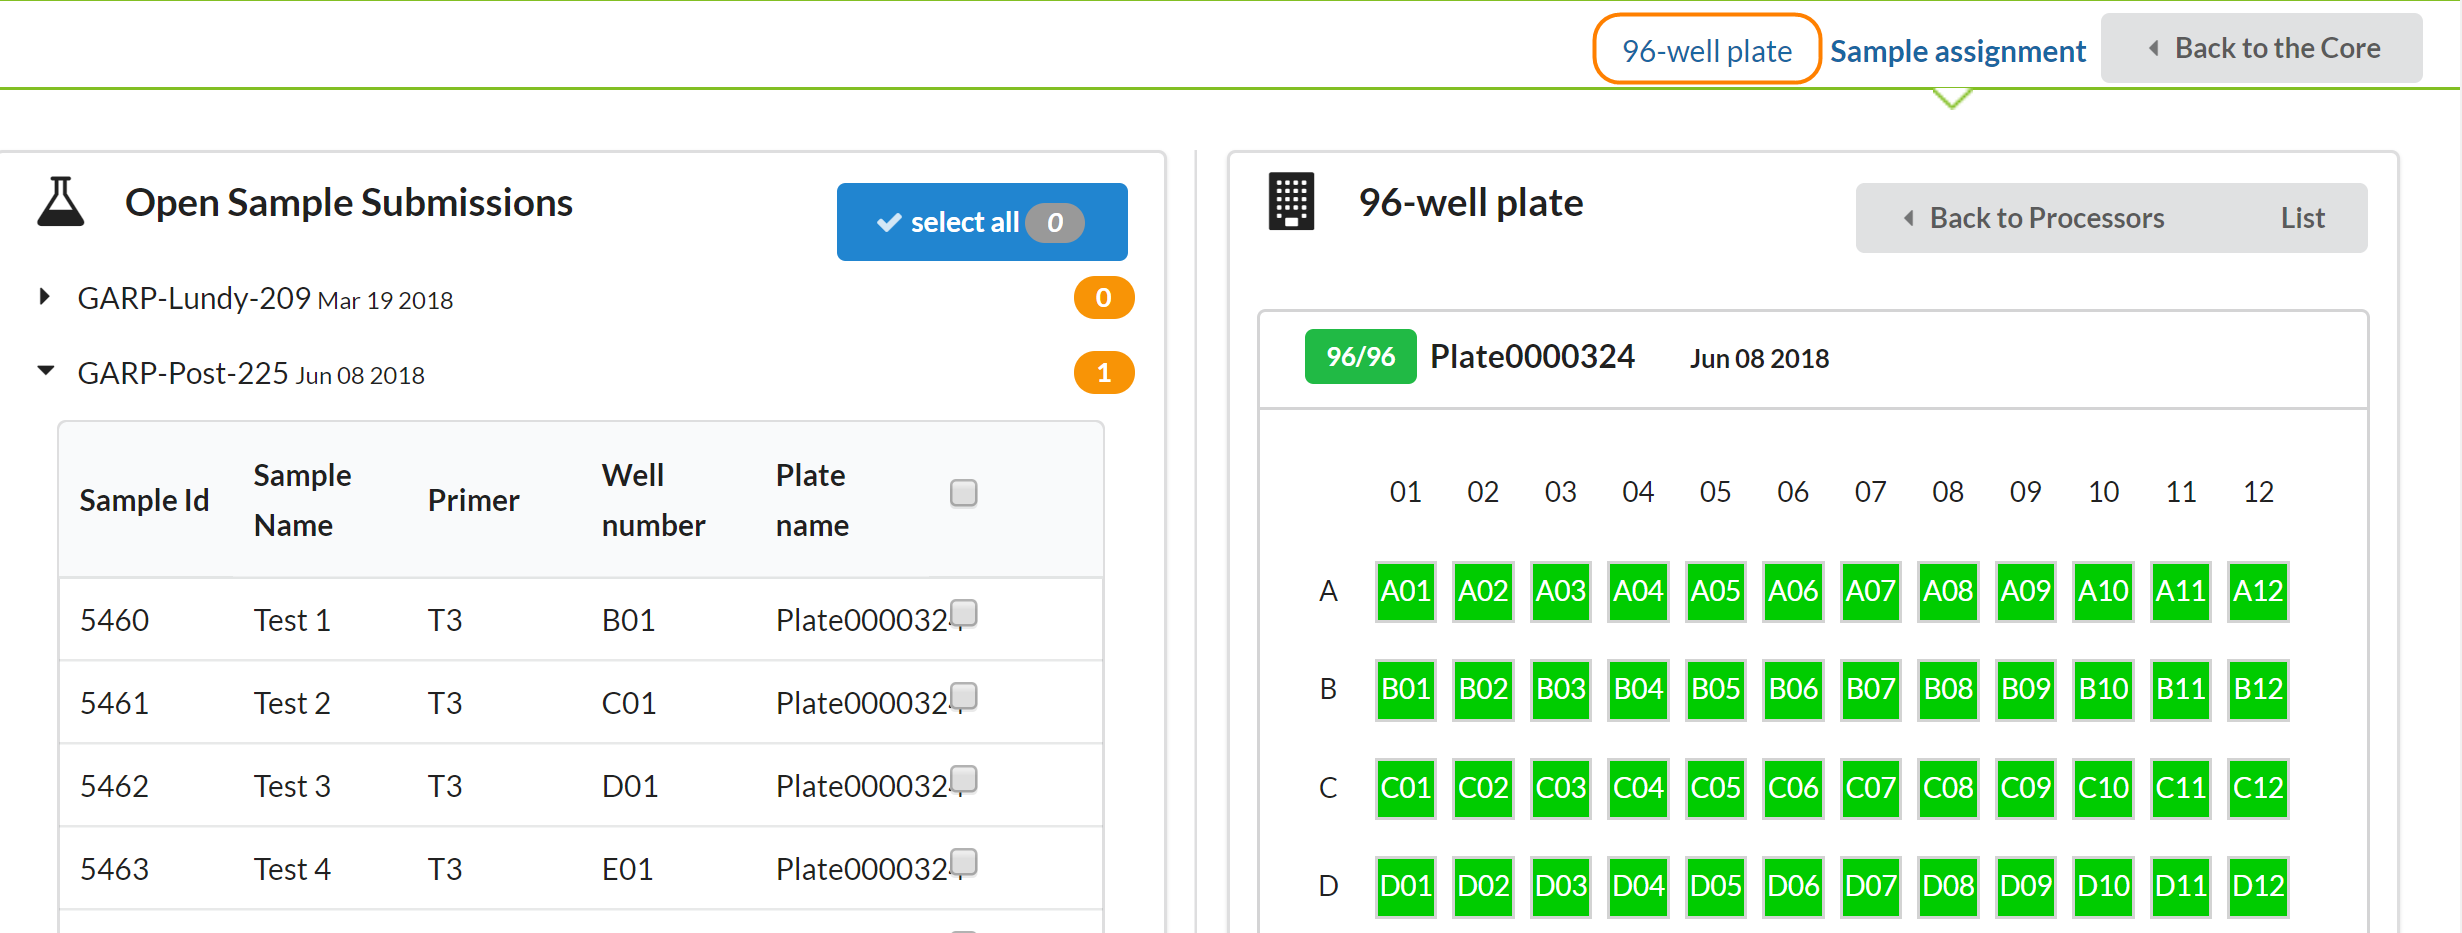
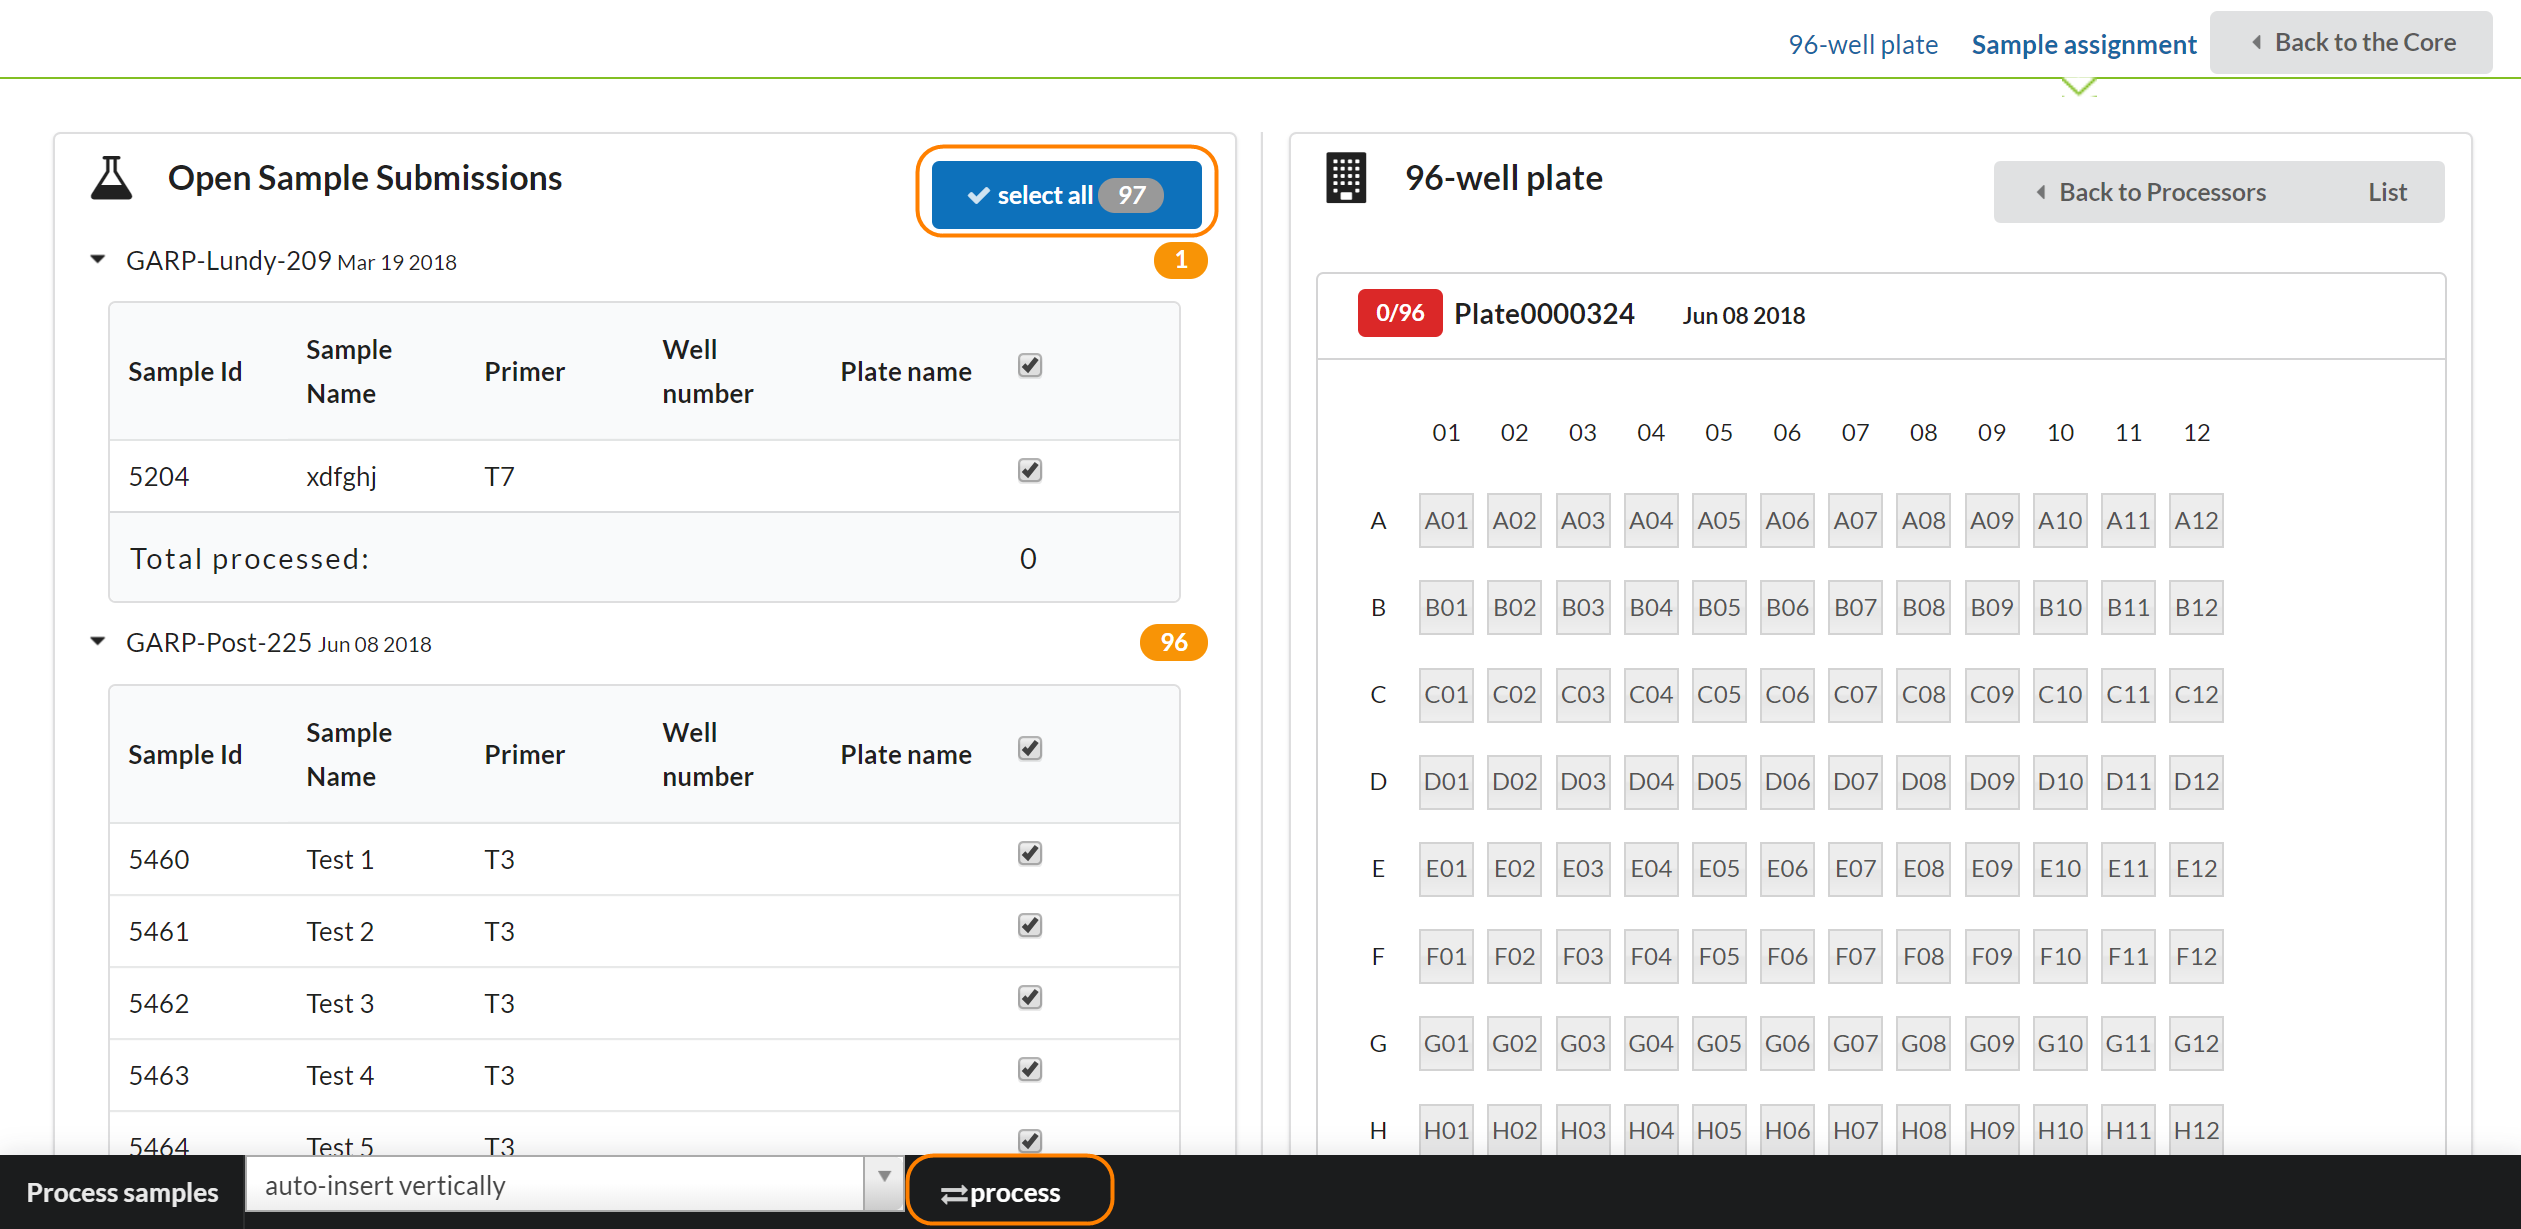
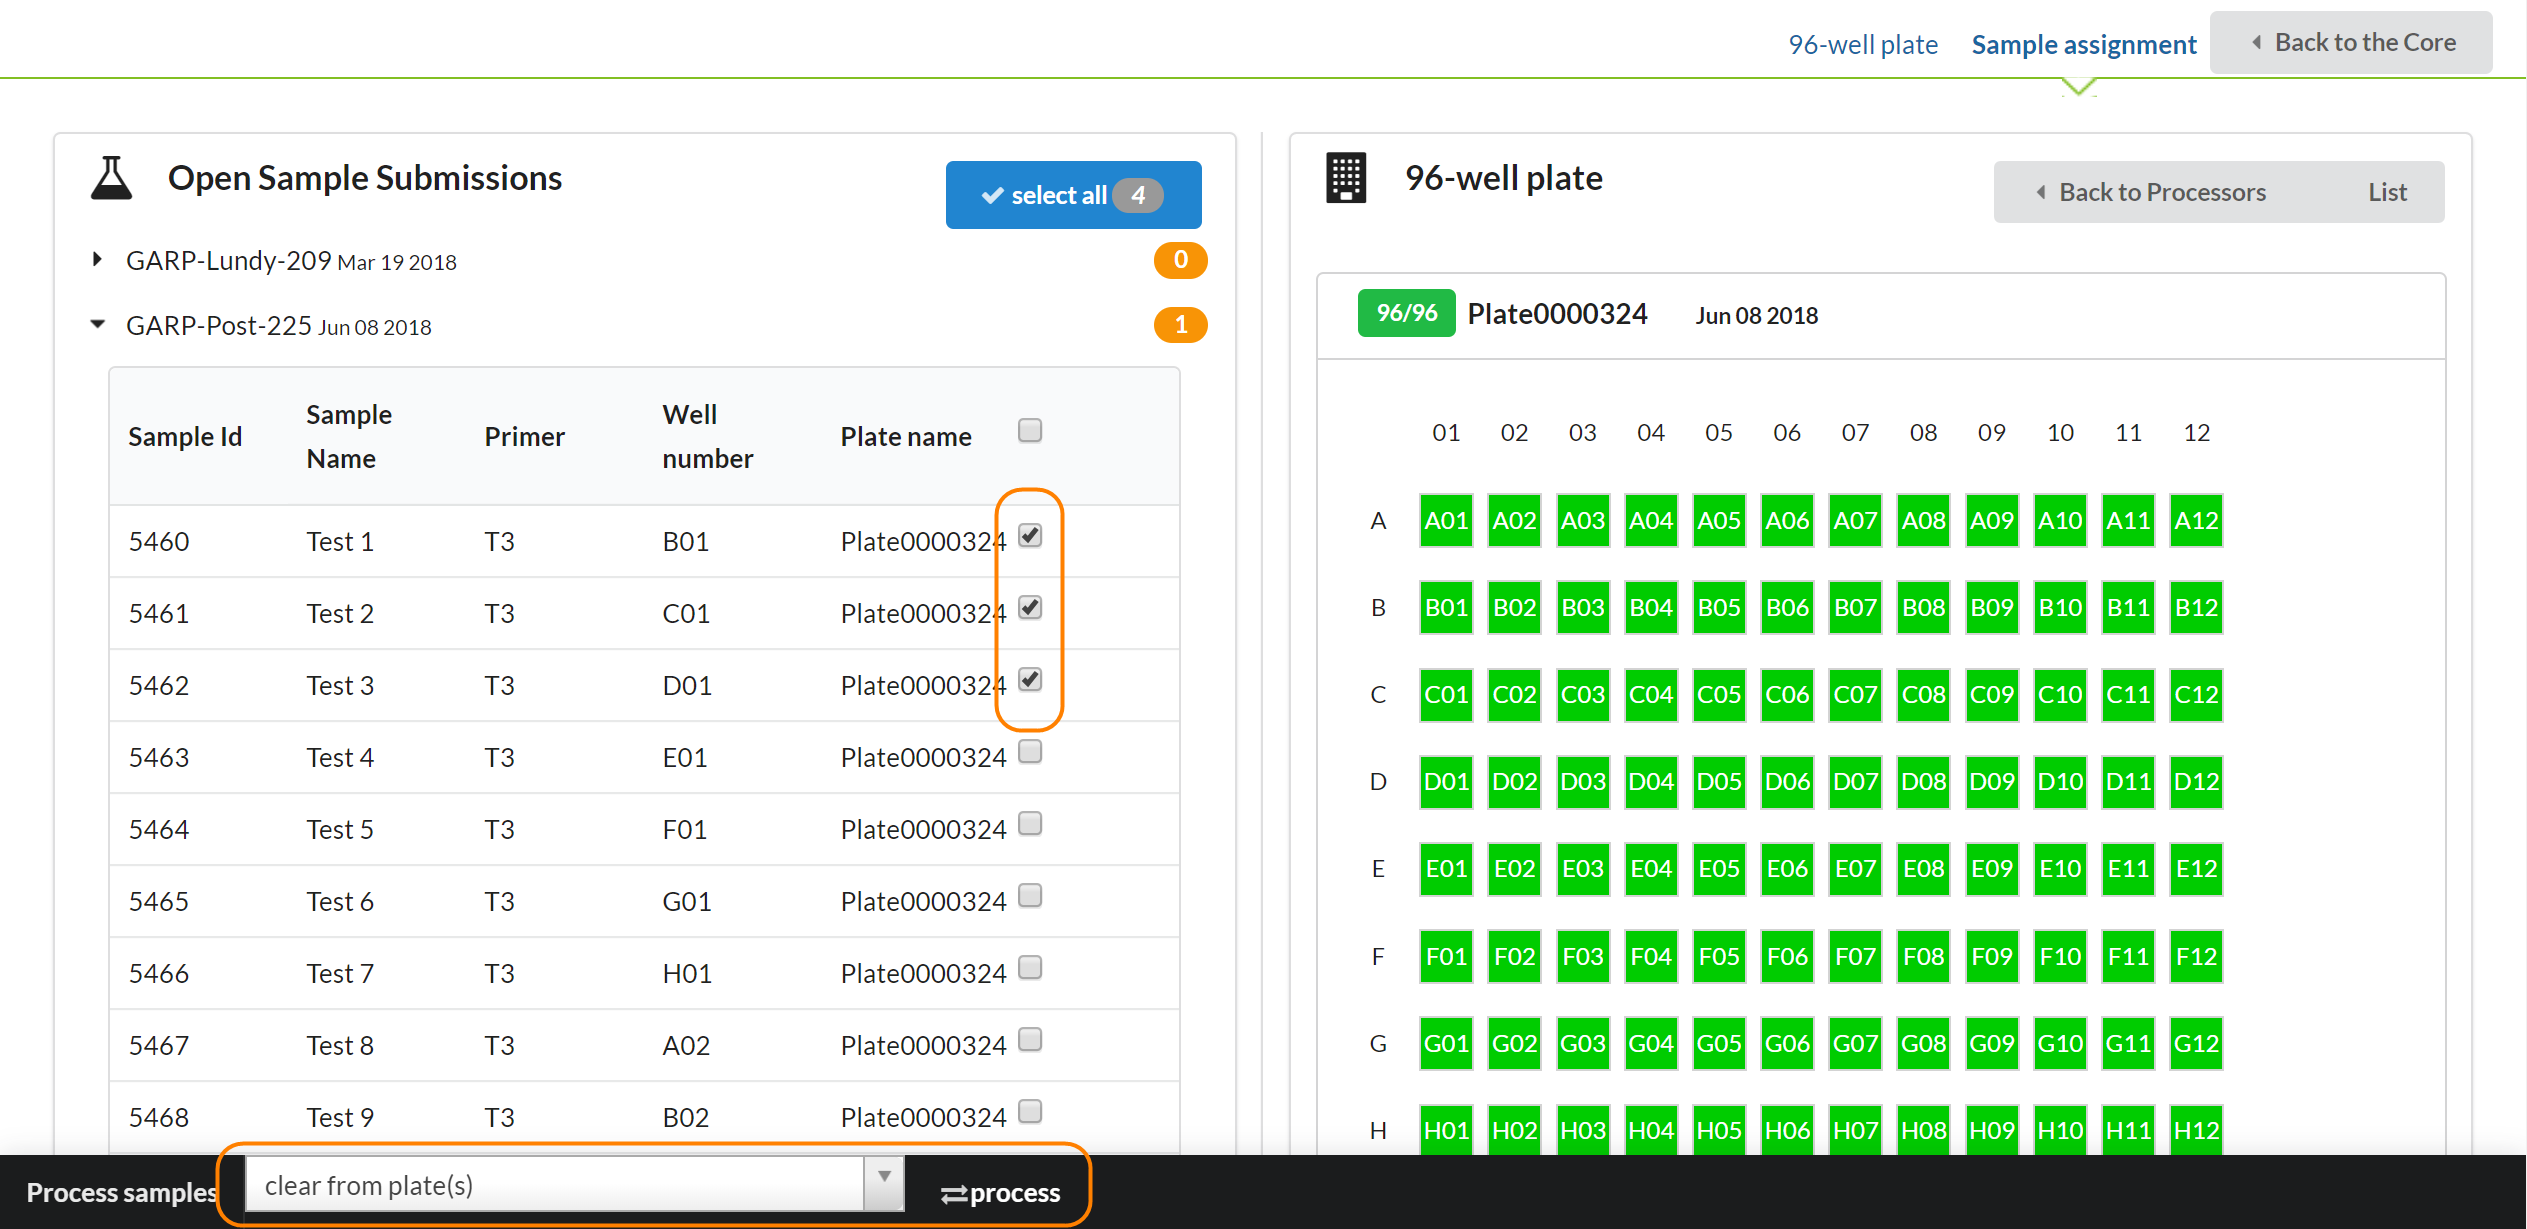
The left hand side of the page is the Open Sample Submissions section, and will be populated by all samples that have been received by the core and marked off as "processing".
The right hand side of the page is the Container Loader View. This is where your container will be displayed and where samples will be inserted.
Set up Containers
The Open Sample Submissions worklist populates with samples that are not yet on a finalized plate. Each sample submission can be expanded by clicking on the black triangle to the far left.
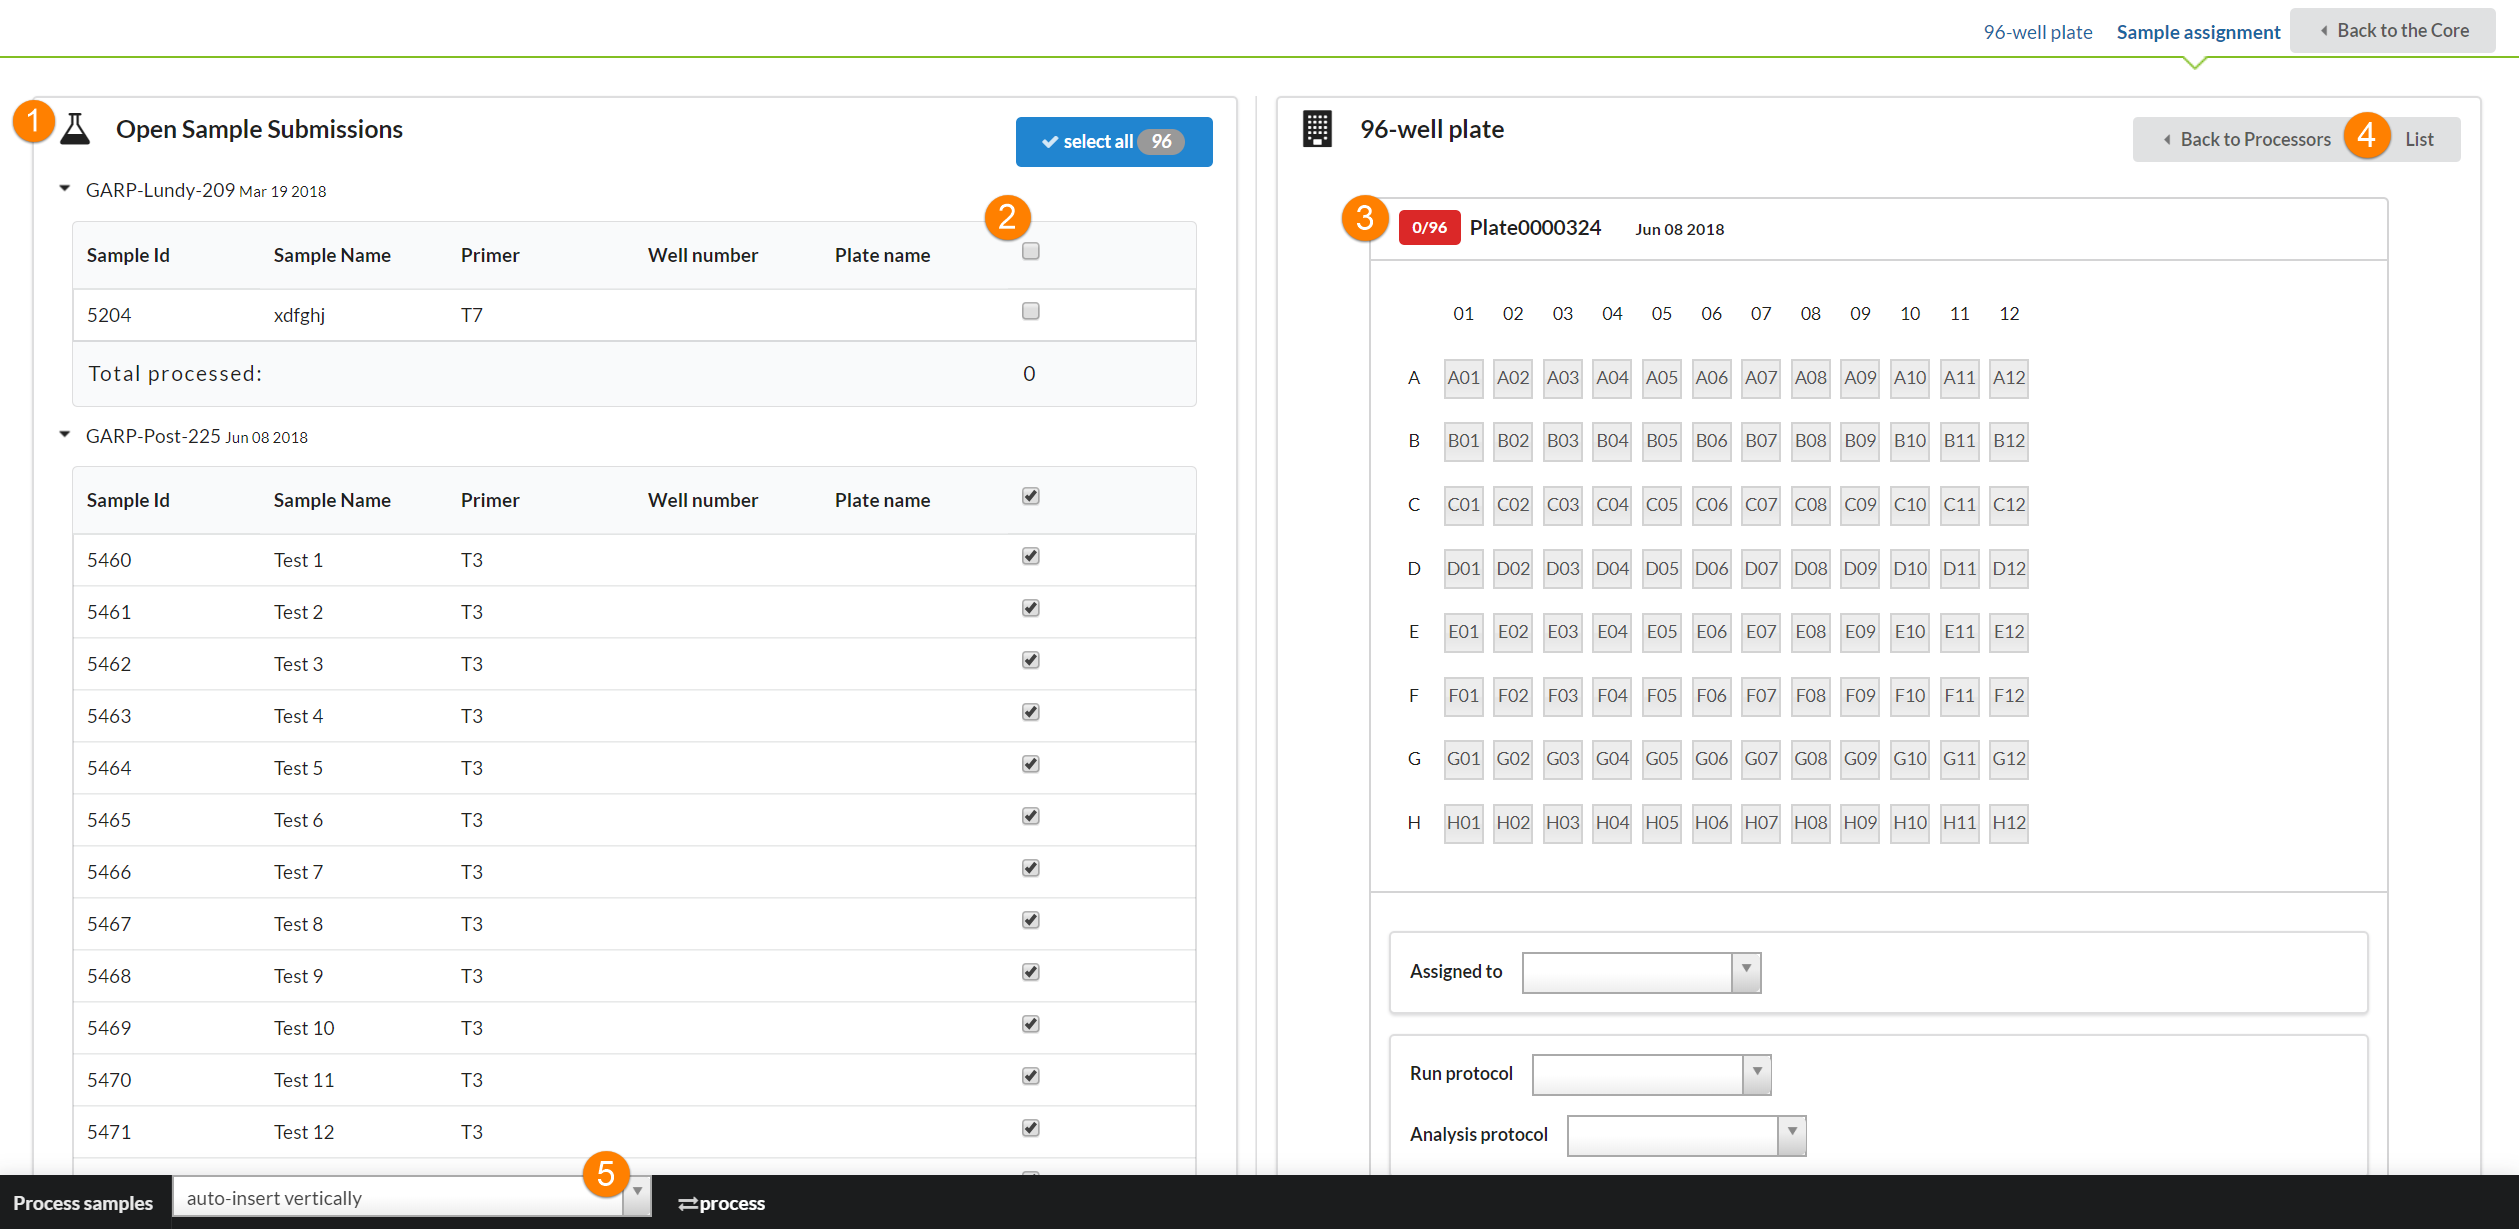
- Open Sample Submissions: Samples available for you to assign to a container.
- Sample checkboxes: The checkboxes allow you to select which samples you'd like added to the plate.
- Plate: The selected container available for assigning samples.
- List: List of plates. Here you can select a different plate, add a new one, or view any finalized plates.
- Process bar: You have the option to insert your samples horizontally or vertically into your container. Select the appropriate orientation option and then click Process. This will automatically move all of your selected samples into your container in the orientation you desire.
The first step in assigning samples to a container will be to create a new container.
Click on the List button in the upper right hand corner of the page.
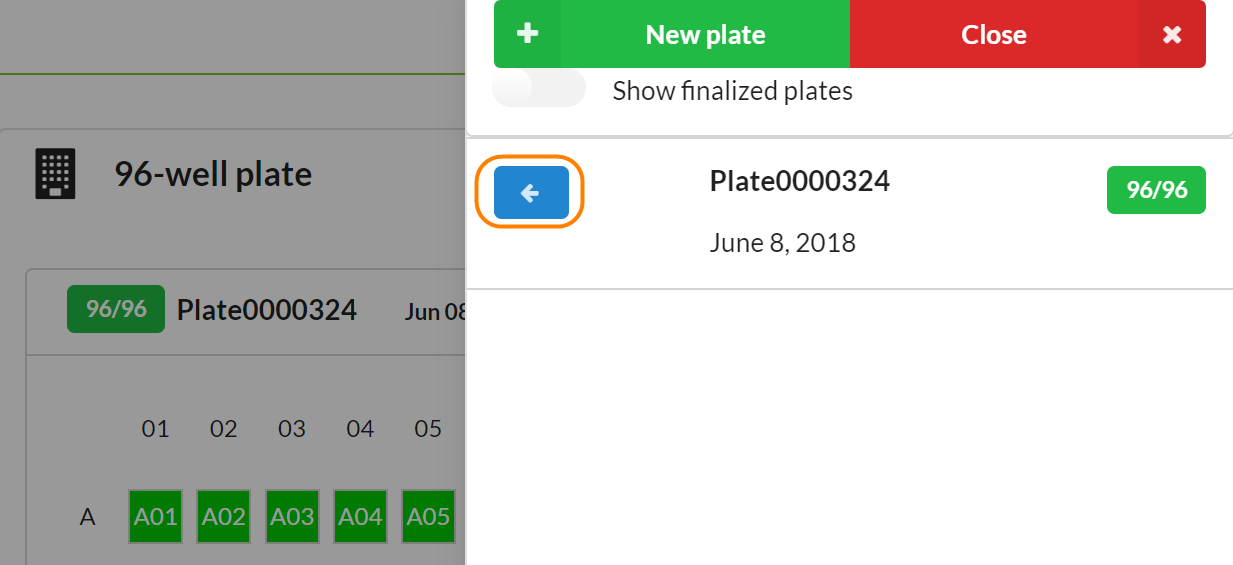
A pop-out window will then appear. Click on the green New Plate button and a new container will be created with a system-generated name.
Click the black arrow box next to the new container name to make that the active container in the Container Loader window (the arrow will then change to light blue, indicating that plate is the active container), and then click the Close button to close the container list. You also have the opportunity to view any finalized plates from this pop-out window.
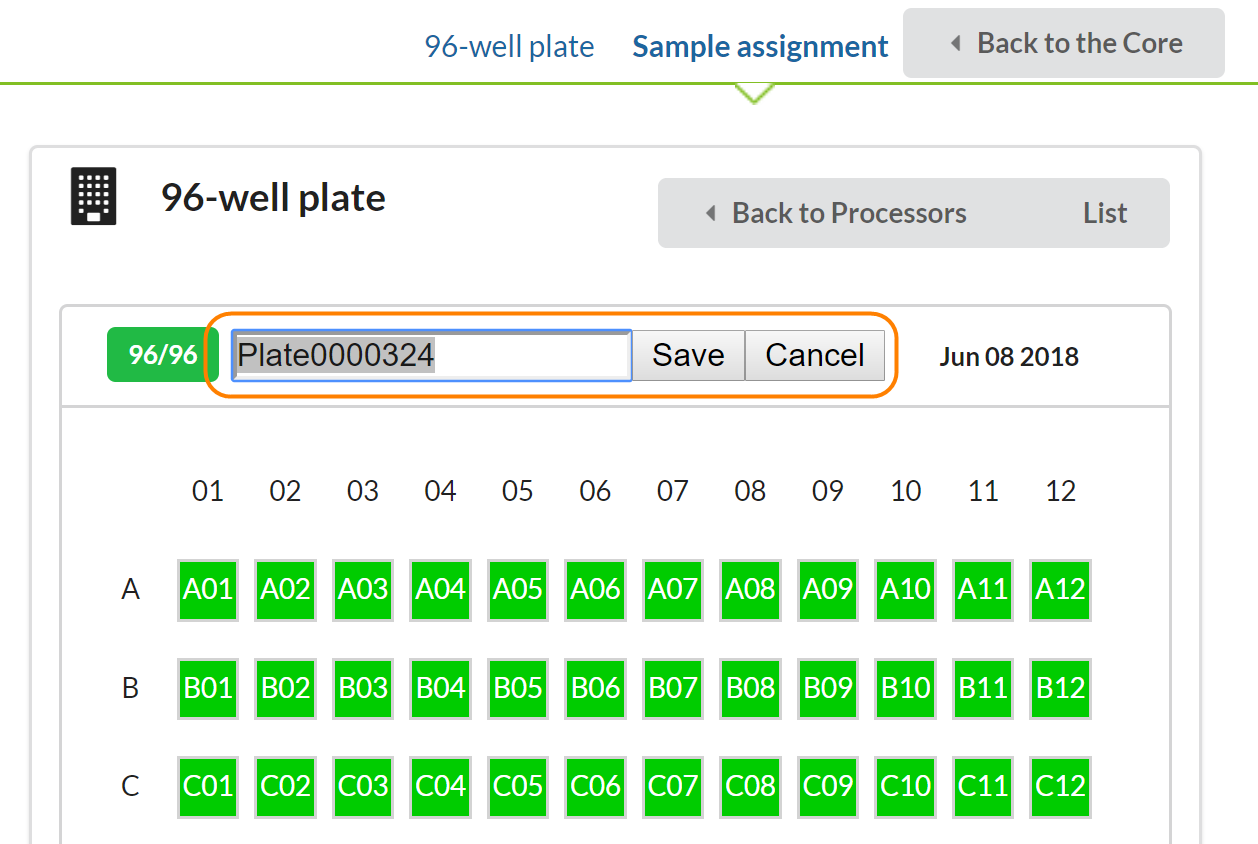
Editing the Container Name
If you have a name you'd prefer over the system generated one, you do have the ability to edit it. At the top of the plate view, hover over the system-generated name of the container until you see the image of a hand and a red edit pencil icon. Click on the name of the container to bring up the editing window below. Type in the new name of your container and click Save.
Note: Once a container has been finalized, requests on that container can no longer be edited by the customer. It will disappear from the list of open containers (open containers in the list are still available for sample insertion).
Also note that you cannot edit the numbers of columns and rows in an existing container.
Assign Samples to a Container
Once you have created a new container, you are now able to assign samples to that plate. The left hand side of the page is the Open Sample Submissions section, and will be populated by all samples that have been received by the core and marked as processing.
The right hand side of the page is the Container Loader View. This is where your container will be displayed and where samples will be inserted.
Assigning samples to a container can be accomplished in a few different ways: all samples from an entire request, all samples available in the open sample submissions list, or one by one.
1. Assign all samples from an entire request: Click the checkbox at the top right of the request header, then go to the bottom of the page to the process bar.
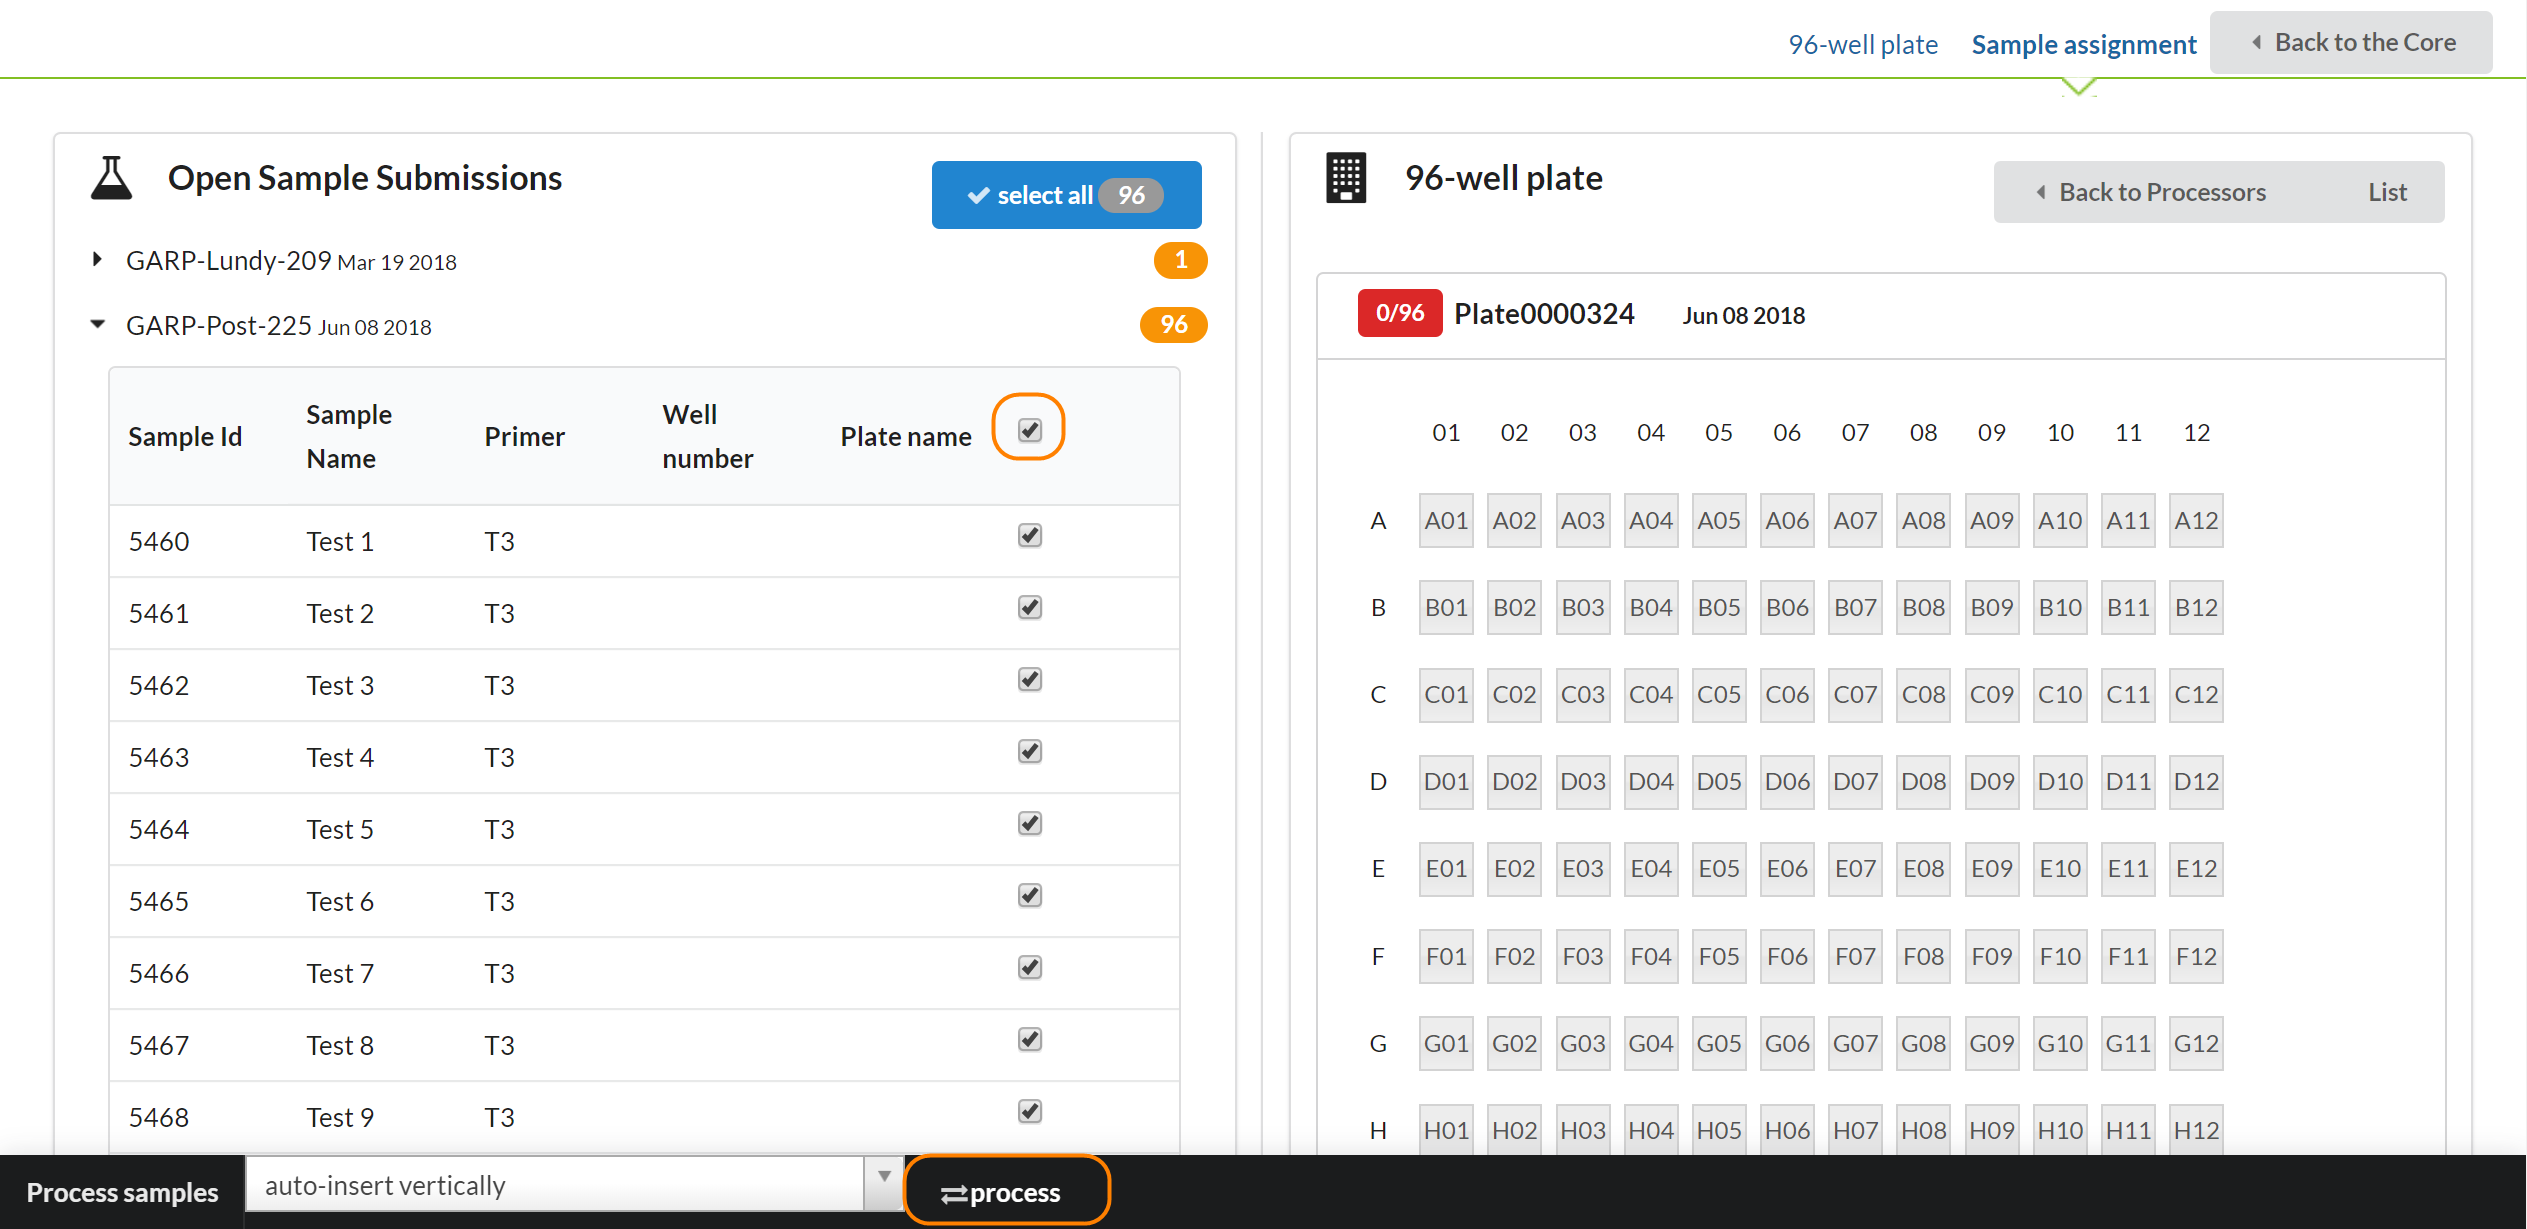
2. Assign all available samples: Click the Select All box at the top right of the open sample submissions list to select all available samples, then go to the bottom of the page to the process bar.
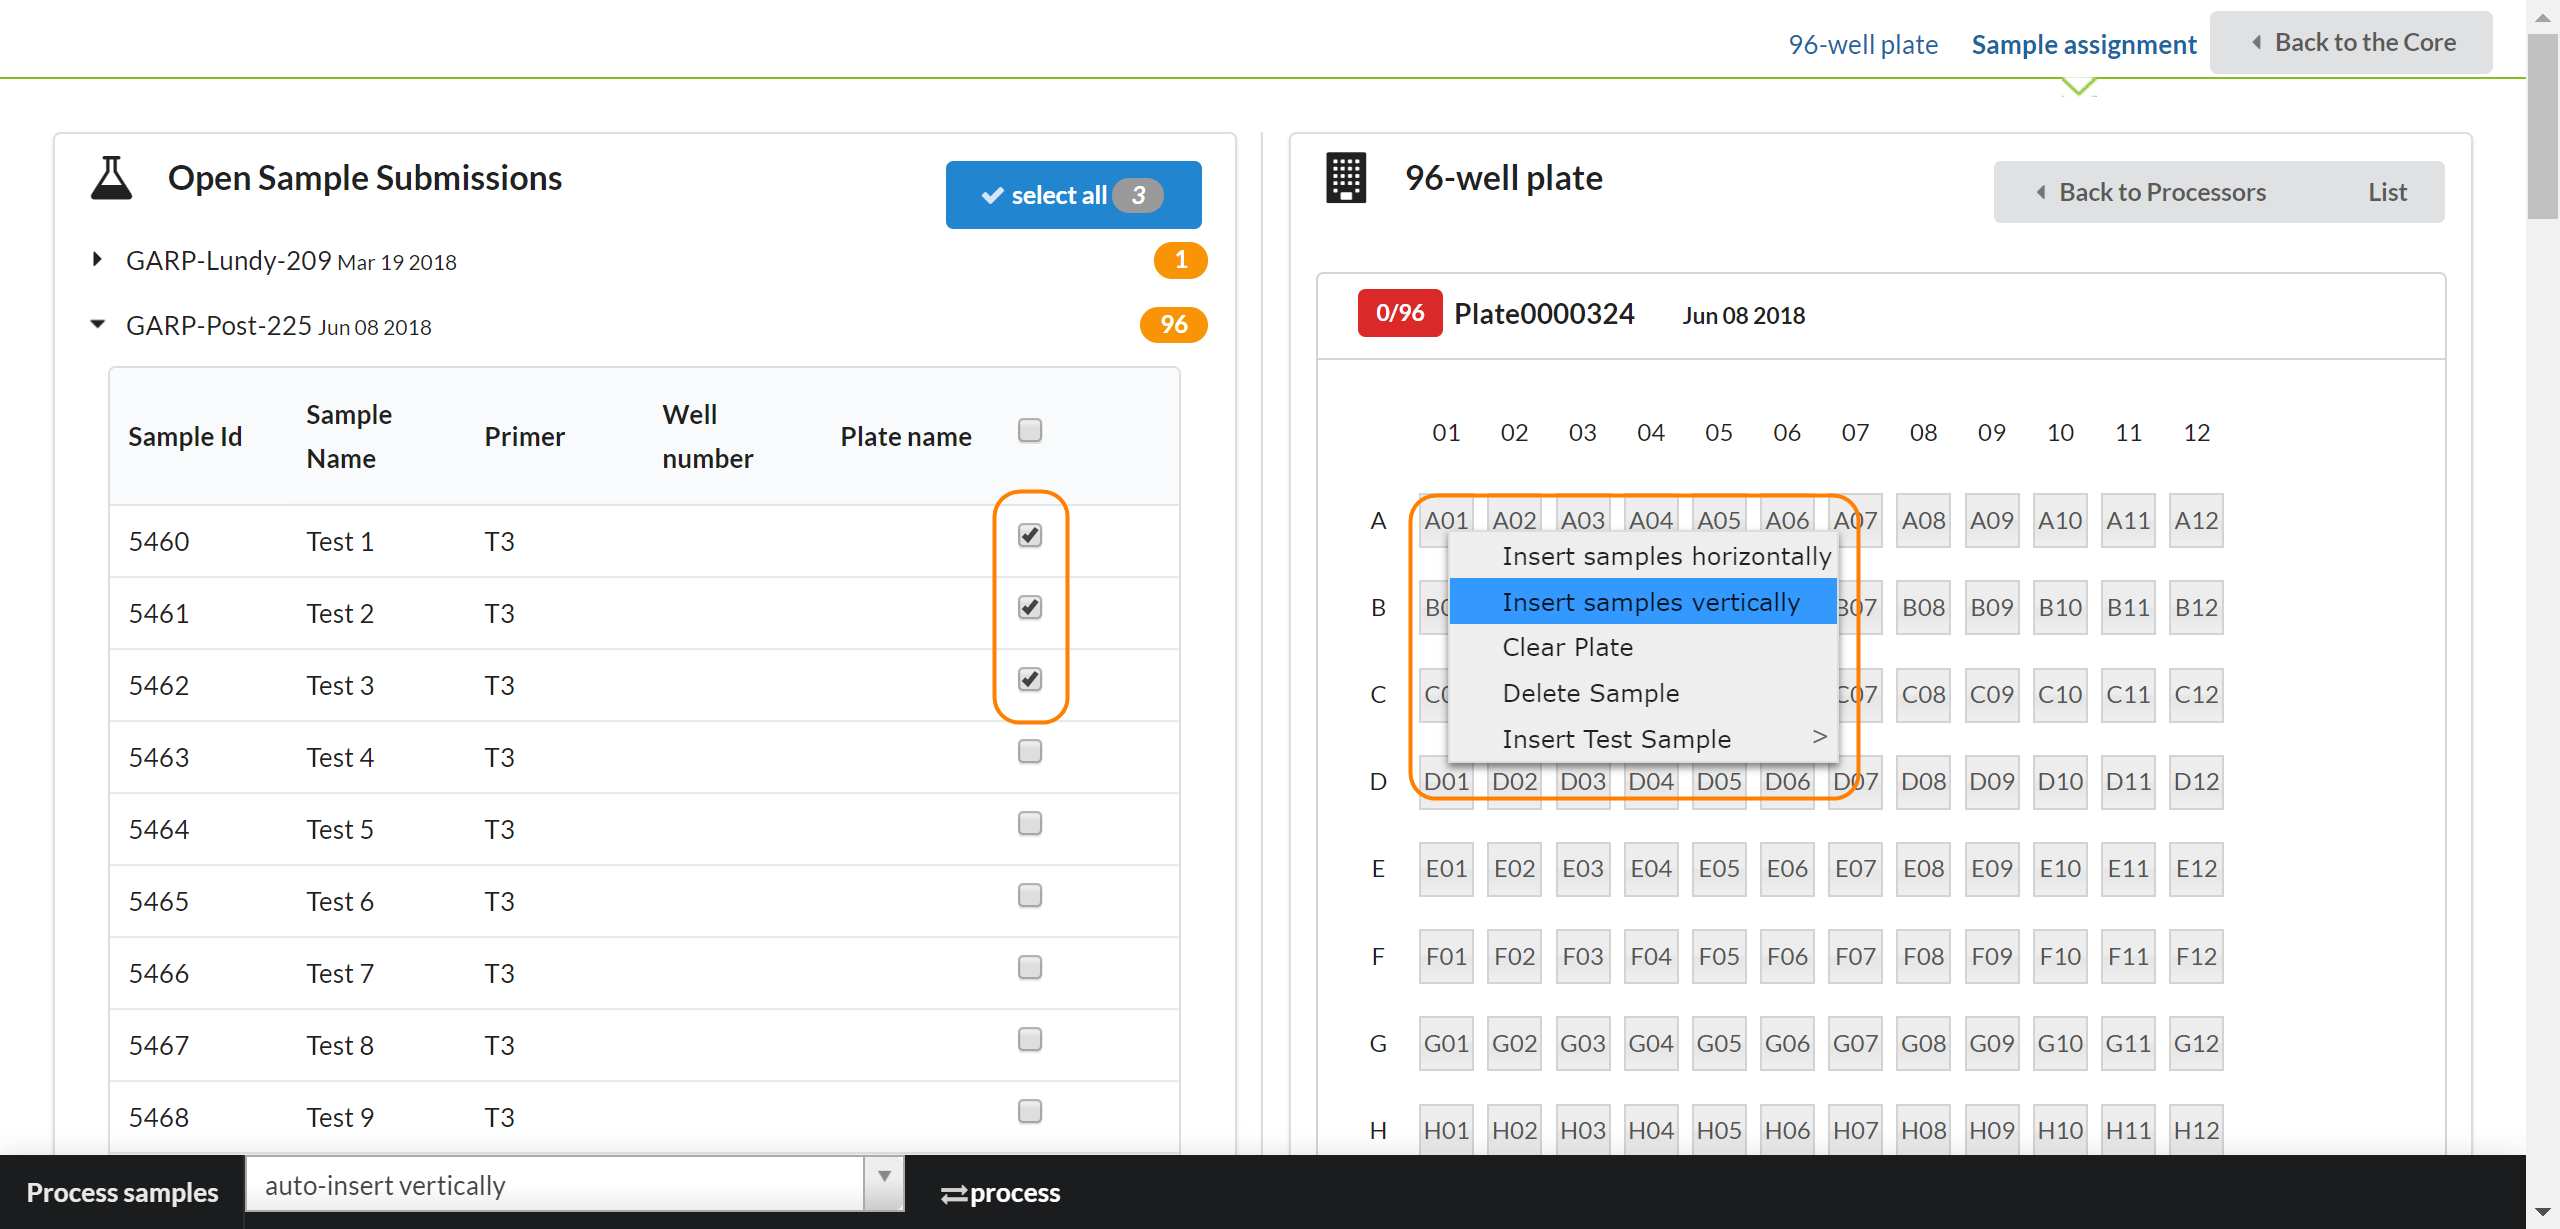
3. Assign an individual sample to a container: click the checkbox next to the sample you would like to insert. You can then either choose a). to insert that sample in the next available position by using the process bar, or b). you can simply click on any well in the container where you would like the sample to be placed.
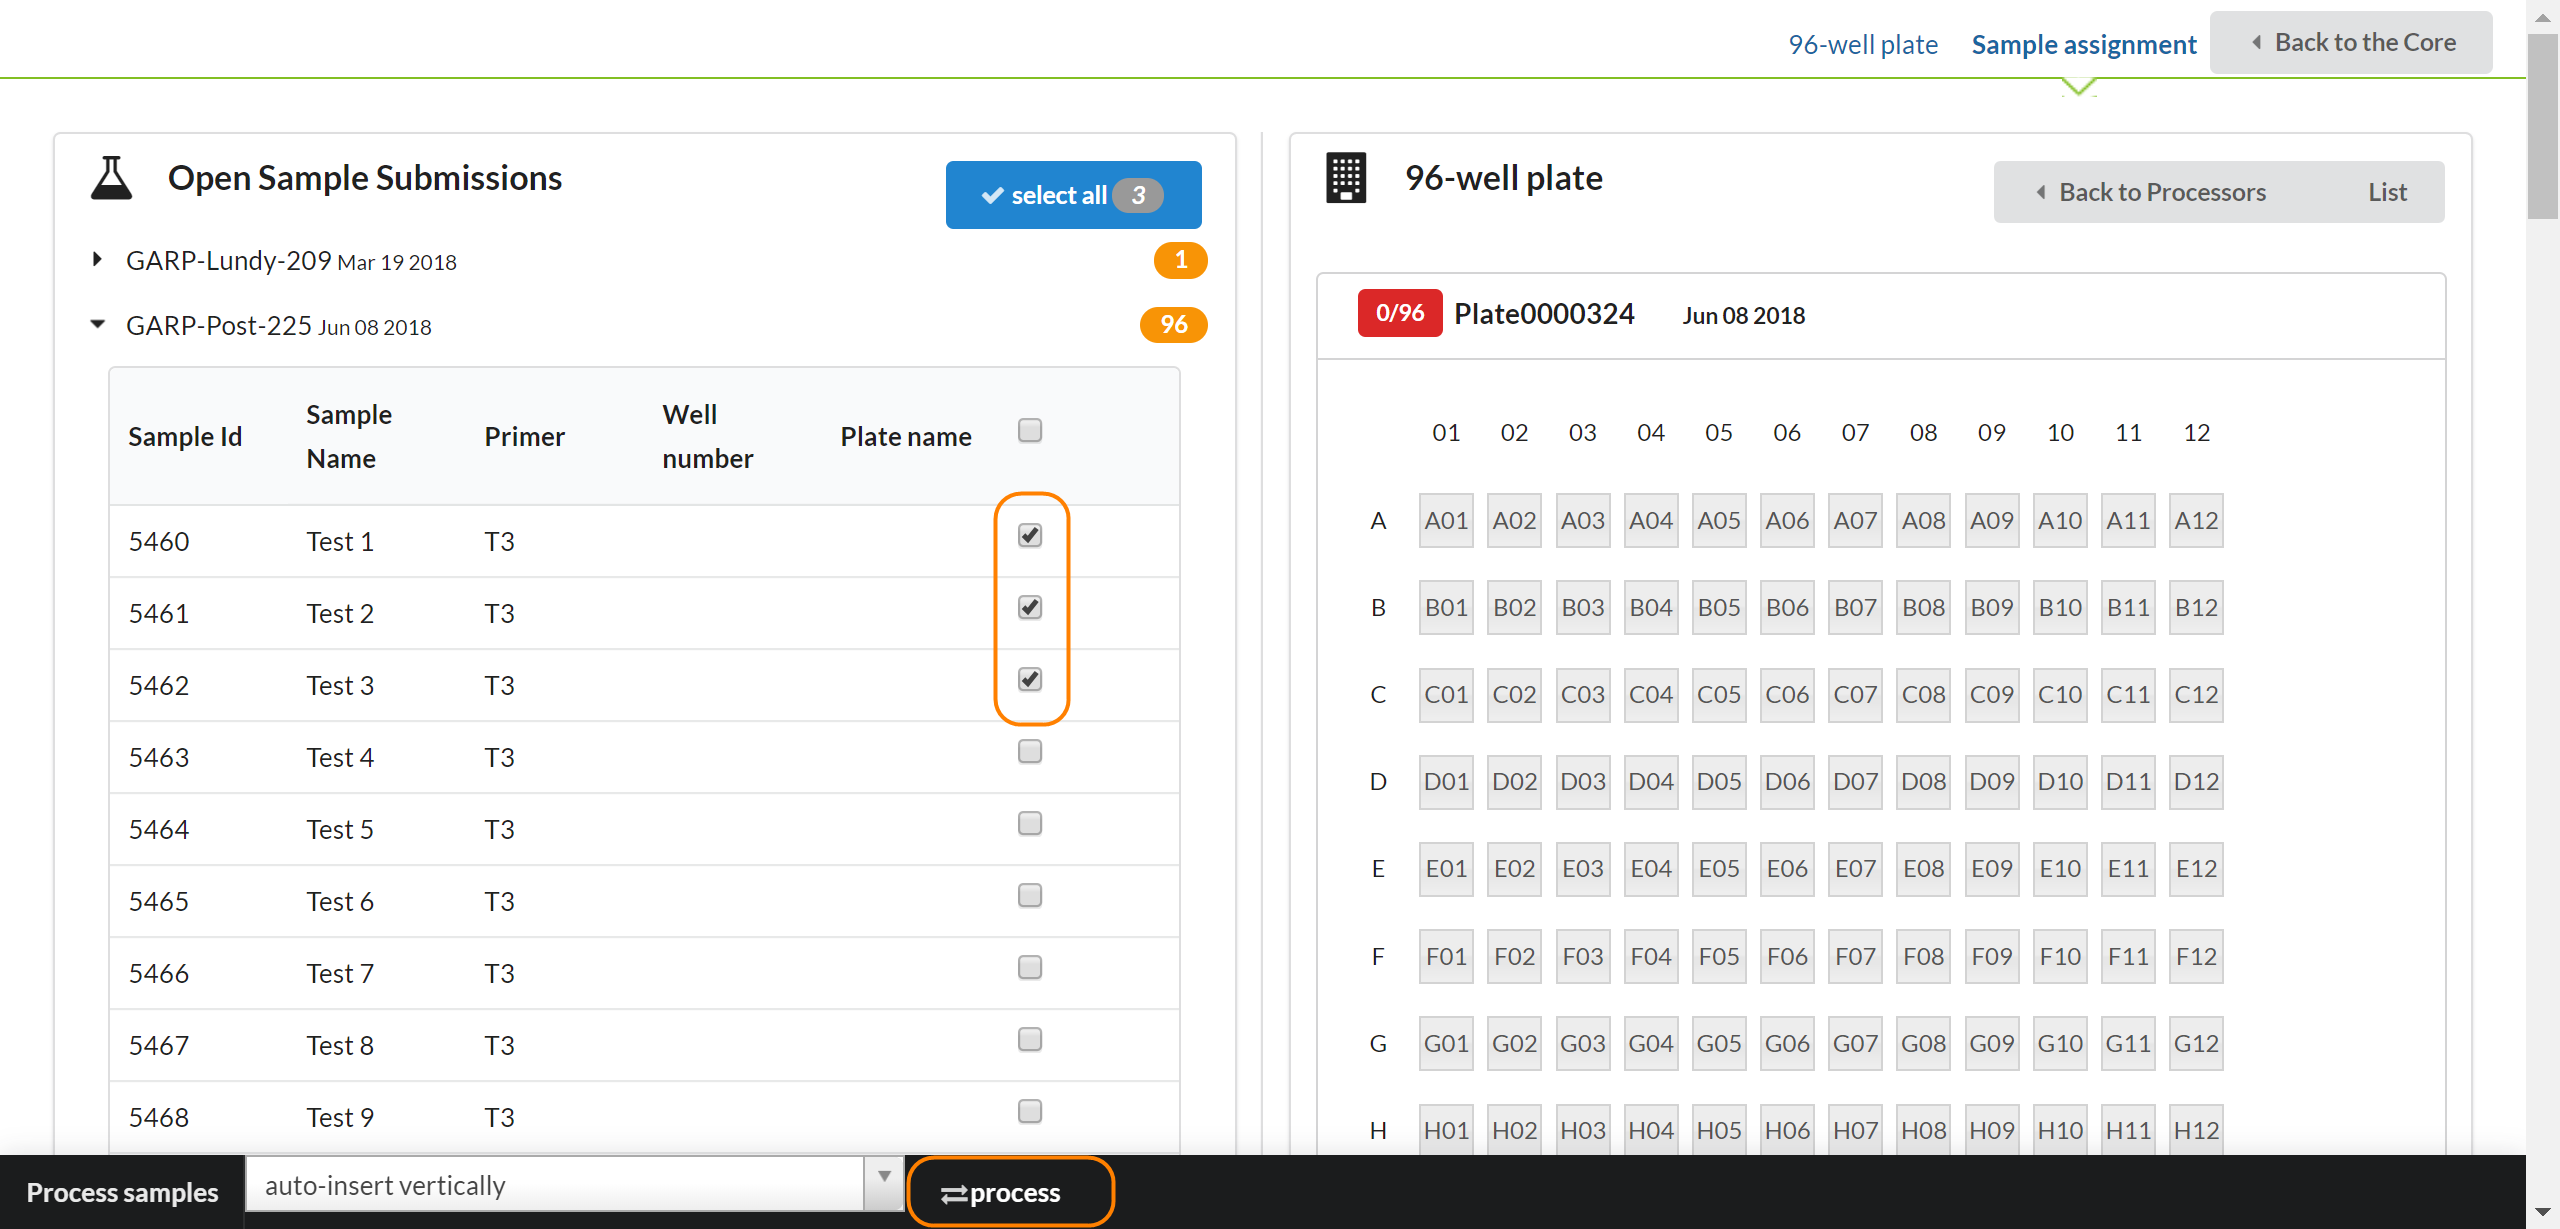
If you right click on the well after selecting your samples, you will have the option of adding the samples horizontally or vertically.
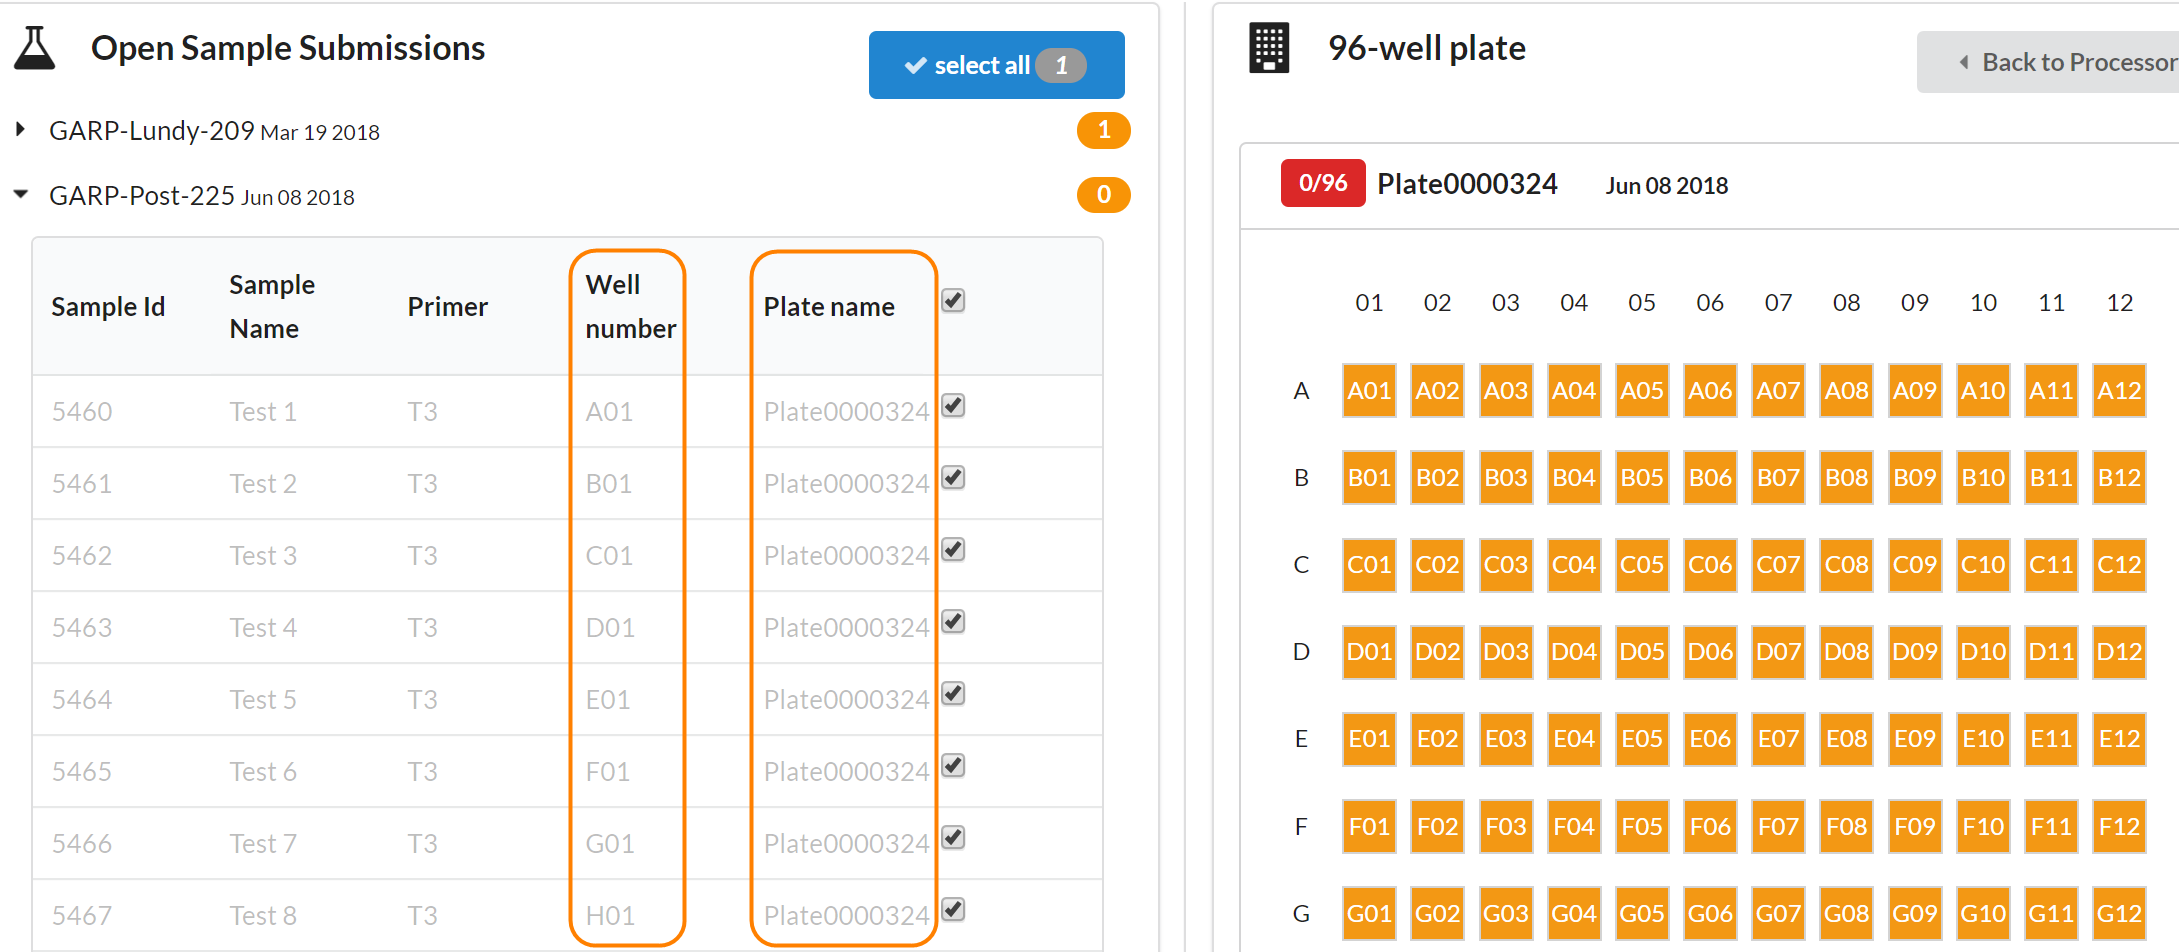
Once you have assigned samples to a container, you will see the Well Number and Plate Name columns in the customer request update to reflect the location and plate of each sample.
Add Controls to the Plate
You also have the ability to insert specific sample types used by the core facility, such as controls, standards, blanks, etc. into a container. To insert one of these sample types, right-click on the well where you would like to place this sample, and choose “Insert Test Sample” from the pop-up menu. You will then see a list of the core sample types you previously defined when building your processor.
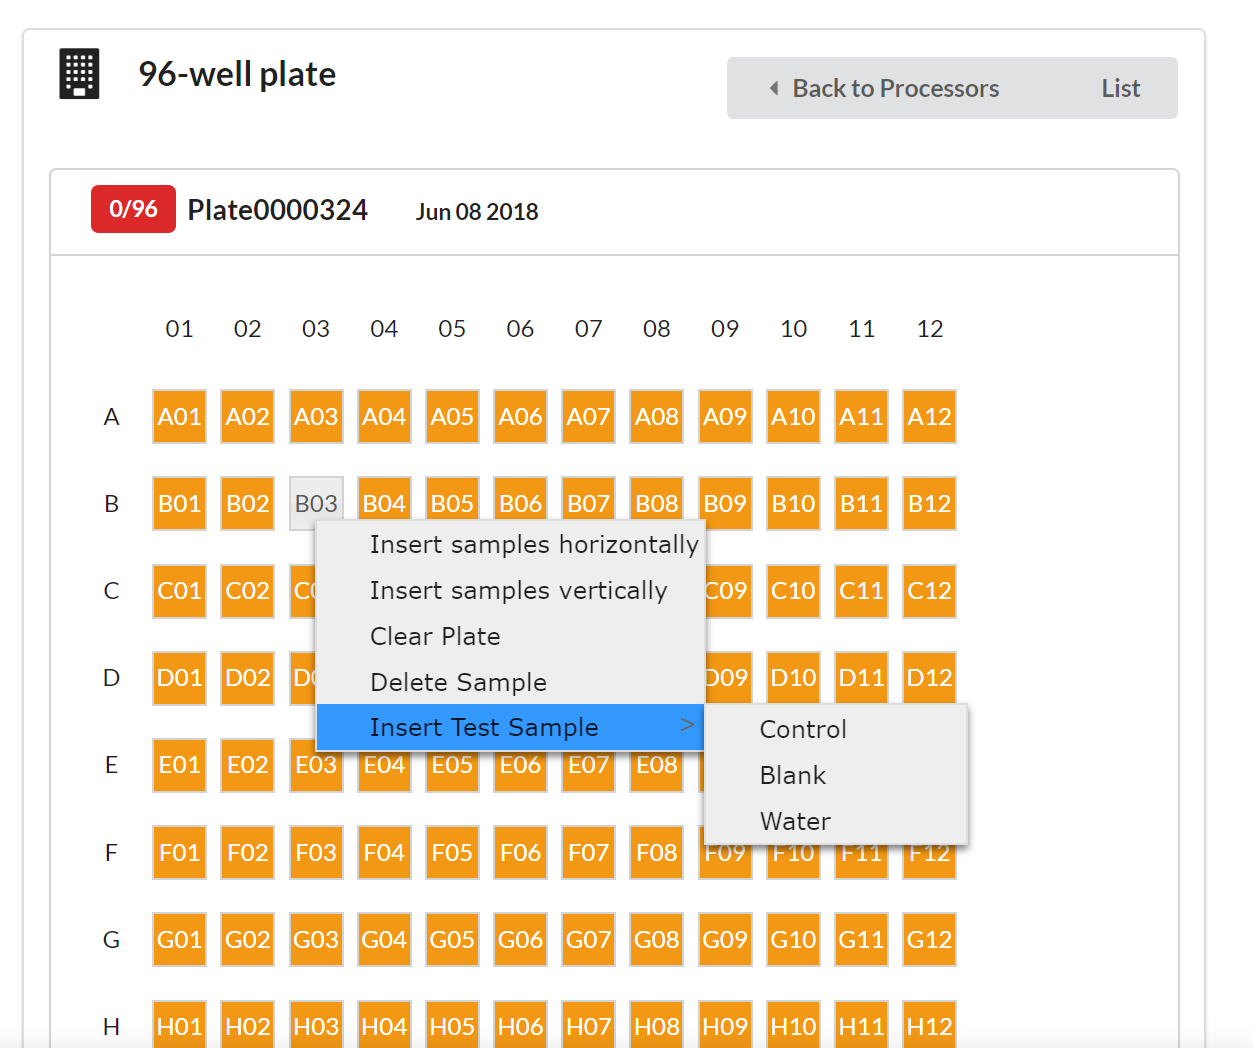
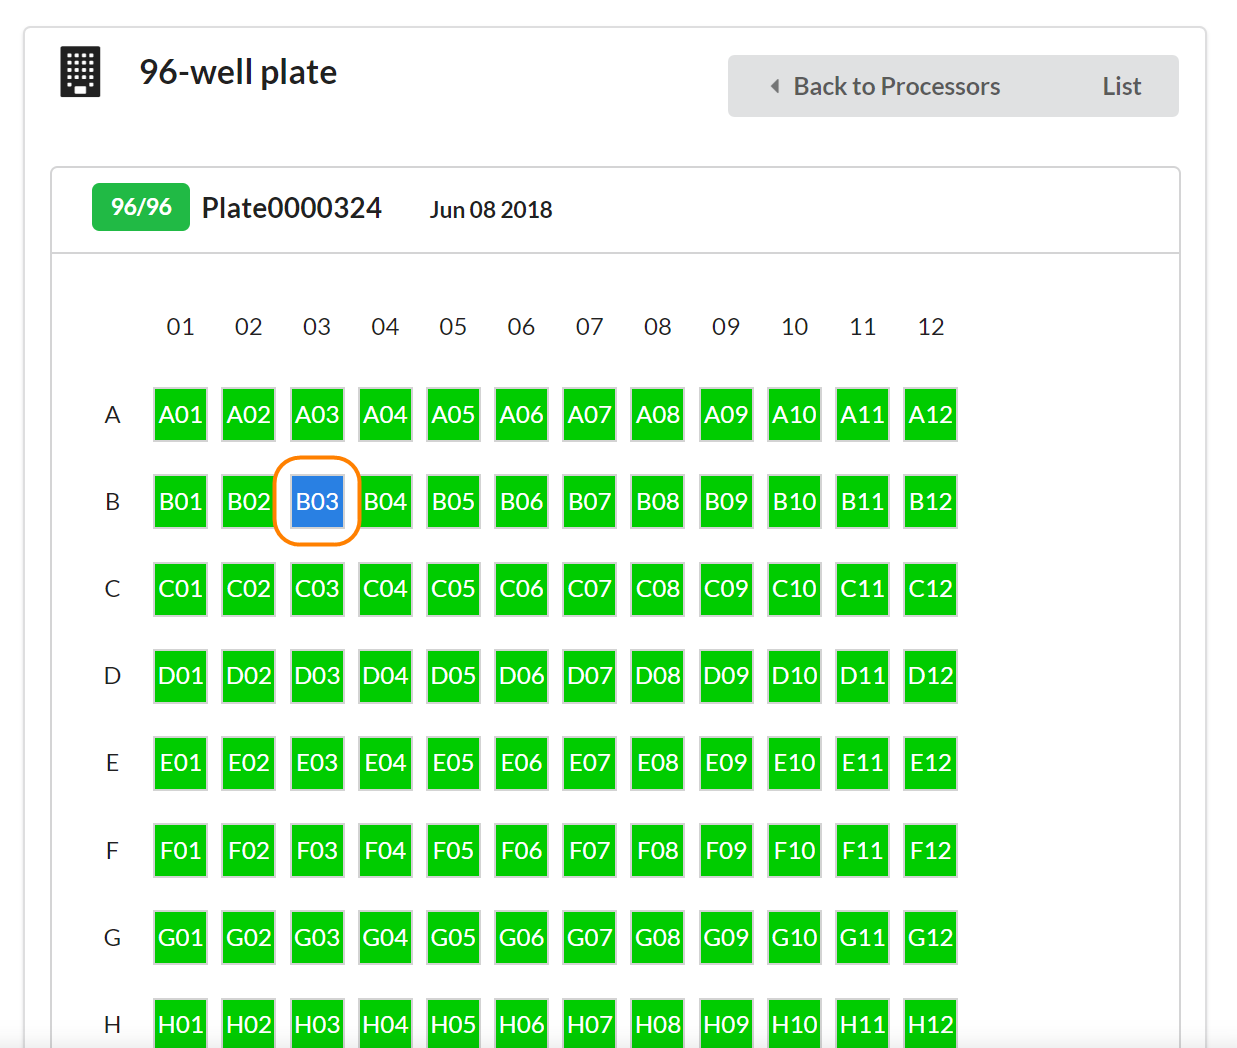
Once a sample type has been selected, the well in the plate view will turn blue, indicating the presence of a core facility sample. If you hover over the well, you'll get a pop-up indicating what sample type was selected and who assigned it.
Remove Samples from a Container
After you have inserted your customer and/or core samples, you may wish to remove any or all of the samples from your container and reinsert them into different locations on the container. There are a few ways to do this:
1. Removing selected samples: In the Open Samples Submission section, mark the checkbox of the sample(s) you would like to remove from the container. Then, go to the bottom of the page to your Process bar, select Clear From Plate, and click Process. This will remove the samples from the container and put them back into the Samples list for reassignment to a different well or a different container.
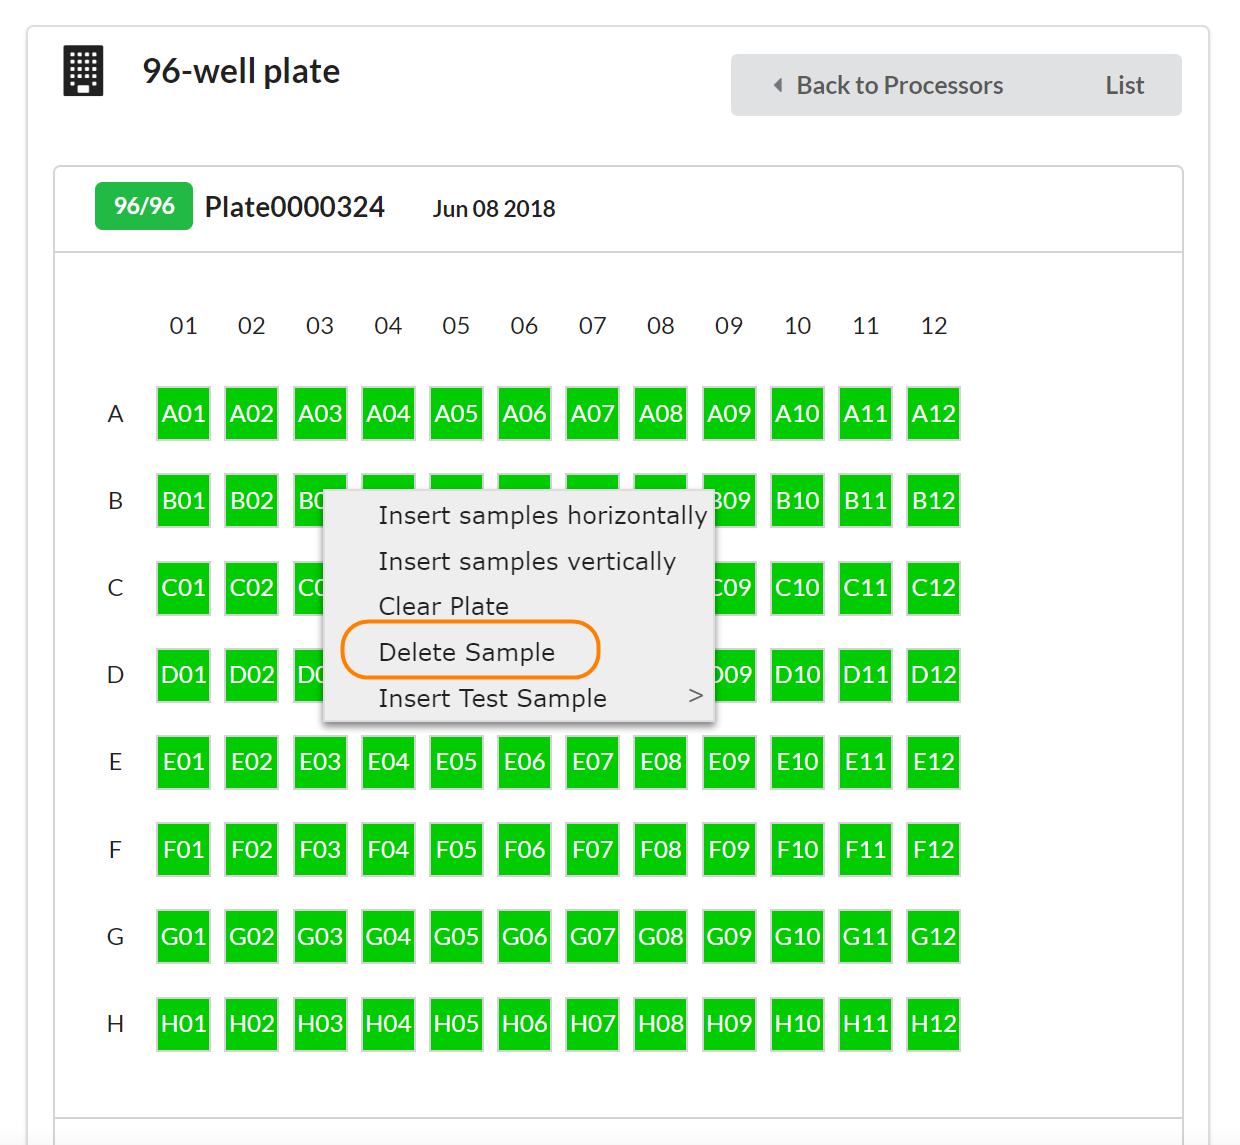
2. Clearing the entire plate: Right-click on any empty well in the container, and choose Clear Plate from the pop-up menu. This will clear all samples currently inserted into that container and put them back in the Open Samples list.

3. Removing individual samples: If you would like to remove just one sample from the container, right-click on the well of the sample you would like to remove, and choose Delete Sample. This will remove the sample from the container and put it back into the Open Samples list. Please note that if the samples were submitted to your core as a plate, rather than individual samples, this action will permanently delete the sample.
Identify Container Attributes
There are several additional attributes of a container you can set while in the Container Loader view.
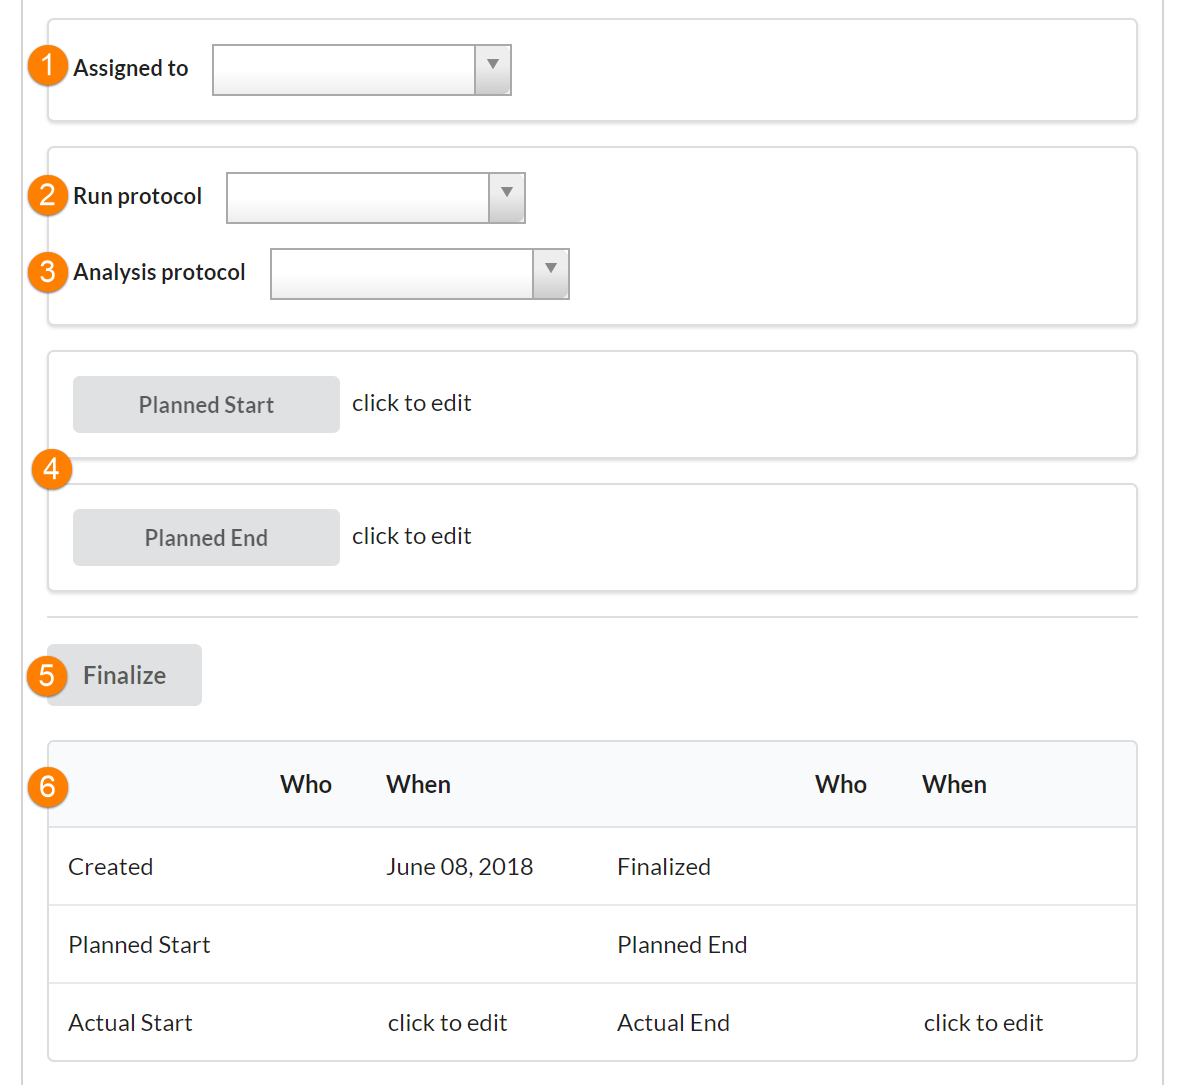
1. Assigned to: A drop-down menu of core staff members that can be assigned to process a container.
2. Run protocol: Your institution may have protocols they use to communicate from the processor to the institution's server. You may choose to designate that here.
3. Analysis protocol: Your institution may have protocols in place for the analysis of the data. If so, you may designate it here.
4. Planned Start/End date: - Allows the operator to set planned start and end dates for processing of the container.
5. Finalize: Once you have finished assigning samples to a container and set all appropriate attributes of that container, click the Finalize button to finish the creation of that new container.
6. Summary: - An overview of the history of the plate displays at the bottom; allows the operator to set actual start and end dates of the container processing; and a summary list of the samples assigned to that plate.
Finalize the Plate
Once you have finished assigning samples to a container and set all appropriate attributes of that container, you will then click the Finalize button to finish the creation of that new container. After the container has been marked finalized, it will disappear from the list of open containers (open containers in the list are still available for sample insertion). Please note: requests where the container has been marked off as finalized can no longer be edited by the customer.
A finalized plate can still be accessed in two places:
1. While in the container loader view, click the List button and then check the Show Finalized checkbox.

2. In the upper right hand corner of the Sample Assignment page, click on the link that describes your container type (i.e. 96-well plate). This will take you to the Plate List View.