Each iLab calendar is built independently and configured with its own set of rules and restrictions. As a core administrator, you can maintain and edit settings for the calendar(s) within your core at any time, or contact support for help. Below is a list of each section within the calendar template.
Note: This is a long article. To return to the top of the page use CTRL + Home (PC) or ⌘ + ↑ (Mac).
- Access Schedule Settings
- General Settings
- Calendar Display
- Public Visibility
- Restrictions
- Cancellation and Edit Policy
- Availability Settings
- Usage Types & Pricing
- Permissions
- Recurrent Events
- Linked Resources
- Add-On Charges
- Billing
- Scans/Sessions
- Usage Tracking
- Advanced Attributes
- Reservation Verification Settings
Access Schedule Settings
From the Schedule Equipment tab, calendars can be edited by clicking the blue pencil icon located to the right of the View Schedule button.

iLab Usage Tracker
Some cores might still see the old iLab Usage Tracker button in the Schedule Equipment tab or in the core settings page within the Admin tab of the Core page. However, this feature has been discontinued, and the R&D team is working on removing it completely from the interface.
Within the schedule settings, each panel of editing sections will display on the left. Click on the setting, or use the search engine, to find specific editing sections.
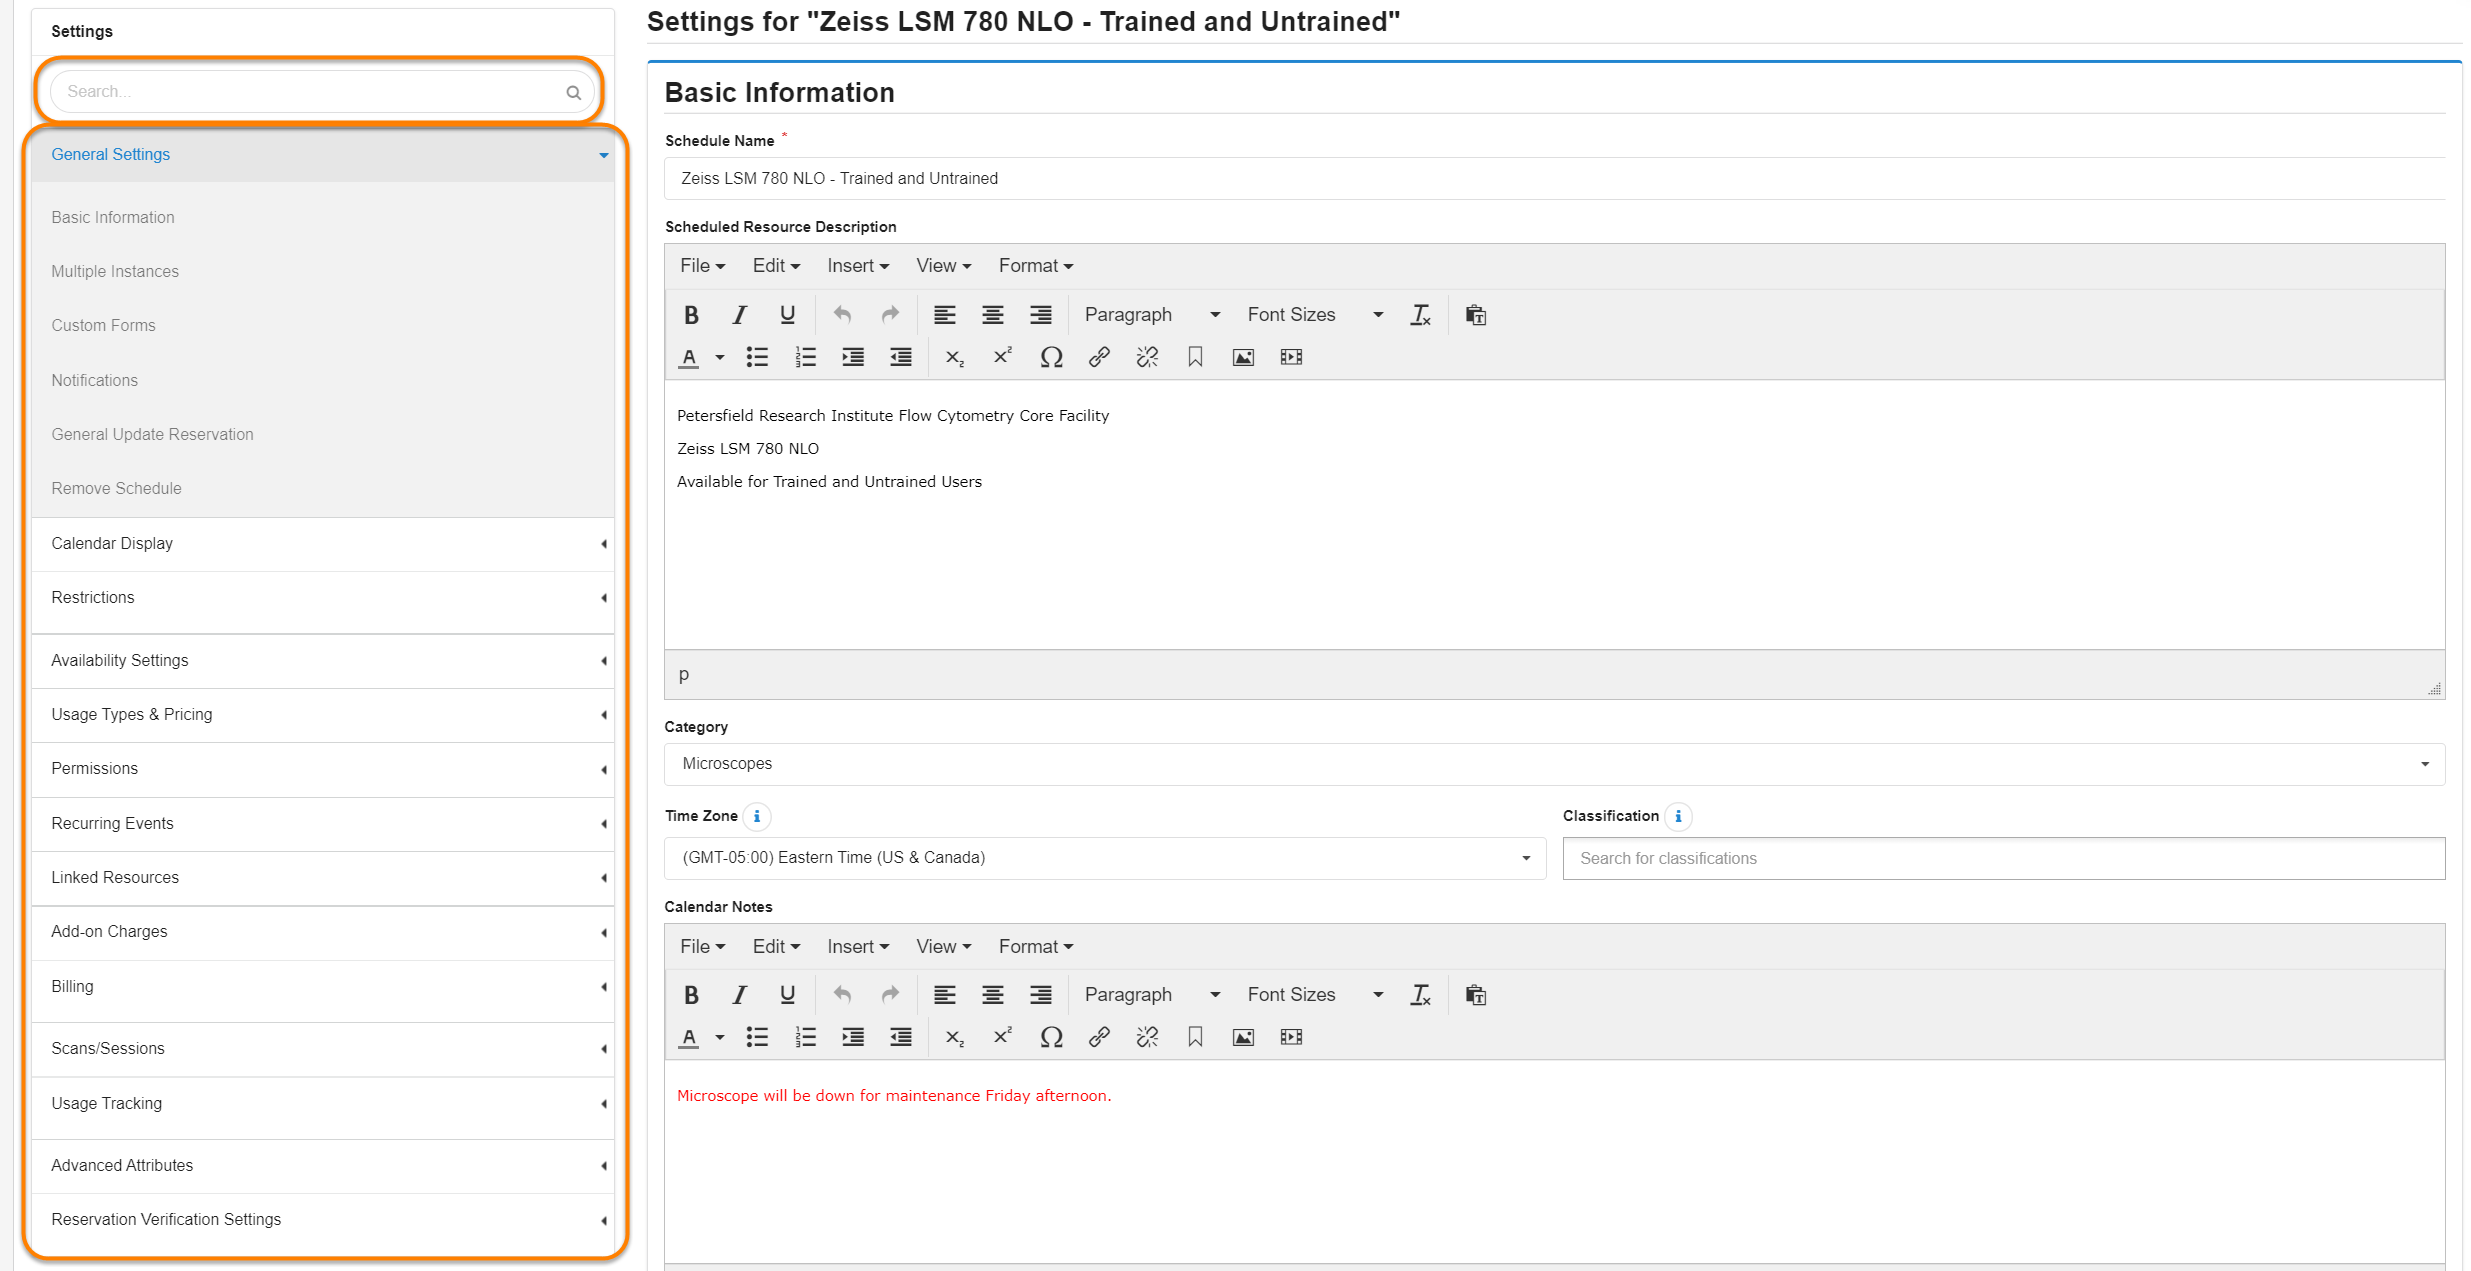
Helpful tips - Each editing panel within a page will need to be saved individually. Most settings have help text to explain the functionality of the setting. Hover the 'i' icon beside the field to review available help text.
General Settings
Basic Information
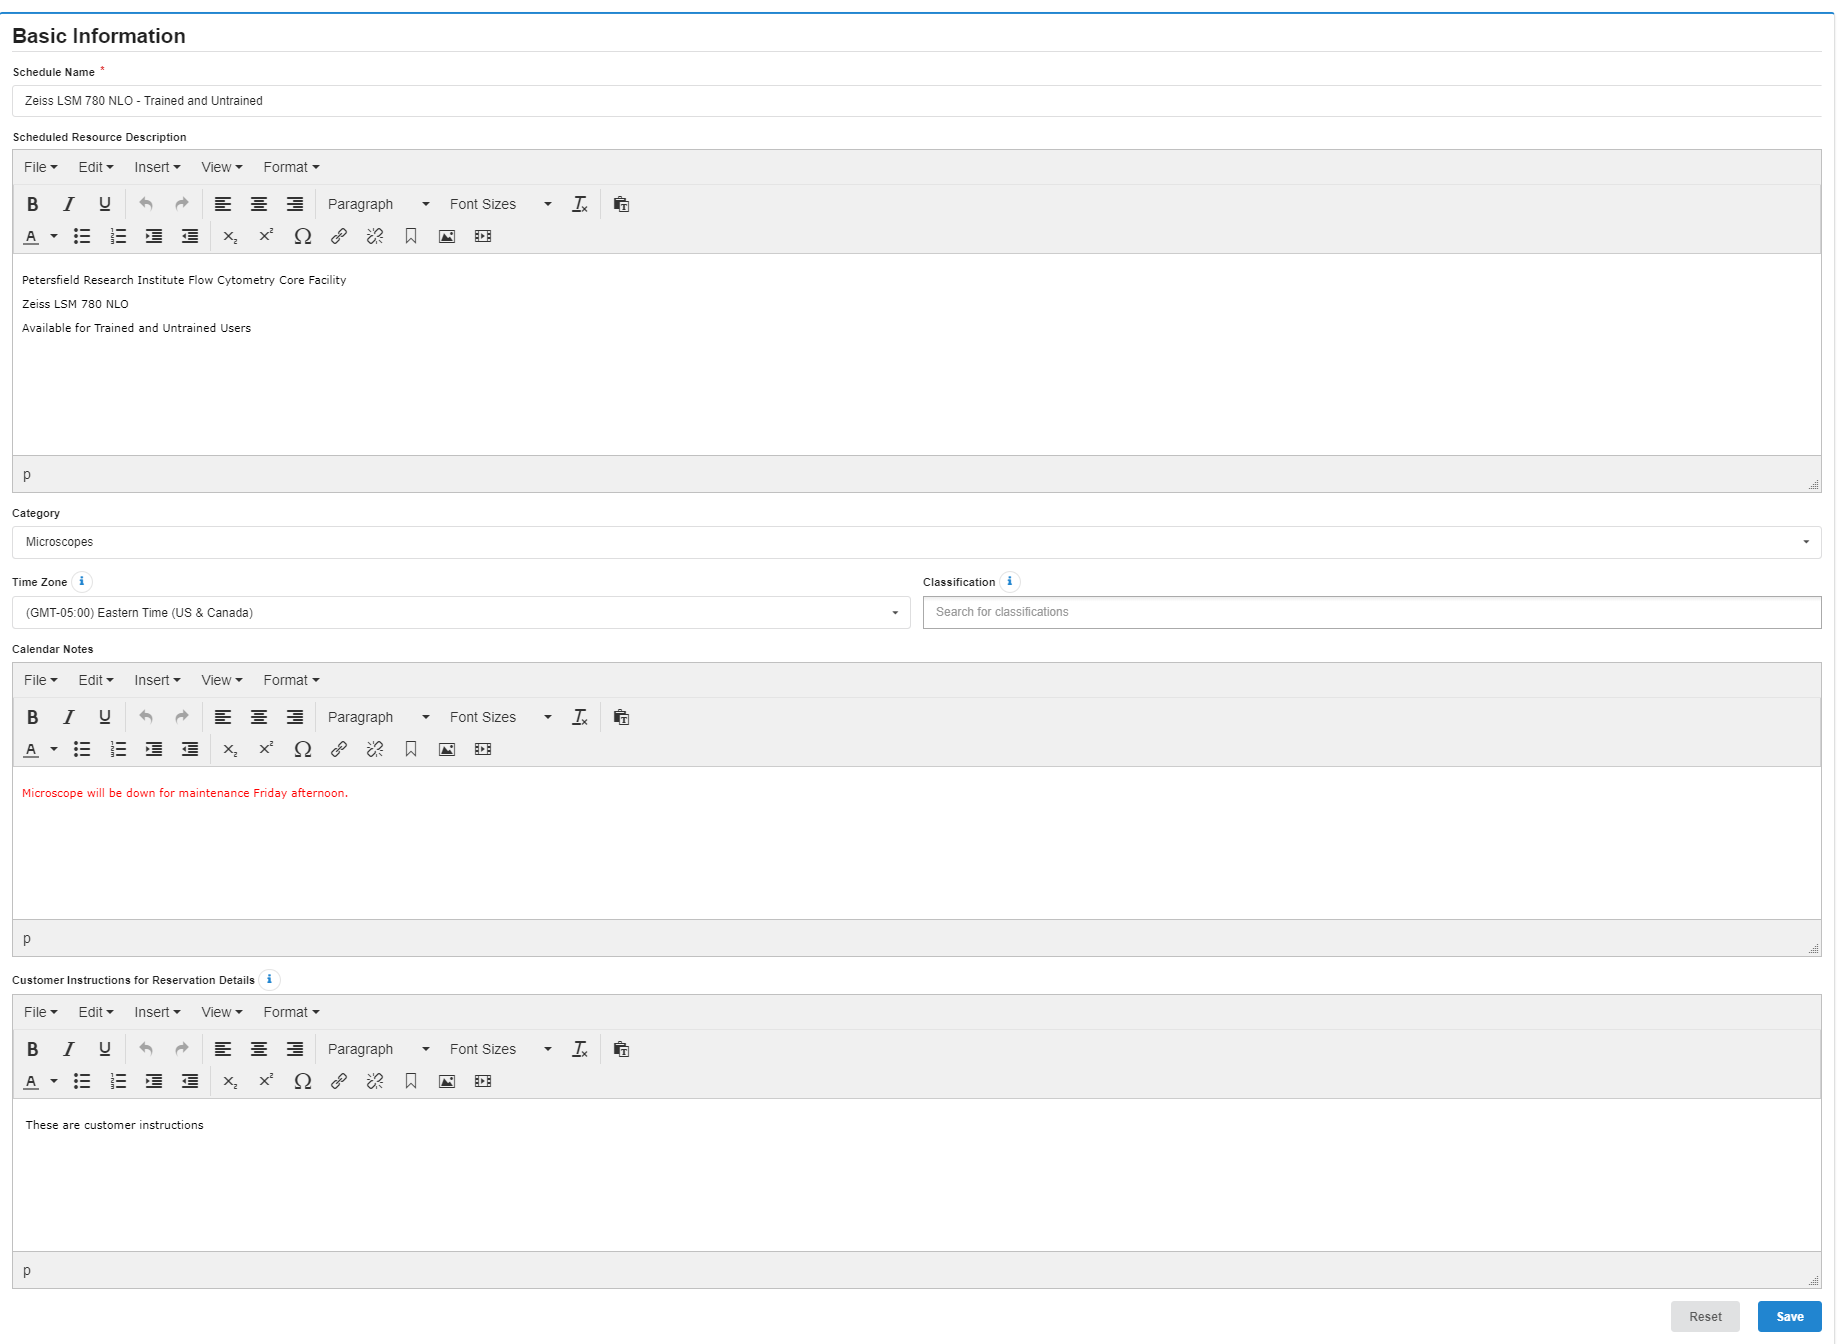
- Schedule Name: Enter a name for the calendar.
- Scheduled Resource Description: This text is displayed to the customer on the calendar interface. You can utilize this text section by providing an explanation of the resource, an image of the resource, billing information, or directions on scheduling.
-
Category: Allows you to group calendars into categories. To create a new category, click in the category drop down and select Add new category, this will create a free text text below where you can type in the name of the new category.
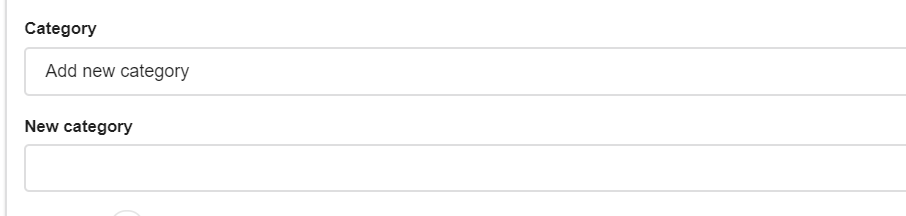 NOTE: If you would like your calendars displayed in categories, please contact iLab, as an additional setting needs to be enabled.
- Time Zone: Enter the time zone to be used for scheduling purposes. By default, this will be set to your institution's time zone. This setting will override the user's personal time zone setting when scheduling on the calendar.
- Classification: Assign a classification to the schedule that can be used to more effectively search for it. Available classification terms are derived from the Eagle I Resource Ontology Set.
- Calendar Notes: You can add a note here that will display above the calendar on the View Schedule page.
- Customer Instructions for Reservation Details: Instructions entered here will be displayed to the customer at the top of the Reservation Details page. For more information about the Reservation Details page, please refer to the Schedule Equipment article.
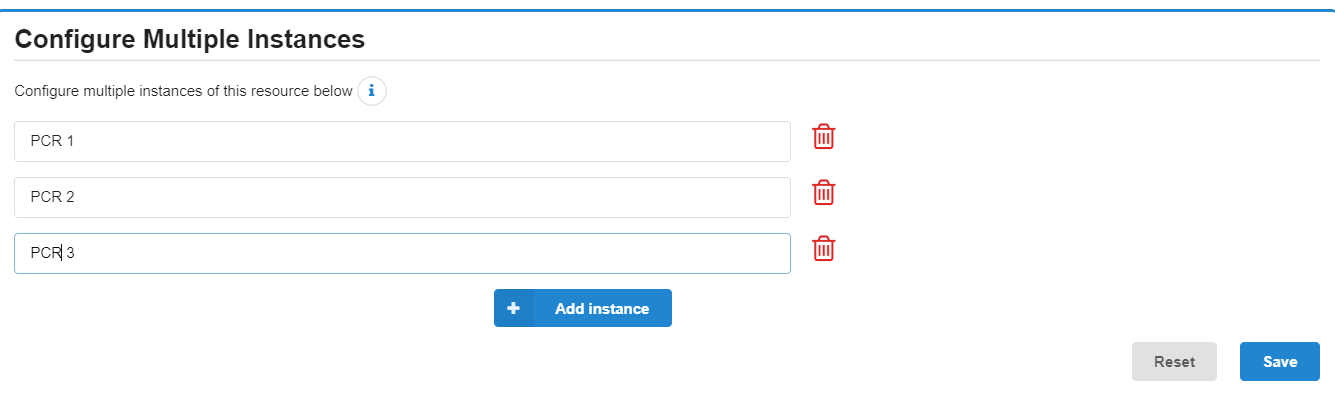
Multiple Instances
Multiple instances allows cores to create multiple calendars for resources within a single calendar interface. Users can then view all calendars at one time to schedule on the available resource. NOTE: The same calendar pricing and restrictions will apply to each instance. For example, if you have multiple PCR machines, you could enter each PCR machine as a separate row within the 'Configure Multiple Instances' section with the names "PCR 1", "PCR 2", "PCR3".
Custom Forms
Custom forms can be included when creating a reservation to capture preliminary information from the customer. Cores can create multiple custom forms and link them to individual schedules. When the user creates a reservation, the form will display in the 'Required Forms' section on the Reservation Details page. Form fields can be required or not to complete prior to submitting the reservation. To manage the forms available to the core, refer to Custom Forms.

- Include custom form on reservations detail page? (Y/N): Indicate whether any custom forms associated with this resource will be displayed on the reservations details page.
- Display a custom form when scheduling maintenance on this resource? (Y/N): Indicate whether a custom form should display when a maintenance reservation is created.
Notifications
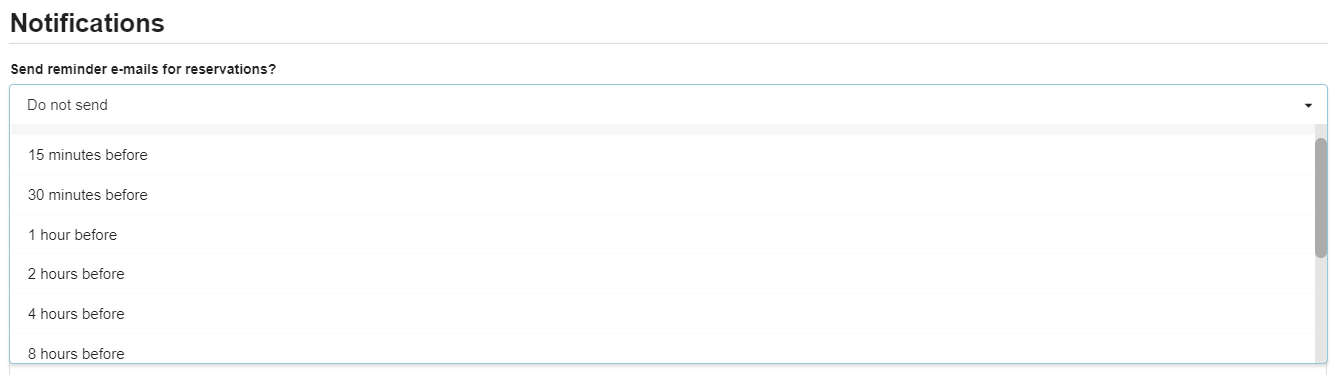
- Send reminder emails for reservations?: Select from the drop down the amount of time prior to a reservation when the user should receive a reminder email about their reservation.
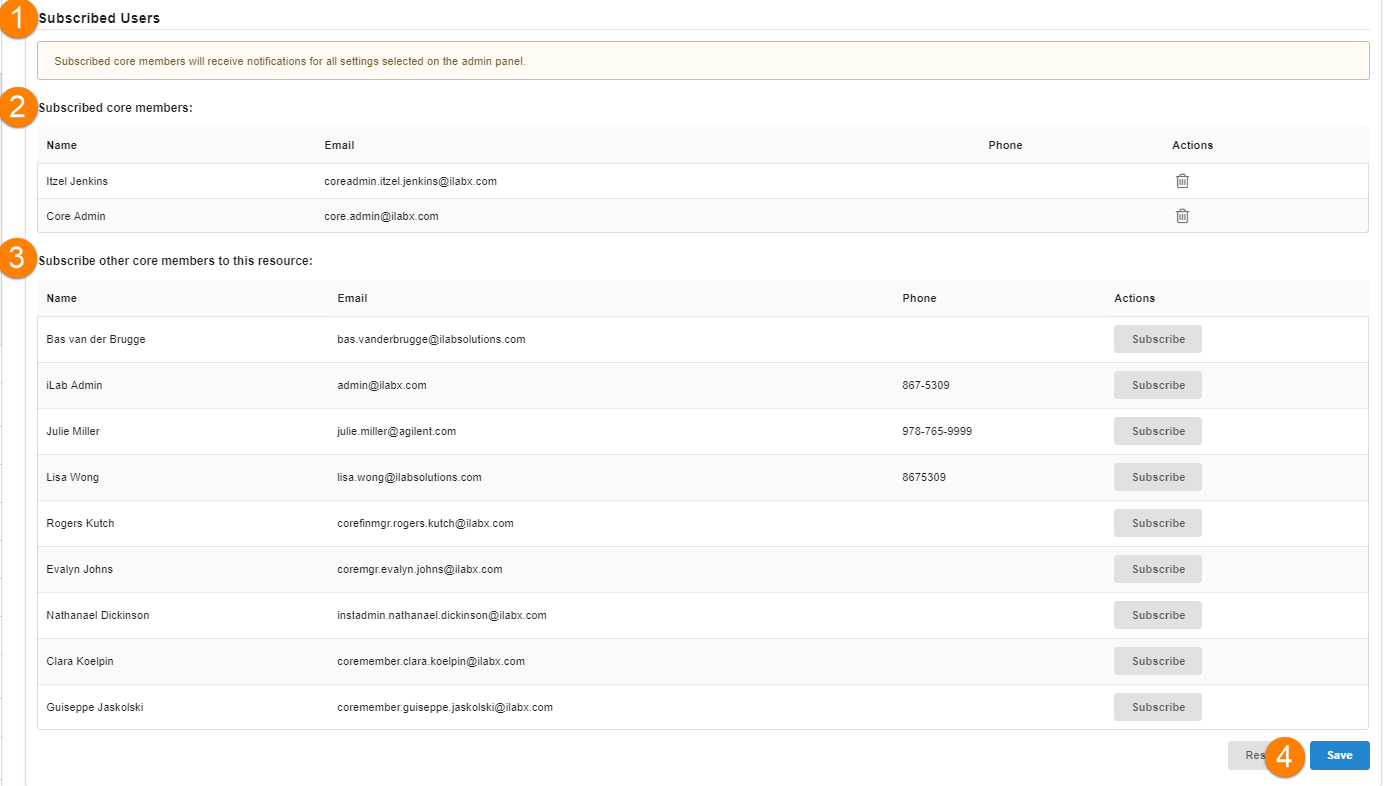
- Subscribed Users: The subscribing users feature allows core staff who are subscribed core members on a specific calendar to receive notifications for all settings selected on the admin panel.
- Subscribed core members: This section displays a list of core members that have subscribed to this calendar.
- Subscribe other core members to this resource: Select what core members you want to subscribe to the calendar. All members of the core will display as an option. Click on the 'subscribe' button beside their name to add them as a subscriber to this calendar. The subscribed member's name will display in the 'Subscribed core members' list. For more information on managing members of your core, please refer to the Members article.
- Click 'Save' to save subscribed core members.
General Update Reservation
- Update service name for reporting: This will update all charges associated with this calendar so they will be grouped in Reporting under the current service name (i.e. instance name). Please note: this action cannot be undone.
Remove Schedule

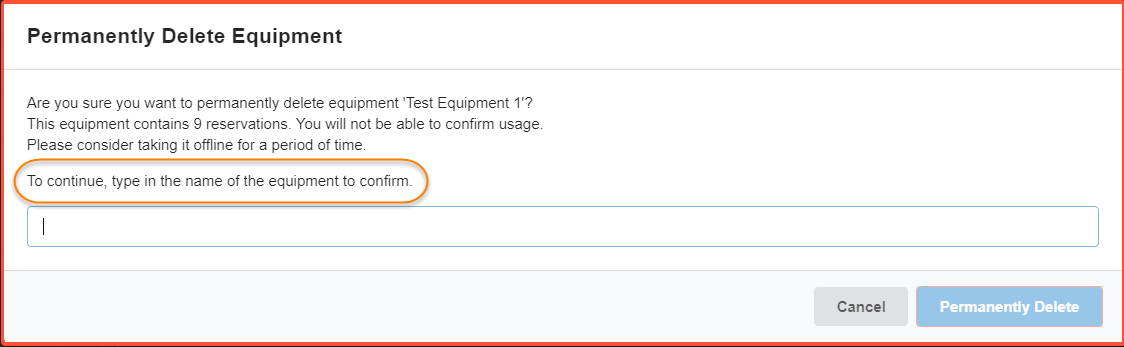
Click this button if you would like to delete the calendar/schedule completely. You will be prompted a second time to confirm you want to permanently delete the calendar. If current reservations exist on the calendar, you will need to type in the name of the resource to confirm deletion. Please note: this action cannot be undone.
Calendar Display
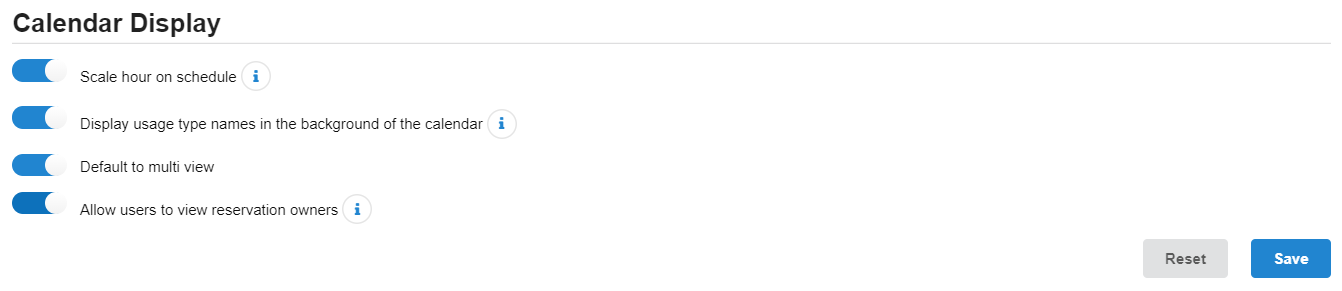
- Scale hour on schedule?: Check this box if you would like the hour on the schedule (y-axis) to scale to the minimum time step allowed on the calendar.
- Display usage type names in the background of the calendar: Turn this setting off to disable the written display of usage types as small text in the background of your calendar. This may limit the information immediately available to your customers, especially if they have a color vision deficiency or other sight impairment.
- Default to multi-view?: Indicate whether you would like the default calendar view to display all calendars when you have multiple instances.
- Let users see reservation owners: This allows users of the core to see the name and email of the person who created the reservation and is beneficial if cores encourage collaboration among customers.
Public Visibility

- Display this schedule to the public on your external landing page?: Choose whether to have this schedule, its description, and availabilities be displayed on the core's external landing page.
- Let public users see the reservation owners?: Choose whether you would like the public to be able to view the owner of reservations.
Restrictions
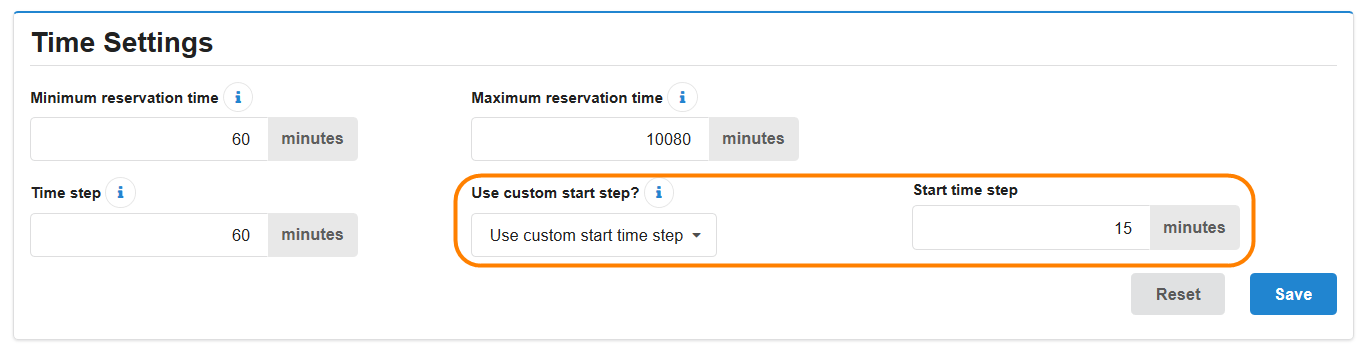
Time Settings
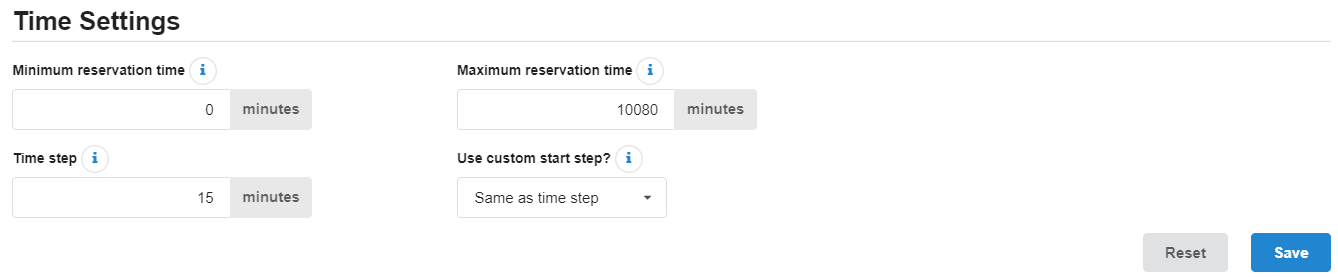
- Minimum reservation time: The minimum amount of time the customer can schedule in one session.
- Maximum reservation time: The maximum amount of time the customer can schedule in one session.
- Time Step: The increment of time by which the event can be increased or decreased.
- Use custom start step: Define this field if you would like reservations to start at a specific time in the hour different from the Time Step. For example, if you enter 30, reservations would start on the half hour only: 12:00 or 12:30, 1:00 or 1:30, etc.
User Access
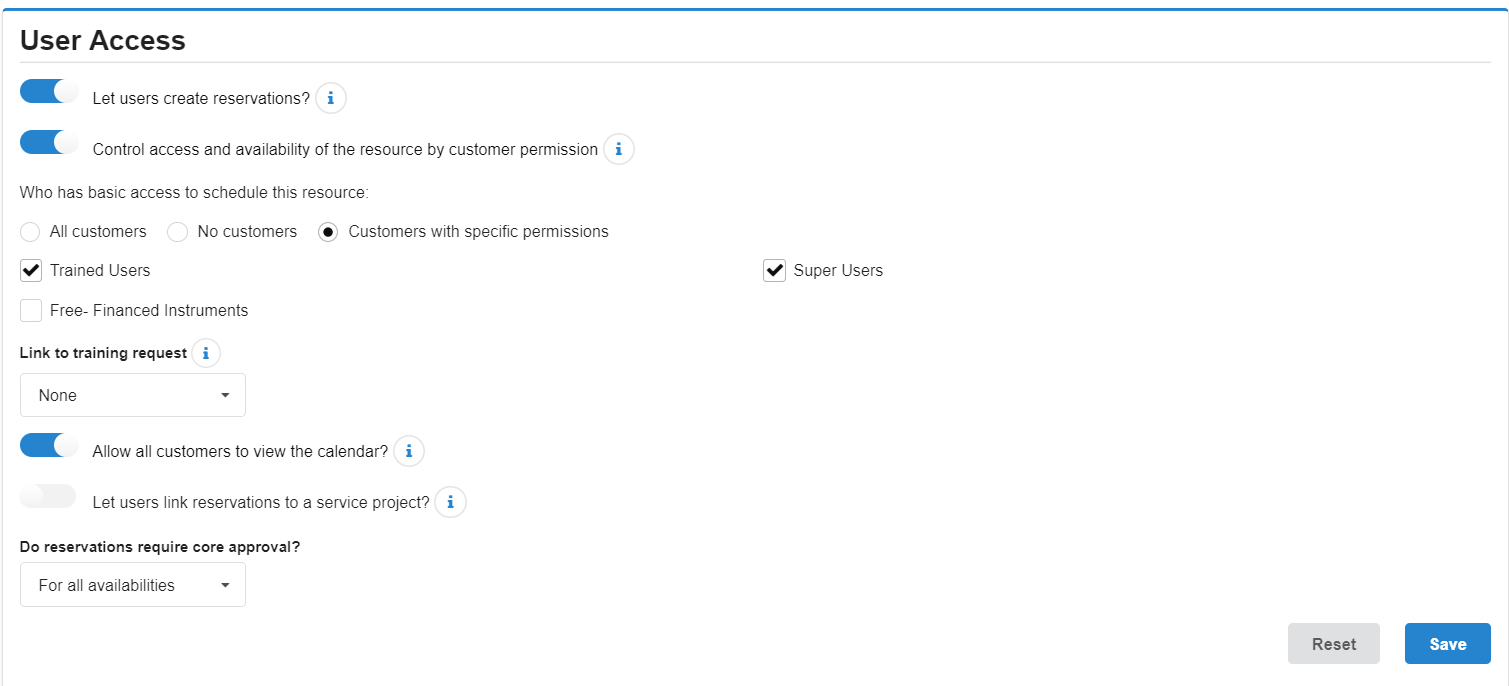
- Let users create reservations?: If this is set to no, only core administrators will be able to create reservations.
- Control access and availability of the resource by customer permission: Turn this setting on if this resource uses permission groups to allow different access for different users.
- Who has basic access to schedule this resource: If the prior setting 'Control access and availability of the resource by customer permission' is turned on, the ability to manage permission groups for the resource is displayed. You can choose to make the resource active to all customers, no customers (staff only), or only specific permission groups.
- Link to training request: You can select one of the service project templates you have created on the 'Request Services' tab here. This will present a link on the schedules list view to redirect the customer to a training request.
- Allow all customers to view the calendar?: Turning this setting on allows internal and external customers to view the calendar interface, regardless of their training status.
- Let users link reservation to a service project?: This setting allows users to assign the reservation to a processing project request. The reservation will then display within the selected project on the view all requests tab.
- Do reservations require core approval: If set to 'yes' or 'only selected availabilities' reservations can be set to require approval from core staff before customers start their reservations.
Cancellation and Edit Policy

- How many hours in advance must a user make a reservation?: Enter the minimum number of hours in advance users must schedule a reservation. Example: If 1 is entered, users will be required to schedule at least 1 hour prior to the start of their reservation. This setting may be set at 0 to allow users to schedule up to the minute provided the calendar has availability.
- Edit/cancellation period: How many hours in advance of the reservation are required to make changes to the reservation or freely cancel it. Once the Edit/Cancellation Period has passed, users are not able to fully delete the reservation, edit the length of the reservation or edit the start time of the reservation. However, they may be able to cancel the reservation (potentially incurring a cancellation fee) depending on the settings below.
- Up to how many days in advance can a user make a reservation?: Enter the maximum number of days in advance users can schedule a reservation.
- Can users cancel after the edit/cancellation period and allow other users to reserve that time?: Turning this setting on allows users to cancel but not delete their reservation during the Edit/Cancellation Period. Cancelling leaves a "ghost reservation" for the core indicating that the reservation was canceled during the cancellation period. The core can then exercise their cancellation policy if the time was not re-booked by another user.
- Allow cancel approved?: Define whether a reservation that requires core administration approval can be canceled after approval has been obtained. Turning this setting on allows the user to cancel their approved reservation prior to the Edit/Cancellation period.
-
Charge a cancellation fee: When this setting is enabled, it provides for two configuration options:
- Fee structure: Set either to "Flat fee" or "Percentage of reservation total"
- Fee amount: Select the flat fee amount or percentage, depending on the option chosen above.
Note that cancellation fees only apply if an "Edit/cancellation period" is set and the "Can users cancel after the edit/cancellation period and allow other users to reserve that time?" setting above is enabled. If the user then attempts to cancel during the cancellation window, they will be presented with a pop-up to confirm the cancellation and accept the listed fee (see Schedule Equipment ). When a canceled event is billed, the invoice will have two lines: one for the event, totaling 0.00, and one for the specified cancellation fee. As a core administrator, you have some flexibility in applying the cancellation fee, as discussed in View Schedule.
With the introduction of cancellation fees, the system will automatically mark cancelled events as not billable. If confirmed, those events can be included in the invoice with 0.00 amount. This way, facilities that do not charge for cancellations can keep their cancellation fee setting off, and cancelled events will be confirmed automatically as no-charge events.
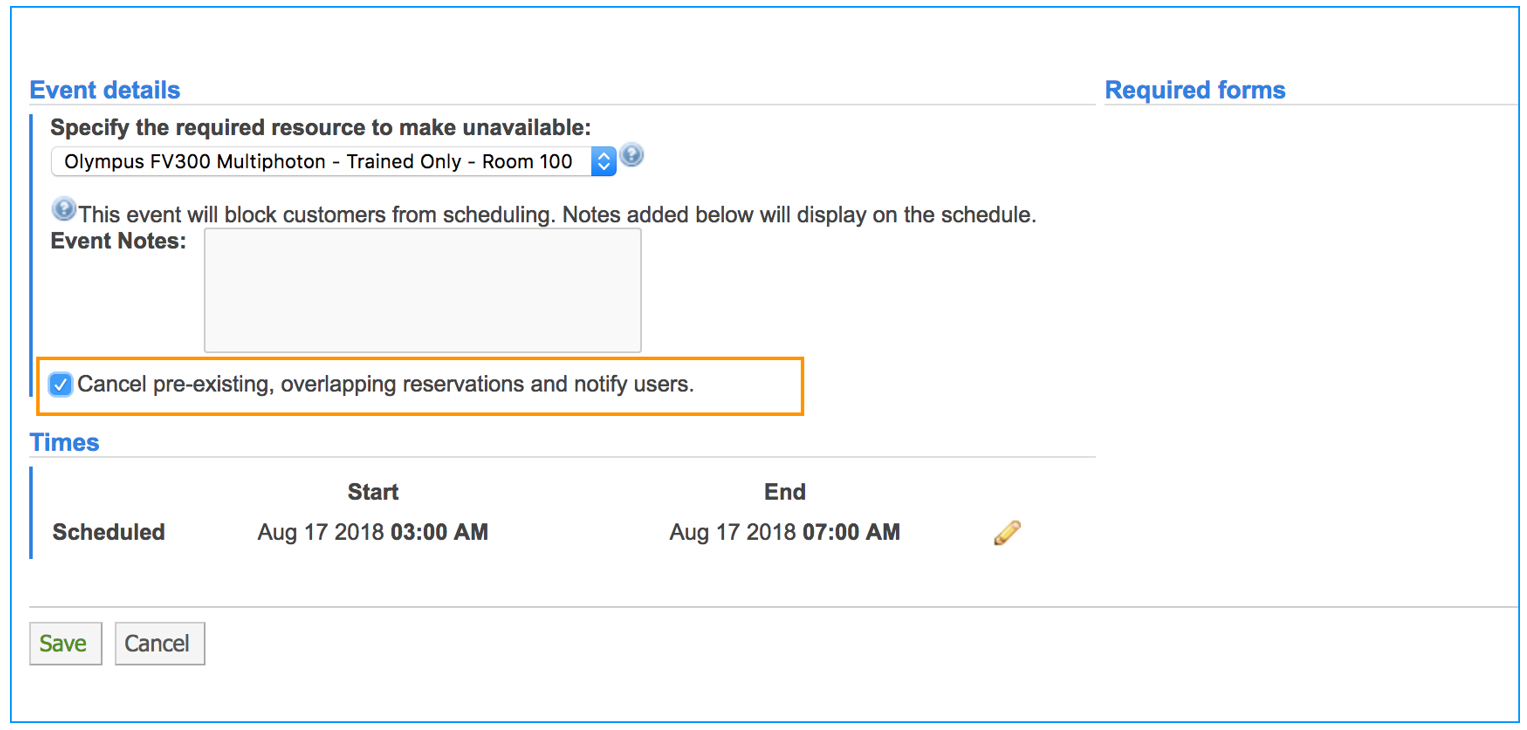
When a core manager need to schedule maintenance events over existing reservations (for example, when the equipment is broken), and they want to indicate that it can’t be used, they have the option to cancel those overlapping user reservations. When events are cancelled like this, cancellation fees will not be applied and there will be no warnings.
Core managers can report on cancelled events using the standard Reporting interface, using the Event Type filter and selecting the cancelled type.
Buffer Times
Buffer times will automatically block time before and/or after a reservation for required procedures such as cleaning and set up. When turned on the required buffer will be added to all reservations. The buffer times will function as normal reservation times where users are unable to have them overlap another user's reservation, as a Core Admin you will have the ability to bypass this when you create a reservation.
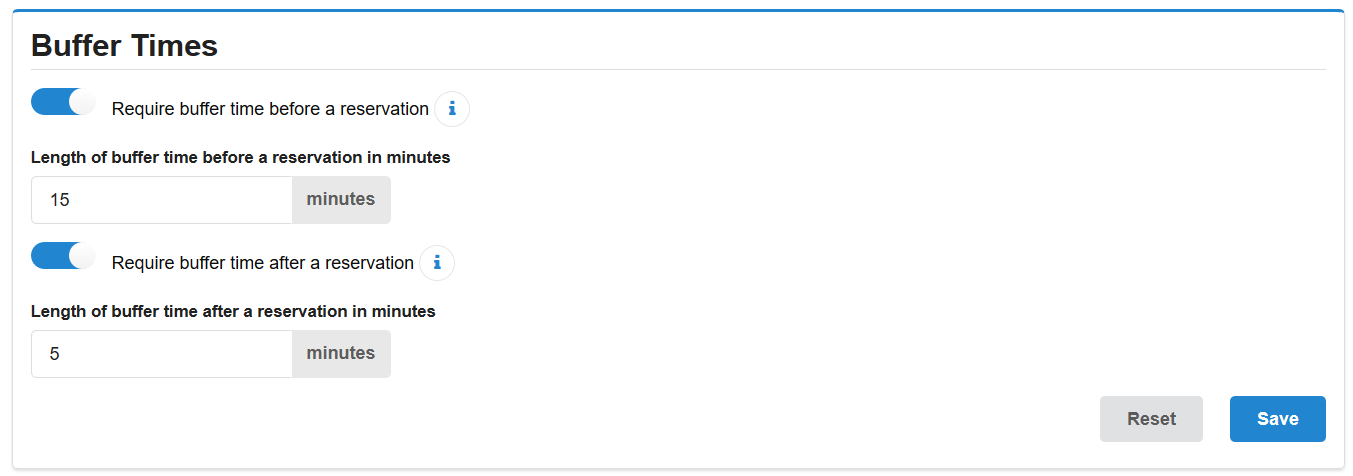
- Require buffer time before a reservation: When turned on this will automatically add the non-billable buffer time in minutes to the beginning of every reservation.
- Length of buffer time before a reservation in minutes: Indicate here the buffer time in minutes that will be added to the beginning of all reservations.
- Require buffer time after a reservation: When turned on this will automatically add the non-billable buffer time in minutes to the end of every reservation.
- Length of buffer time after a reservation in minutes: Indicate here the buffer time in minutes that will be added to the end of all reservations.
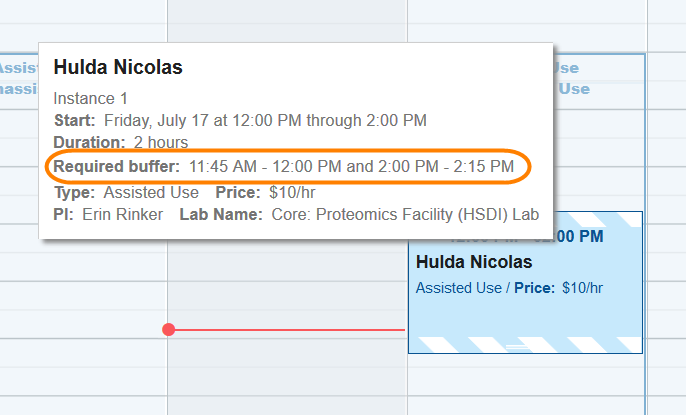
When a reservation is created that contains a buffer, the buffer time will be indicated before and/or after the reservation with an additional time block.
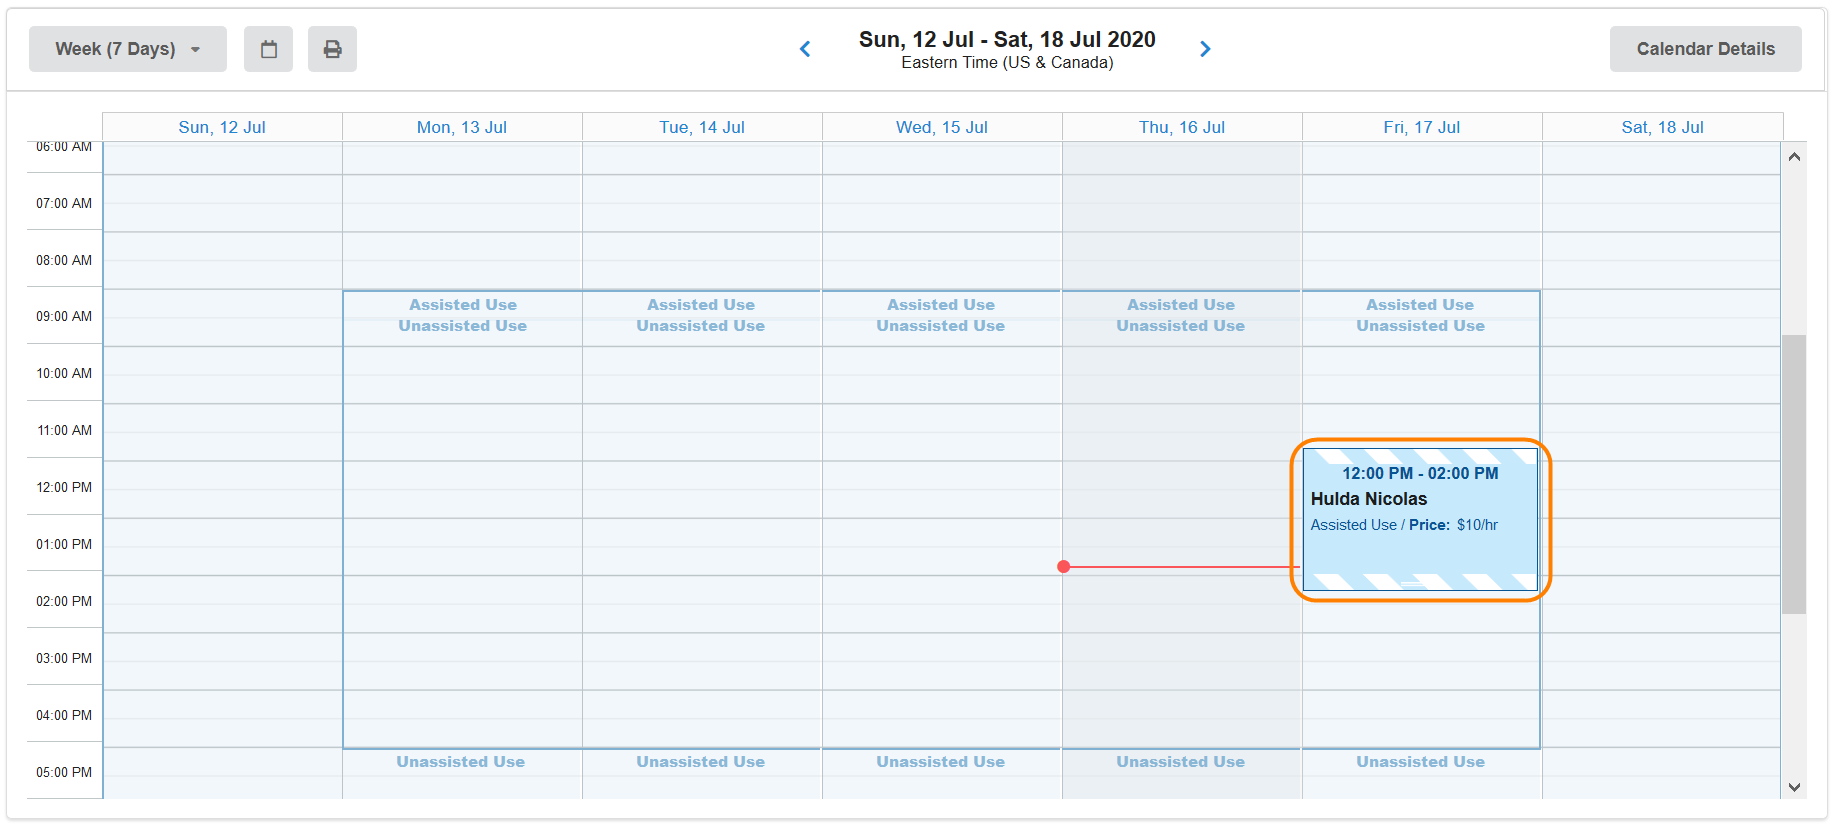
If you hover over the reservation the required buffer will be displayed within the details.
Note: If your schedule has a large time step such as 60 minutes, adding a buffer will impact the number of hours that are available for your users to book. To resolve this you can continue to have the large time step but select the option Use custom start step and set a smaller start time step. This will allow users to continue to make reservation by the time step for example 60 minutes but not require that each reservation start on the hour.
Availability Settings
An availability is a predefined set of circumstances that is defined under the usage type and pricing section. This section allows for you to set limitations and defaults around those usage types to be applied to the calendar.
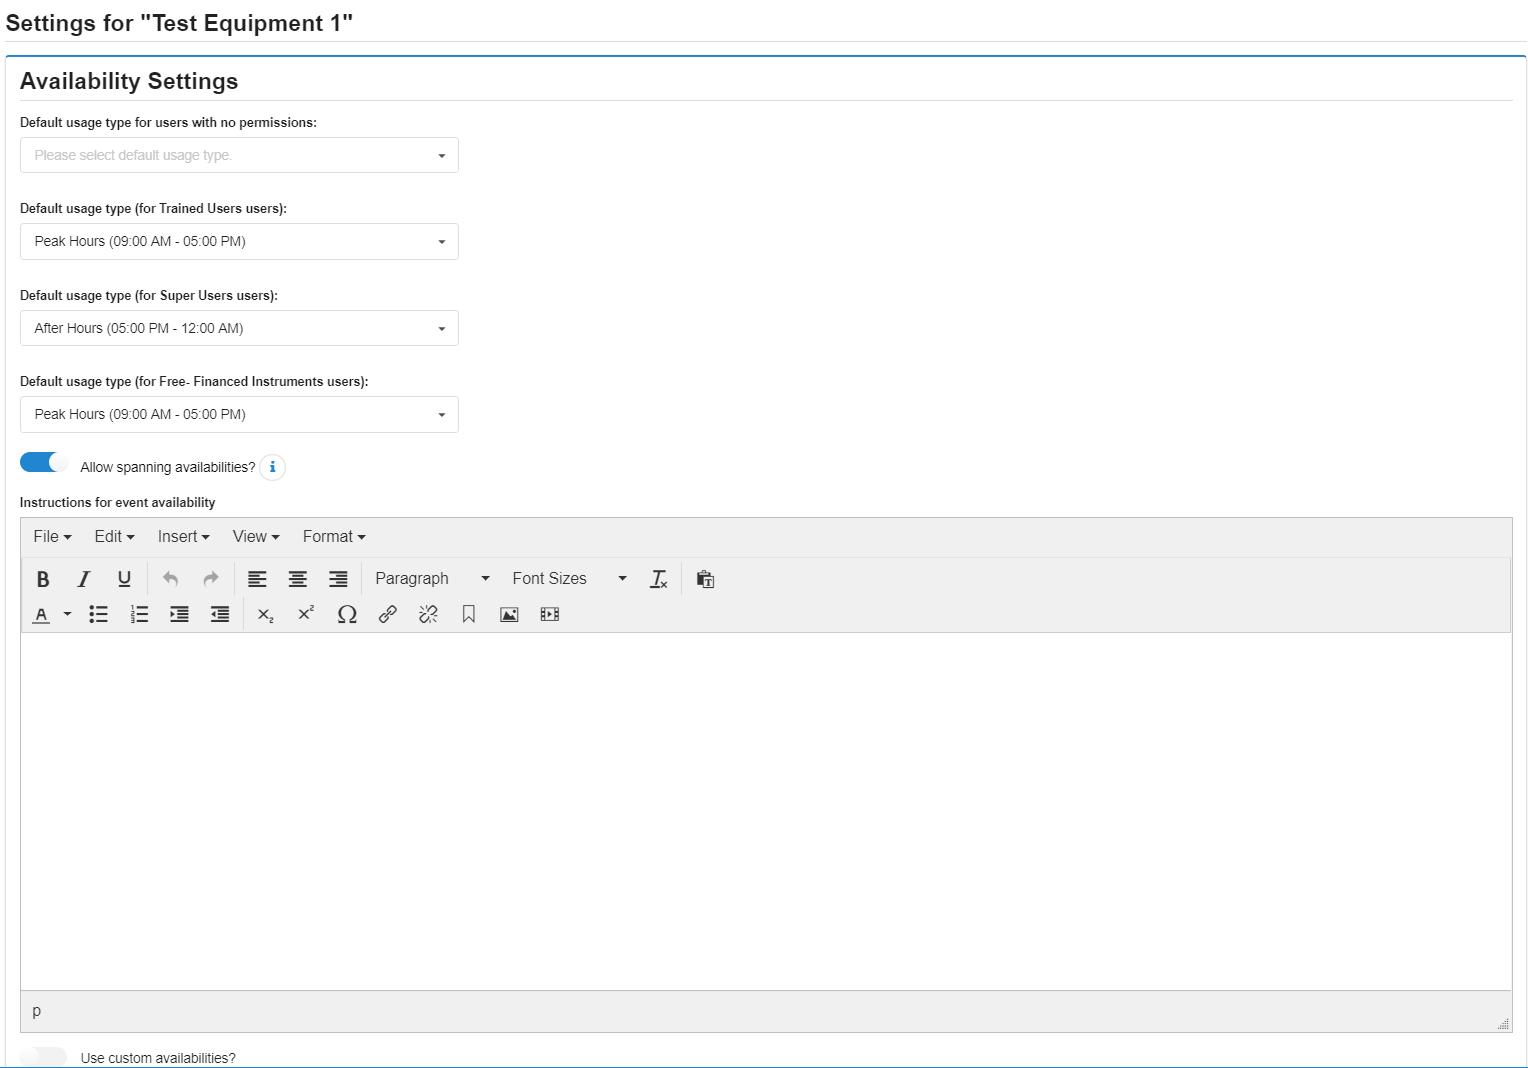
- Default usage type for users with no permissions: Select the default usage types that should display when users are not in any permission groups.
- Default usage type (for Trained users, etc.): Select the default usage types that should display when each permission is shown. This section will populate a number of rows depending on how many permissions have been added (up to 10).
- Allow spanning availabilities?: This setting controls whether or not customers can schedule events that cross from one availability into another availability (i.e.- peak to non peak hours) . If this setting is turned off, the customer would need to schedule one event for each availability.
- Instructions for event availability: These instructions can be viewed in the reservations details screen when users are selecting an availability.
- Use custom availabilities: Turning this setting on allows for core staff and users to be able to schedules ad-hoc reservation at any open time on the calendar. This setting overrides other restrictions placed upon the calendar.
Usage Types & Pricing
A usage type is a predefined reservation type created with specific scheduling and rate parameters. For example, you may allow the usage type "Independent User" to schedule from 8am - 5pm, M-F and set the cost of usage during that time frame to a specific amount. Within each usage type, rates can be set differently for each price types (i.e.- external, internal, corporate) and can differ among different usage types. Core admins can also designate if this availability requires a certain Permission level or approval for users within each usage type.
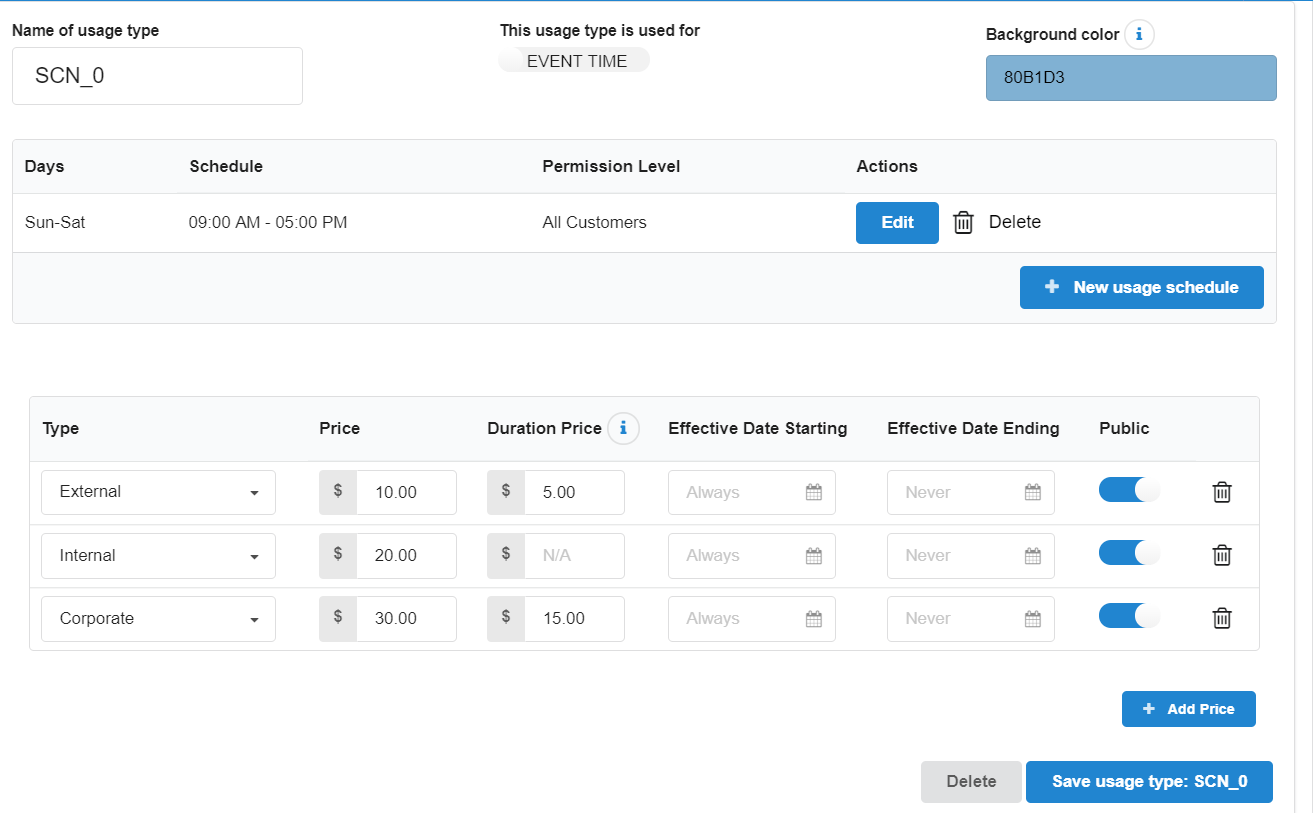
- Name of usage type: Name your usage type. Example of frequently used usage types are Independent, Assisted, Peak, After Hours, etc. This is a free text field that can be configured to your site.
- Background color: Define which color should display on the calendar for this usage type. HINT: Lighter colors are easier to view. Every usage type has a color to help define that particular time frame when viewing the calendar.
- New usage schedule button: Under the Actions column, use the Edit button to define the days and times for this usage type. Depending on the restriction settings, you can also select whether training or approval is required for this usage type.
- Custom Fields: If set on the institution level, cores will have the option to set custom billing fields per calendar.
- Type: Select the price class(es) utilizing this usage type. Price classes are defined at the institution level.
- Price: Define the per price class for the usage types.
- Duration price: If enabled by an iLab Associate, you can set the Duration Price field to apply a discounted rate after a specified number of minutes. See Duration Pricing for more information.
- Effective Date Starting: Enter a start date for this current rate, if applicable.
- Effective Date Ending: Enter an end date for this current rate, if applicable.
- Public: Define whether this usage type should be displayed on the external landing page.
Permissions
Calendars and individual usage types can be set to allow only certain users to schedule depending on the permission group they are part of. Permission groups for users are managed within the calendar edits under the 'Permissions' section. Groups of users can be added in bulk via the People Tab.
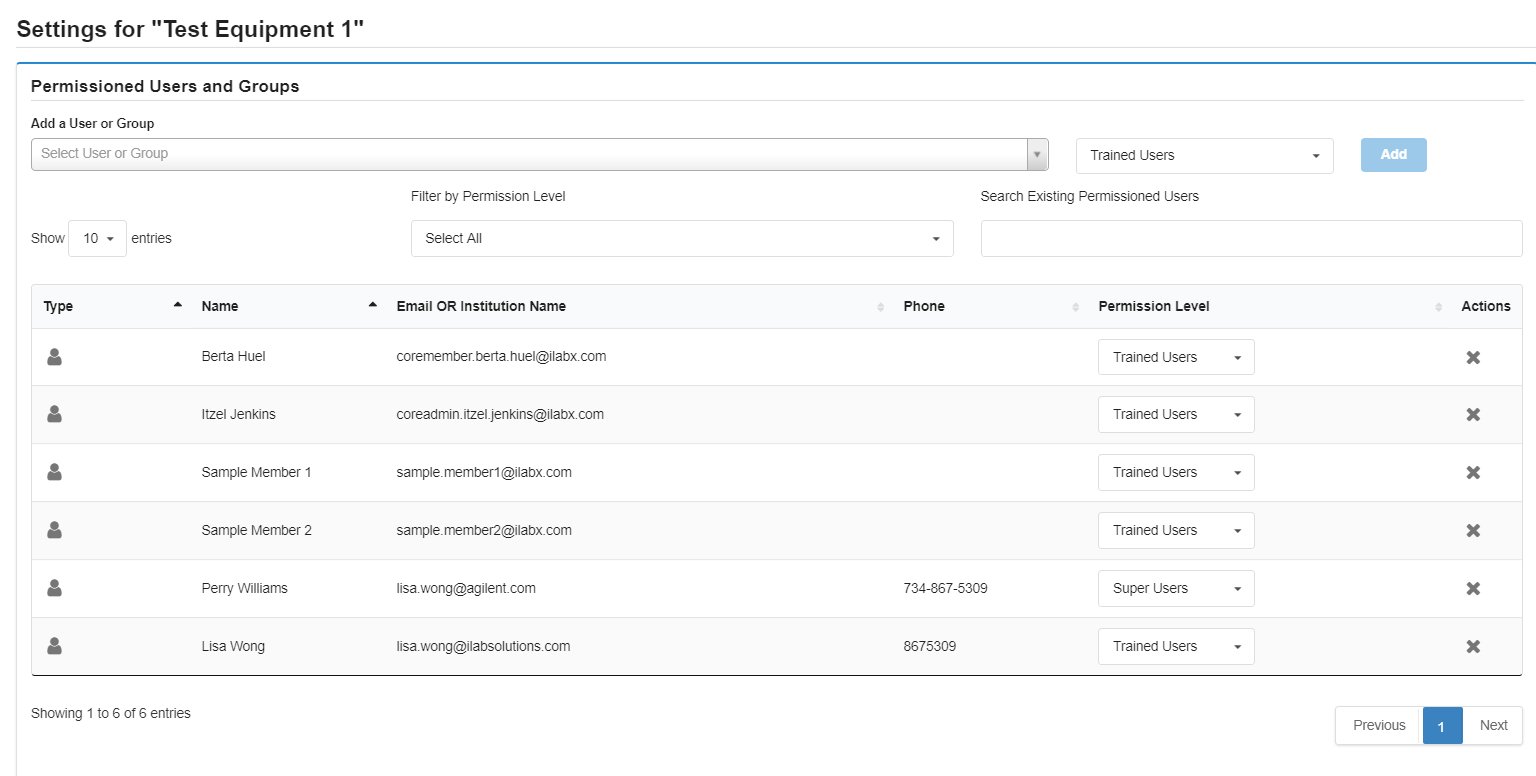
- Add a User or Group: To add a new user or group, enter the name of the user or user group to search and then select it from the drop down. Then select the permission level that applies to the user or group and click 'Add'.
- Permissioned users list: This section displays a list of current permissioned users and groups. Use the 'Filter by Permission Level' field to search for existing permissioned users. Users can be removed from the list by selecting the X to the right of their name.
Recurring Events
Recurring reservations are reservations you would like to repeat at the same time on pre-defined days, for a specific amount of time. For example, you may want to schedule a resource every Wednesday from 1pm - 3pm, for the next five weeks.
Recurring Events must first be enabled under the Administration tab of your core. For more information refer to Scheduling Settings to enable the Recurring Events module, and the Recurring Events Settings section for more information on a number of specific settings.
Within the calendar edit section of your core, select the Recurring Events panel to manage users you will allow to create recurring events (dependent on the settings set under the Administration tab).
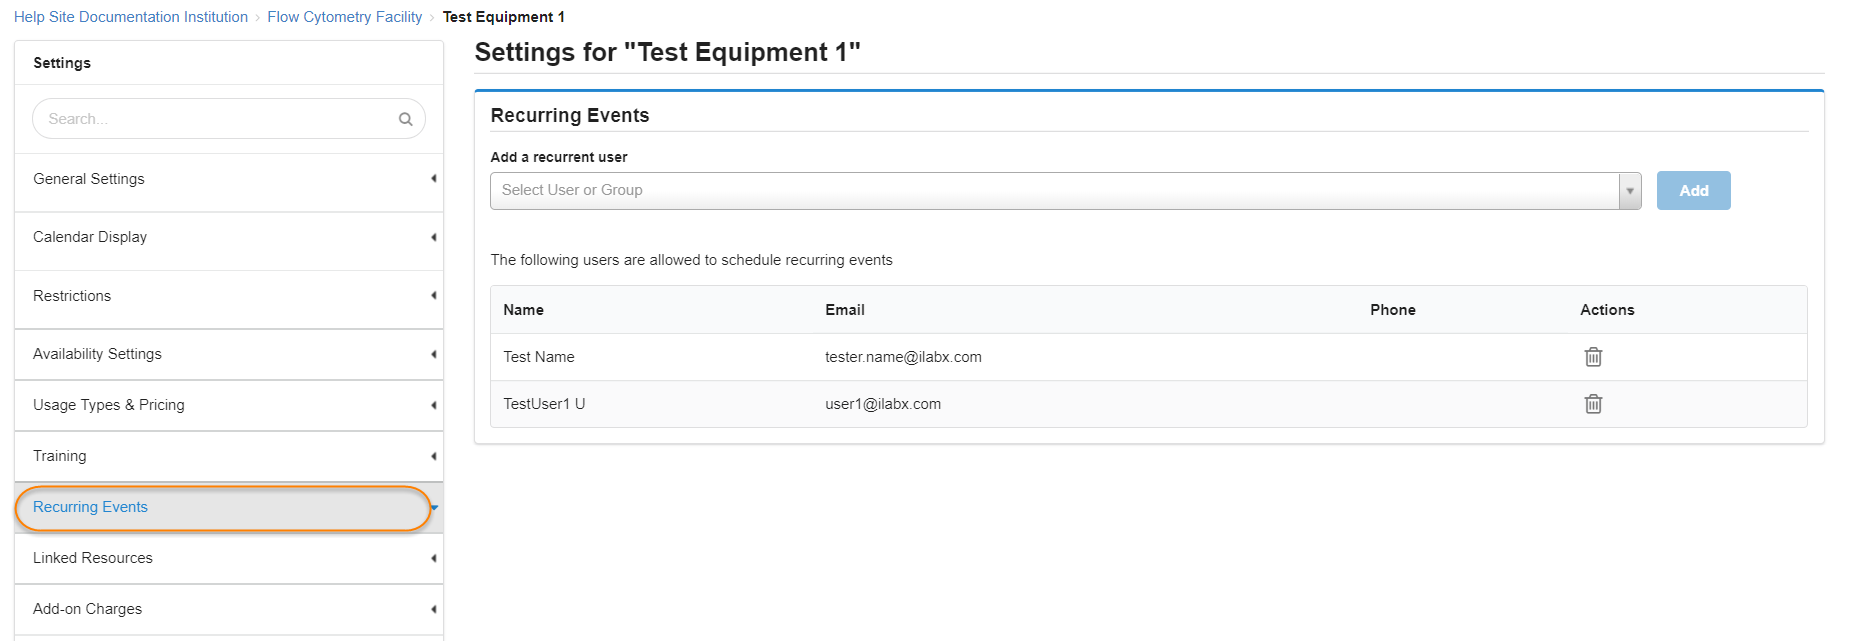
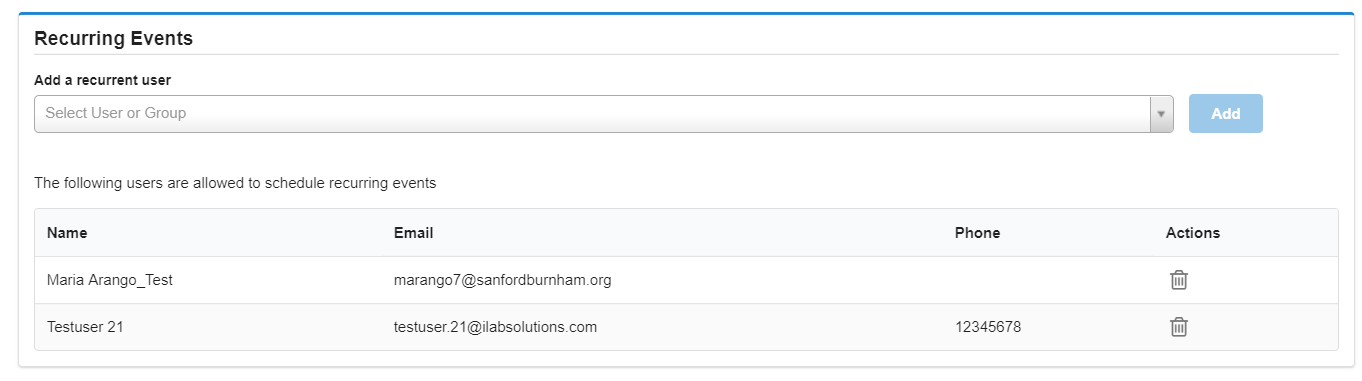
- Add a recurrent user: If your calendar has been designated to accept recurrent reservations, you may select to only allow specific users access to the recurring reservation functionality. To add a recurrent user, search for the user by typing their name in the text box, then select the appropriate user. Click 'Add'.
Linked Resources
Linked resources are resources needed to be scheduled in tandem. If you decide to link other resources, you may choose to make the linked resource optional or required depending on your workflow needs.
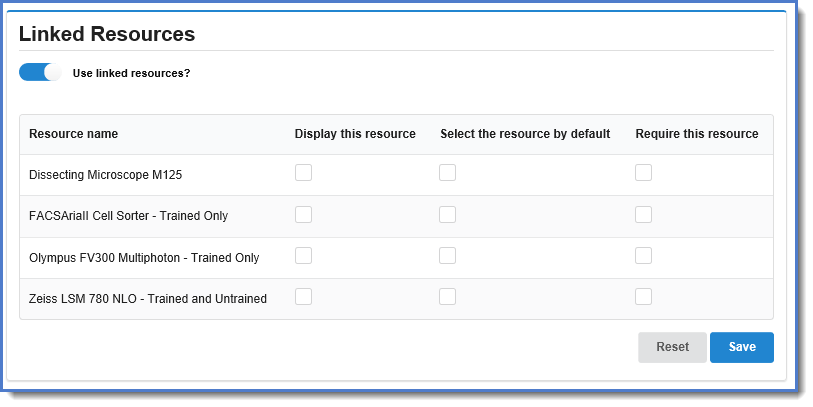
- Used linked resources?:
If this setting is set to yes, a list of all resources in the core will display. Select from the following options:
- Display this resource: Select this field if you would like the calendar to display as an option for users to select as a linked resource. Selecting this option does not automatically book the additional resource.
- Select the resource by default: Select this field if you would like each new reservation to reserve the linked resource by default, but would like for users to be allowed to de-select the linked resource if needed.
- Require this resource: Select this resource if you would like the linked resource to be automatically booked by default. The user would NOT be able to de-select the linked reservation.
Add-on Charges
Service charges can be added to reservations when needed. As a core admin, you can manage add-on charges by adding default charges to reservations, allowing only specific charges to be added to a reservation, and/or determining if charges are available for customers or only core staff to add.
Add-on charges must first be enabled under the Administration tab of your core by enabling "Allow 'add-on' charges in reservations" in the Scheduling Settings.
Once enabled, select the Add-on Charges panel to manage add-on charge details.
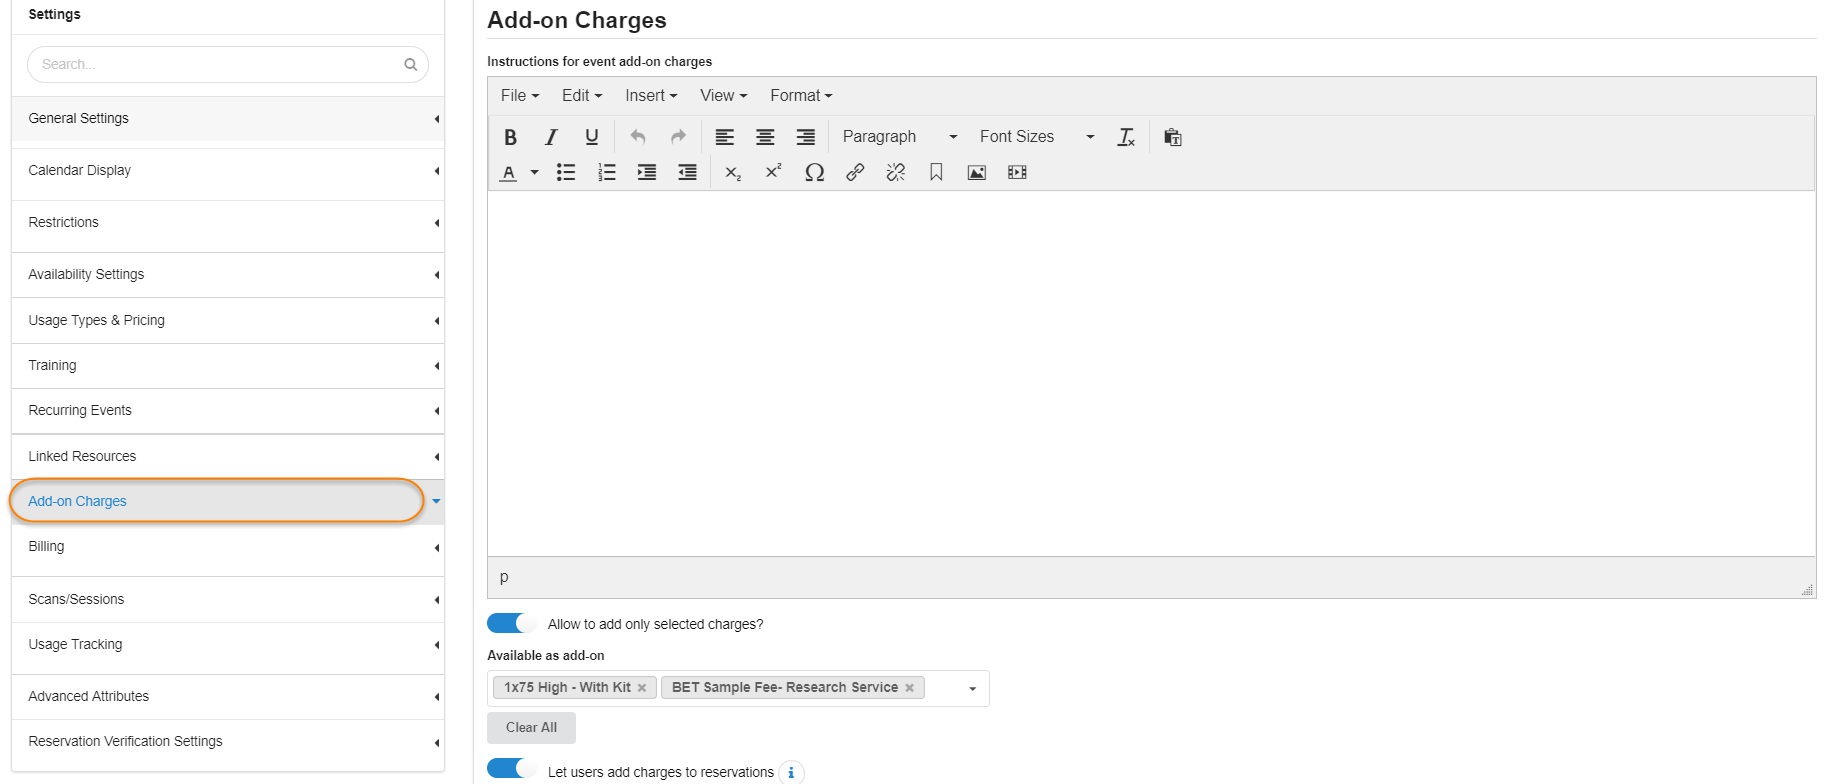
Add-on Charges
- Instructions for event add-on charges: You may enter instructions to direct the user on adding additional charges to the reservation that will display on the reservation details page.
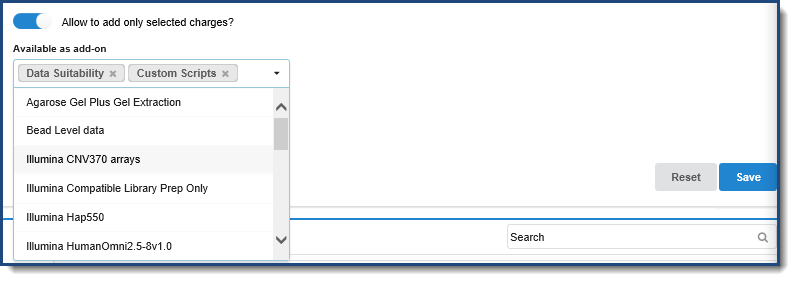
- Allow to add only selected charges?: You may designate that only specific charges from the Service List are available to add. To do so, click the down arrow to view the list of charges that pull from your Services List. Select the charge you wish to add. The charge will populate in the box above the service list.
- Let users add charges to reservations: If this is set to no, only core administrators will be able to add charges to reservations. This includes the both the reservation details and the kiosk interface.
Default Add-on Charges
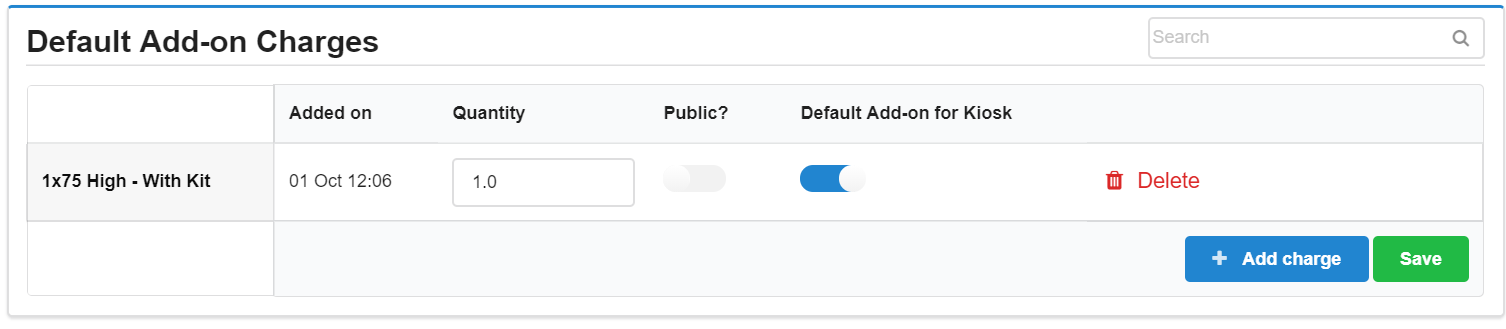
Charges can be added to a reservation by default (Note: The core setting to allow add on charges must be defined as YES). To do so, click the down arrow inside the text box and select the charge you would like added by default. Enter the quantity of this service to be added to each reservation. You may also select to turn on the 'Public' setting to display this charge on the external landing page if you have made the resource public. Multiple default charges can be added per reservation. If you would like these add-on charges displayed on the Kiosk interface, you will toggle the section to 'Default Add-on for Kiosk'. Be sure to click the 'Save' button to save all changes to this section.
Billing
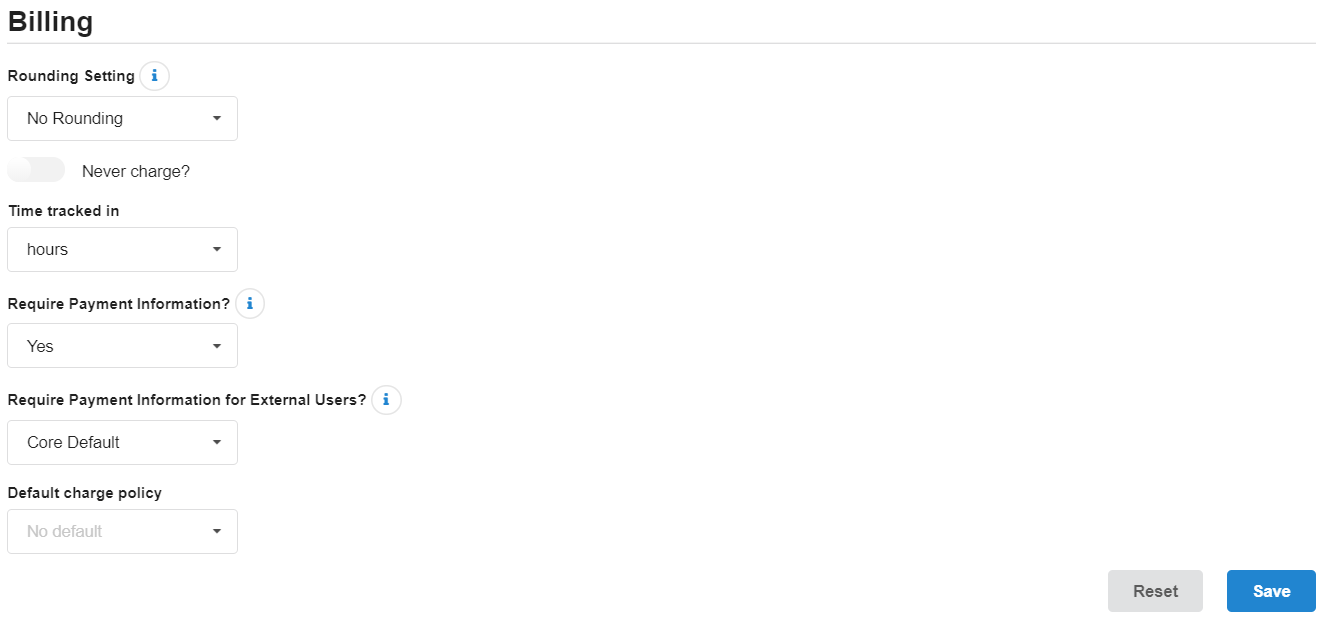
- Rounding Setting: This setting will determine how billed time will be rounded to time step increments. The options are No Rounding, Round to the nearest, or Round Up. In the case of the first increment, 'Round to the Nearest' will round up.
- Never charge: You may select to never charge for this resource.
- Time tracked in: Select to track time in minutes or hours.
- Require Payment Information: Indicate whether internal customers must provide a payment number or fund code prior to starting their session. When selecting Core Default, the system will defer to the setting that are set at the core level.
- Require Payment Information for External Users: Indicate whether an external customer must provide a payment number prior to starting their session. When selecting Core Default, the system will defer to the setting that are set at the core level.
- Default Charge policy: Indicate the way the system will charge by default: Scheduled time, Logged time, or Maximum time.
Subsidies

NOTE: This setting must be turned on by your iLab Project Manager and requires a financial integration.
A subsidy is a form of financial aid or support extended to an institution to help with the payment of specific elements of scientific research. Subsidies can be applied to the core as a whole or set service by service.
To search existing subsidies, enter the subsidy name in the Search box then press <Enter>. Select the appropriate subsidy from the list that displays.
To learn more about subsidies, click here.
Scans/Sessions
Scans are essentially a stopwatch in the calendar. When scans are turned on, the user can open the reservation and stop/start time as they are utilizing the reservation. Scans are typically used by clinical cores that have prep time and actual test time as part of the reservation. Ex.- MRI operator
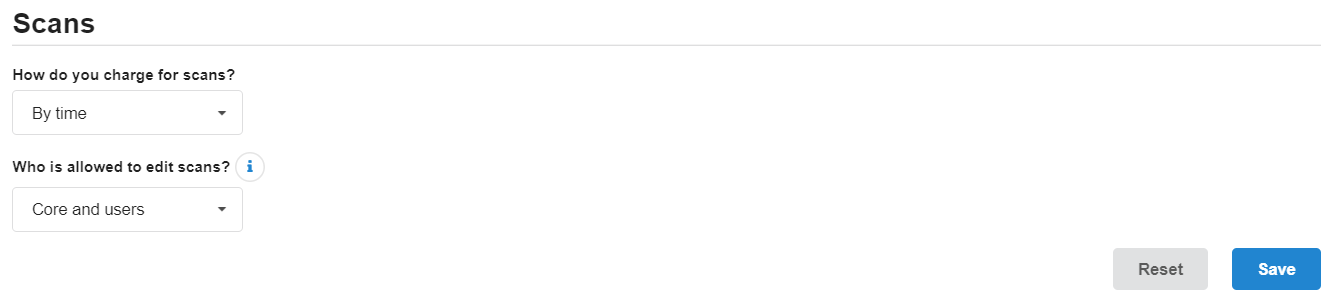
- How do you charge for scans?: Options are By time and By time or service charge.
-
Who is allowed to edit scans?: Options are:
- No one: Time is not editable by anyone, including core staff.
- Core employees: Only core employees can create, edit, and delete scans.
- Core and users: Owners of a reservation and core employees can all edit scans both before and after the fact.
Usage Tracking
Tracking usage on an instrument provides administrators an accurate record of how long a customer used a resource and ensures billing for usage is accurate. This feature allows administrators to track actual event usage and merge scheduled time against logged time. The main tools for usage tracking is the iLab Kiosk, possibly paired with Interlock. Settings related to usage tracking of various kinds are found under the Usage Tracking section in the calendar edits.
Usage Tracker
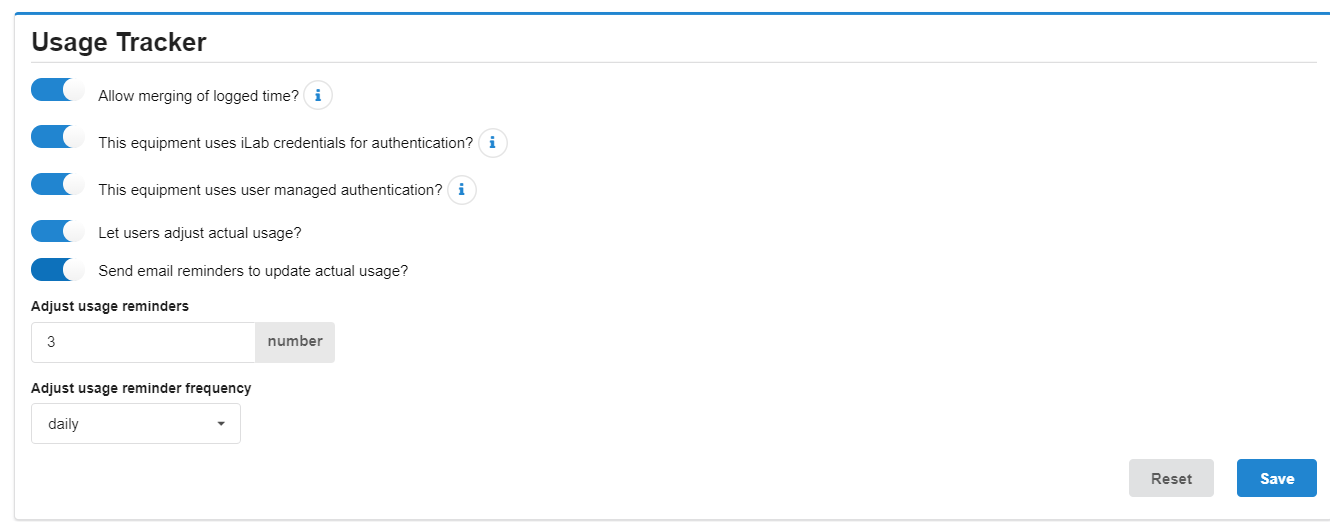
- Allow merging of logged time: Check this box if you want to allow users to match actual times to logged times. Matching logged times will be useful if there is a discrepancy between logged time and actual time.
- This equipment uses iLab credentials for authentication? Indicate that this equipment has the usage tracker installed and that users log into this equipment using their iLab credentials.
- This equipment uses user managed authentication?: Indicate that this equipment uses a custom username and password pair for login (windows level login).
-
Let users adjust actual usage?: Indicate whether users should be allowed to adjust their actual usage. If this setting is yes, the following fields will display and must be completed:
- Send email reminders to update actual usage?: If turned on, an email will be sent to the user, reminding them to update their usage.
- Adjust usage reminders: Determine amount of reminders that should be sent.
- Adjust usage reminder frequency: Indicate how often reminders should be sent. Options are daily, weekly, and monthly.
Kiosk
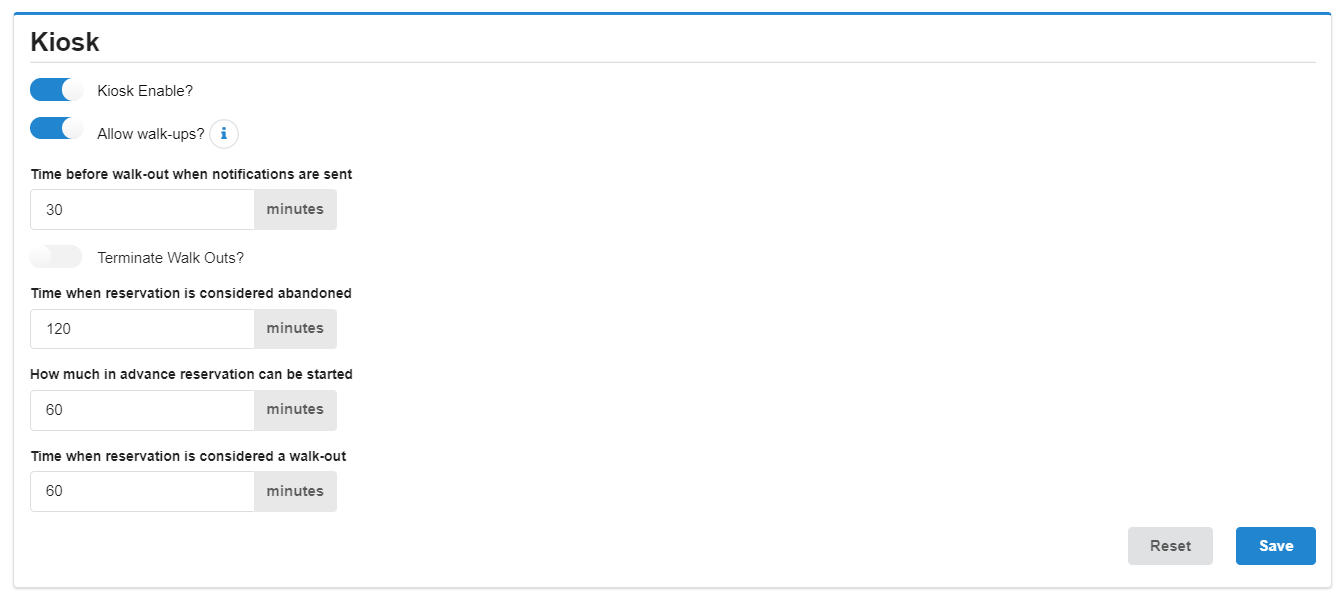
- Allow Walk-ups: Indicate that this equipment allows walk-up reservations (without a prior reservation scheduled from the calendar interface).
- Time before walk-out when notifications are sent: Enter the amount of time (in minutes) before an email notification of a walk-out is sent to the user. This is typically because a user forgets to end their session from the kiosk dashboard.
- Terminate Walk Outs?: Indicate whether reservations determined to be a walk-out should be terminated.
- Time when reservation is considered abandoned?: Determine how many minutes of inactivity should be allowed before the reservation is considered abandoned (the user did not show up to start their session). After this time period, the reservation will open for other users to make a reservation if walk ups are allowed.
- How much in advance reservations be started?: Allows the core to set how many minutes in advance can a user begin a reservation (provided there are no other reservations during that time).
- Time when reservation is considered a walk-out: Set how many minutes of inactivity should be allowed before the reservation is considered a walk-out.
Advanced Attributes
Advanced attributes, used to set up Configurable Reservations, are specific details assigned to a reservation or a resource that go beyond the normal availability for user type and hours of operation. Advanced attributes allow for the core to set up specific parameters for the calendar. Cores with instrumentation that requires significant setup would find the most benefit from this feature. Example: A core can set specific time on the calendar to one configuration (specific microscope head and specific material needed will only be available on Tuesday from 9 am- 3 pm) and then set another time on the calendar for another configuration of the instrument with different materials. Advanced Attributes must be turned on by iLab Support. For more information on configurable reservations, click here.

Reservation Verification Settings
Reservation verification settings allow core administrators more control over their reservations by flagging any reservation missing required information. Flagged reservations will display and can be corrected in Confirm Usage. These options allow validations for time, add-on charges or scans. If you are interested in enabling Reservation Verification Settings, please contact your IA to enable advanced scheduling options. Once enabled, you can set the below calendar edits accordingly.
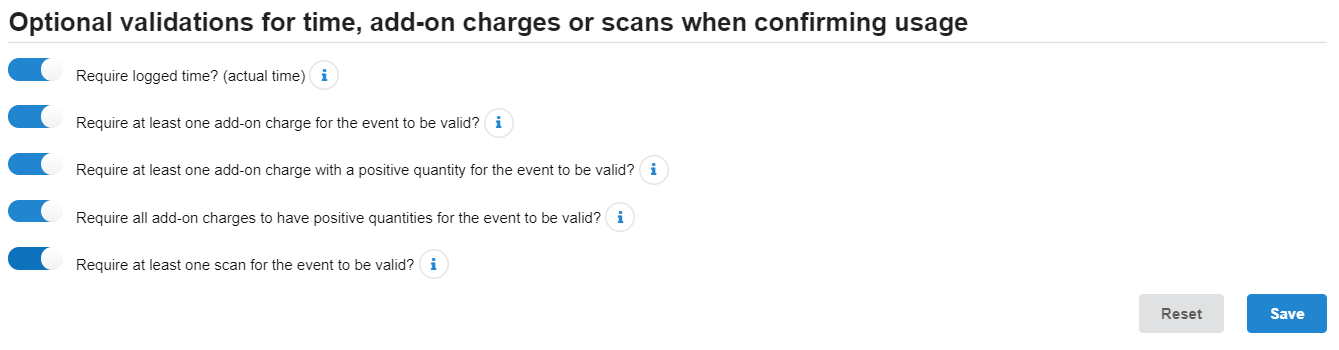
- Require logged time: In Confirm Usage, this setting sets an event's status to 'Invalid' if no actual time has been logged. The source of the actual time will be valid if it is either core edited, user edited, or collected through a usage tracking option.
- Require at least one add-on charge for the event to be valid?: In Confirm Usage, this sets an event's status to 'Invalid' if there are no add-on charges. Note: In the kiosk interface, if this setting is on, a warning message will display if no charges are added. This will not stop the use of kiosk but will flag this event in confirm usage.
- Require at least one add-on charge with a positive quantity for the event to be valid?: In Confirm Usage, this sets an event's status to 'Invalid' unless there is at least one add-on charge with a quantity greater than zero.
- Require all add-on charges to have positive quantities for the event to be valid?: In Confirm Usage, this sets an event's status to 'Invalid' if there are any add-on charges with a quantity of zero.
- Require at least one scan for the event to be valid?: In Confirm Usage, this sets the event's status to 'Invalid' if there are no scans associated with the reservation.
Warnings on Confirm Usage
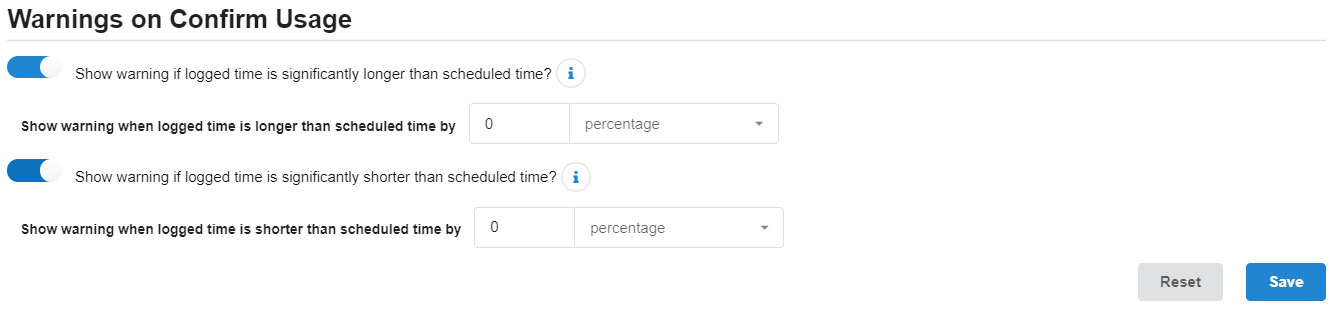
- Show warning if logged time is significantly longer than scheduled time?: Use this setting to flag an event when confirming usage that is considered Significantly Longer. If this setting is turned on, another setting; Show warning when logged time is longer than scheduled by: will be shown. These settings together allow the core to set threshold by percentage or time when they consider a reservation to be significantly longer than originally scheduled. For example, if this is set to 25%, a reservation for two hours will display a warning on confirmed usage when the logged time reached two hours, thirty minutes.
- Show warning if logged time is significantly shorter than scheduled time?: Use this setting to flag an event when confirming usage that is considered Significantly Shorter. If this setting is turned on, another setting; Show warning when logged time is shorter than scheduled by: will be shown. These settings together allow the core to set threshold by percentage or time when they consider a reservation to be significantly shorter than originally scheduled. For example, if this is set to 25%, a reservation for two hours will display a warning when the logged time is less than one and one half hour.
Flag Events for Review and Verification
Flagging events for review and verification that can automatically add in additional verification prior to confirming usage. By turning on these settings, the core is able to automatically flag events that fall in certain parameters and also determine who should verify the completed events, core or customer.
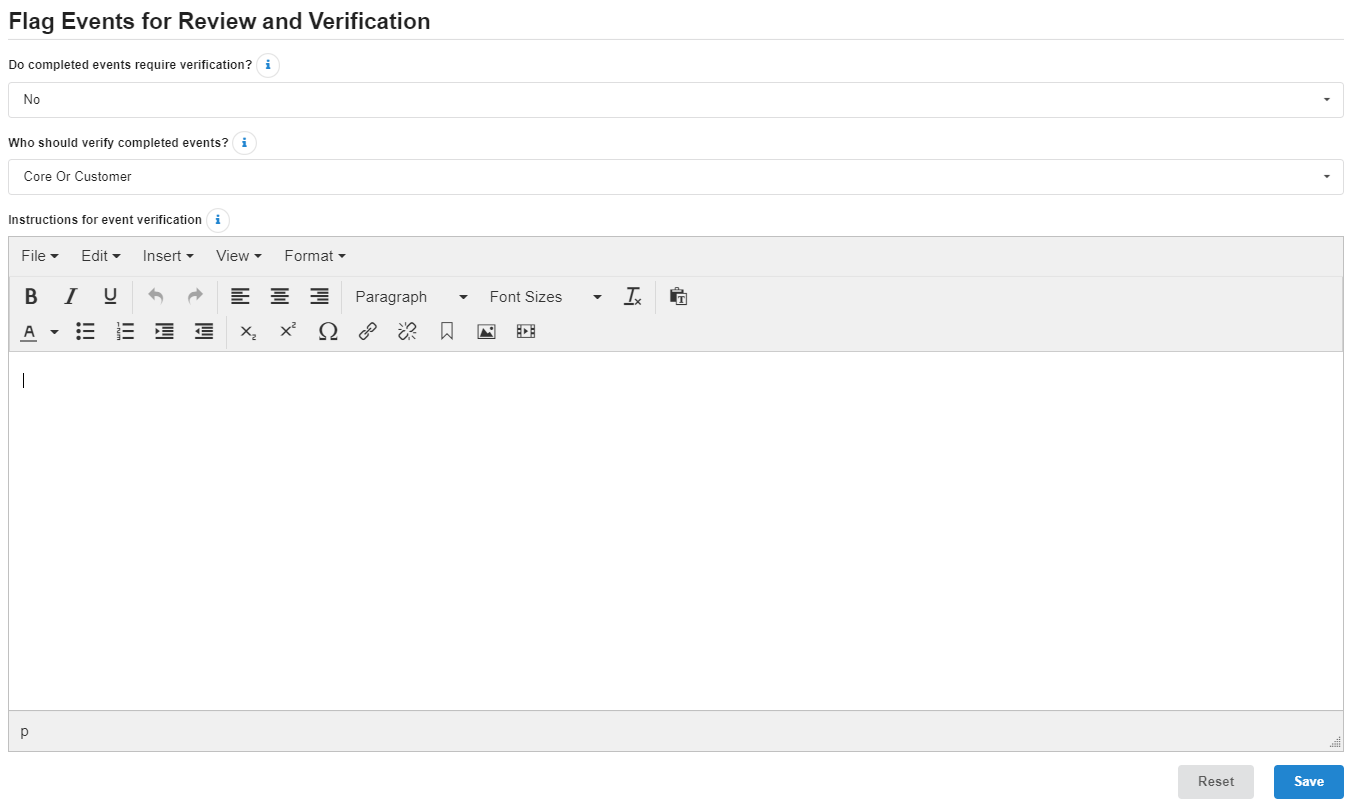
- Do completed events require verification?: The core can determine if all events, or only events with warnings and issues will need additional verification.
- Who should verify completed events?: Core staff or customers can verify completed events. If you would like the core facility staff to receive emails to verify events, select core.
- Instructions for event verification: This option allows core administrators to add 'Help' text that will display above the 'save' and 'verify' button when reviewing a past events.
Verification of logged time
For cores tracking usage, the below options allows administrators to enable additional warnings on events.
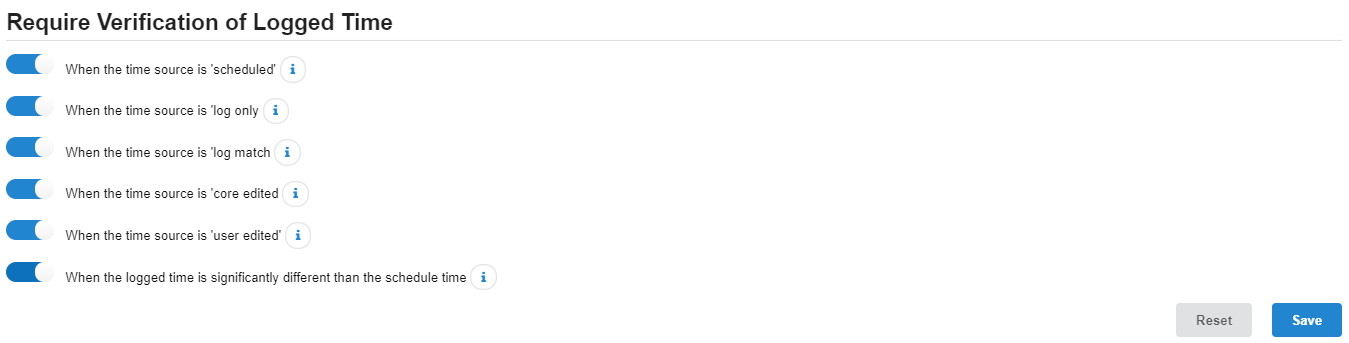
- When the time source is scheduled: Selecting this option will require verification of all events where the scheduled time is the only source of time.
- When the time source is log only: Selecting this option will require verification of all events where a log file or usage tracker is the only source of time.
- When the time course is log match: Selecting this option will require verification of all events where log time has been matched to scheduled time.
- When the time source is core edited: Selecting this option will require verification of all events where the core facility has edited the log time.
- When the time source is user edited: Selecting this option will require verification of all events where the core customer has edited the log time.
- When the logged time is significantly different than the schedule time: Selecting this option will require verification of all events where the log time is significantly different than the scheduled time.
Verification of event
Administrators can choose to require events with add-on charges, scans or required payment information all be verified by administrators in the confirm usage interface.

- When add-on charges are problematic: Selecting this option will require verification of ALL events where there are problems with add-on charges.
- When scans are problematic: Selecting this option will require verification of ALL events where there are problems with scans.
- When payment information is missing: Selecting this option will require verification of ALL events where payment information is missing.