Every project request within the View All Requests tab will require management by core staff, in order to move the request through the core workflow. Specific actions can be taken within each request to build out the total cost, add any additional forms or events, assign staff members, and in general, manage communication with the customer. A single service request can be viewed by toggling open the blue triangle on the left hand side of the request.
- Layout of individual service request
- Edit service request details
- Manage services/charges
- Manage forms
- Manage milestones
- Manage events
- Change order
Layout of Individual Service Request
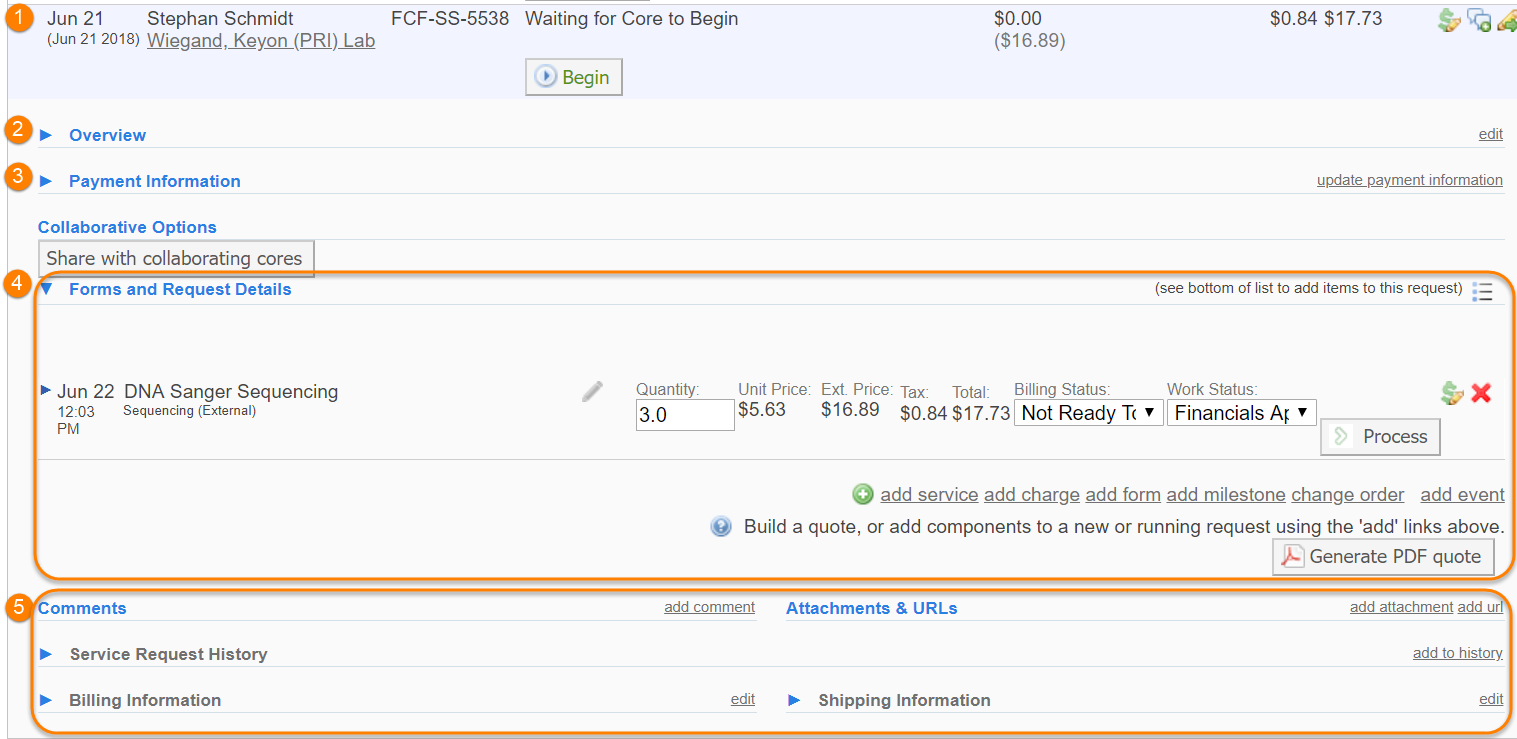
- Status Bar: This section is visible on the View all Requests tab when the request has not been opened or expanded. It contains general information about the request including, user, research group, status, cost and payment information.
- Overview: This section contains details on the request as a whole, including institution, lab information, customer information, and most importantly, the direct URL to this request.
- Payment information: Tells information on cost and fund numbers assigned to the request. For more information on how to update this area please see Changing Fund/Payment Information.
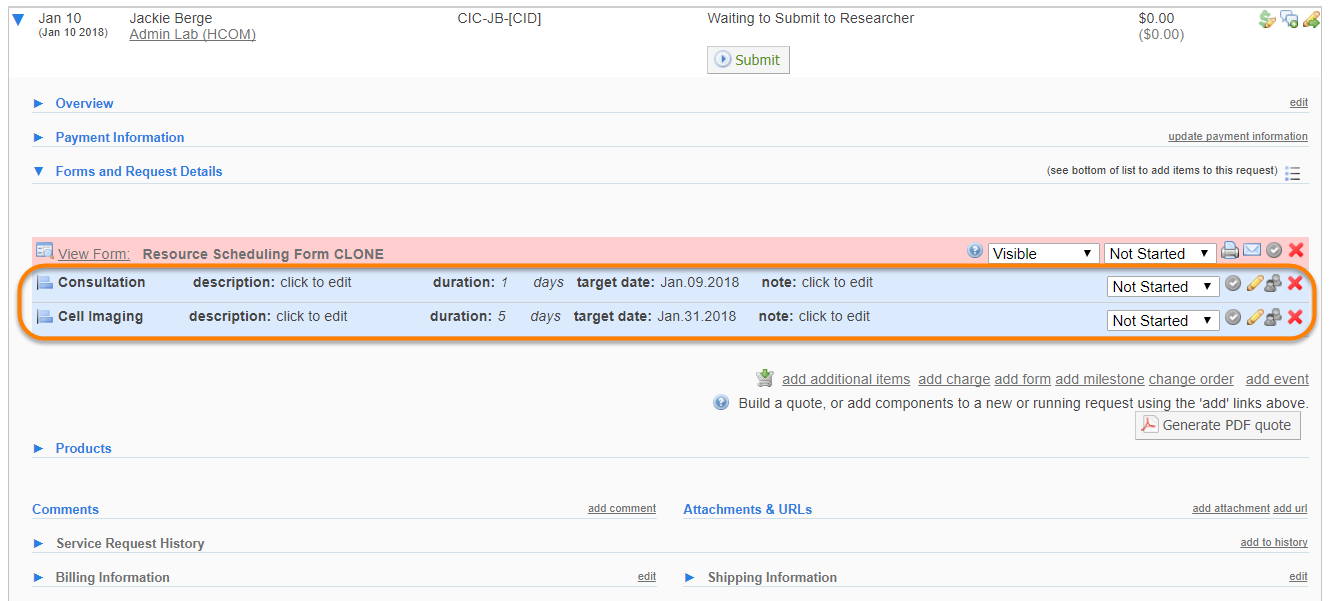
- Forms and Request Details: All of the forms used to gather information for the core, and any services and/or milestones added to the request will live here. You may also create a new PDF in this area, and or view a pdf quote that was previously generated. For more information on this section, Managing services/charges, Managing forms, and Using Milestones will give detailed information.
- Other Request Information: The bottom section of the single service request houses some important tools for communicating with customers. Customers and the core facility can click on the 'add comment' link to correspond with one another regarding the request. Please see Adding Comments for more information. Important attachments and URLs can also be added in using the links to the right. Service Request History provides a history of when changes were made. Also, Billing and Shipping information can be viewed and/or updated using the edit link.
Edit Service Request Details
Under the overview section of a single service request, there are a number of editable fields. You can access this section by clicking on the edit link to the far right hand side of the page.
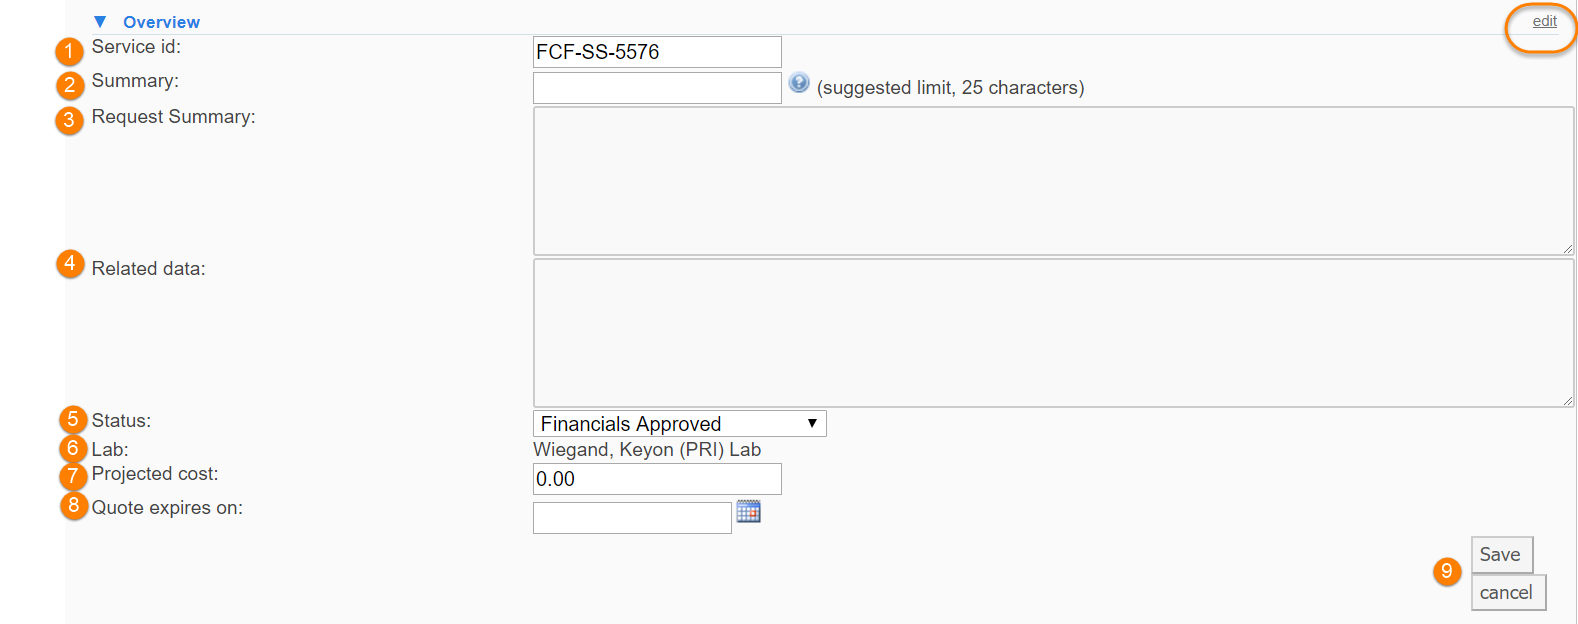
- Service id: This is the unique identifier assigned by iLab. The default Service id format is {Core Name Initials-Last Name of Researcher-unique number that populates sequentially}. Each service id is editable here but please note that iLab does not validate this field for duplicates once it has been edited. To learn other default options available, please see Service Requests Settings.
- Summary: This is a custom field that can be edited and will be visible underneath the service id without opening the single service request.
- Request Summary: This section allows for custom details about the request to be added. These details can then be shown on the pdf quote when generated.
- Related data: This section allows for custom details about the request to be added. The information entered here is not shown in any other area.
- Status: Core administrators are able to override the current workflow status. This is helpful when financial approval is not needed, or when a request was completed prematurely and needs to be reopened. Note: the Status field may not be editable if your organisation doesn't allow this
- Lab: The research group that the requester belongs to is listed here. If a requester belongs to more than one lab, there is a change lab link that will appear and allow the core to change labs if the original lab was incorrect.
- Projected cost: This will populate with the initial cost agreed to by both the core and the researcher.
- Quote expires on: This is the date the core has given the researcher in which the quote provided will no longer be valid.
- Save or Cancel: Be sure to 'Save' your changes or 'Cancel' to exit the editing screen.
Manage Services/Charges

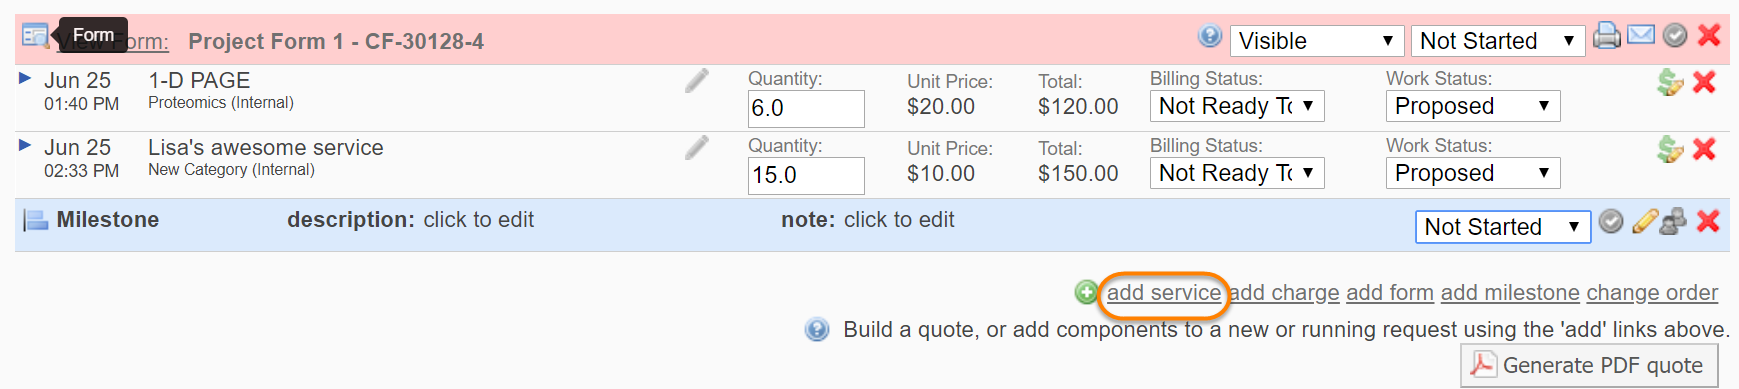
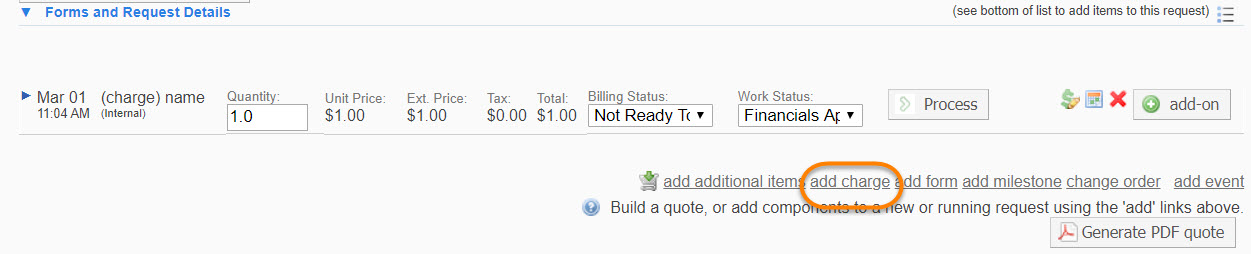
Individual services or charges can be added to a service request. Each service item will appear as a separate line row, and will include information about the service/charge.
- Date: This is the date and time that a service/charge is added.
- Name of Service/charge: A charge will be differentiated by (charge) prior to the name entered.
- Notes: This field is editable and allows a custom note pertaining to the service.
- Quantity: Quantity of service/charge added.
- Unit Price: Price per quantity of 1.
- Total Price: Quantity x Unit Price
- Billing Status: Charges can be billed individually. A status of 'Ready to Bill' will complete this service and allow it to become available for billing.
- Work Status: Charges must be 'completed' prior to being available for billing.
- Action Button: Once a charge line has been added and approved by the researcher, it will move into a work status of 'Financials Approved' and an action button appears to move to the next step. The next step is 'Processing' and then it moves to 'Complete'. Once a charge has reached complete status, it is ready to be billed.
- Payment Information and Red X: Payment information can be differentiated per charge if necessary, by clicking on the dollar sign icon. The red X deletes the charge.
Add a Service
Adding services allows the facility to add in actual cost or projected cost (for building a quote) to the service request. To add a service, click on the 'add service' link.
From the pop up services window, you can search and select available services by using the search option, by expanding the categories and viewing the services within each category or alphabetically by using the "show alphabetically" link. To select by searching, enter a key word in the text box and then press the arrow to begin the search. In the example below, we are searching for "DNA" and have received one match under the Sequencing category: DNA Sanger Sequencing.
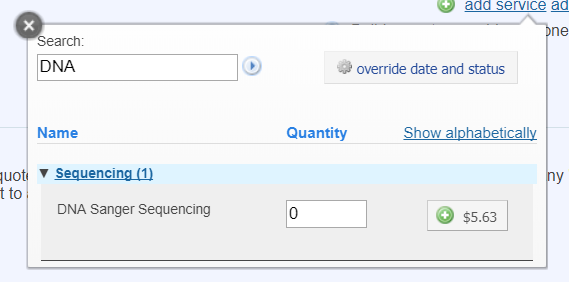
Select the service you want to add, enter a quantity in the text field, and click on the green plus sign.
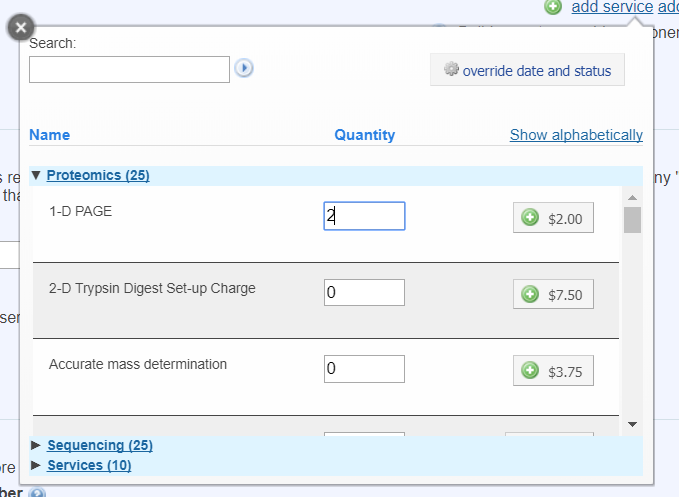
To select a service from a category, click on the category name to expand it, then select your service by entering a quantity and clicking the green plus sign.
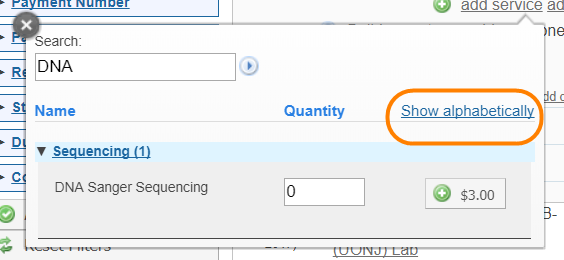
Finally, you may search by scrolling through an alphabetical list of all the available services. To do so, click on the "Show alphabetically" link.
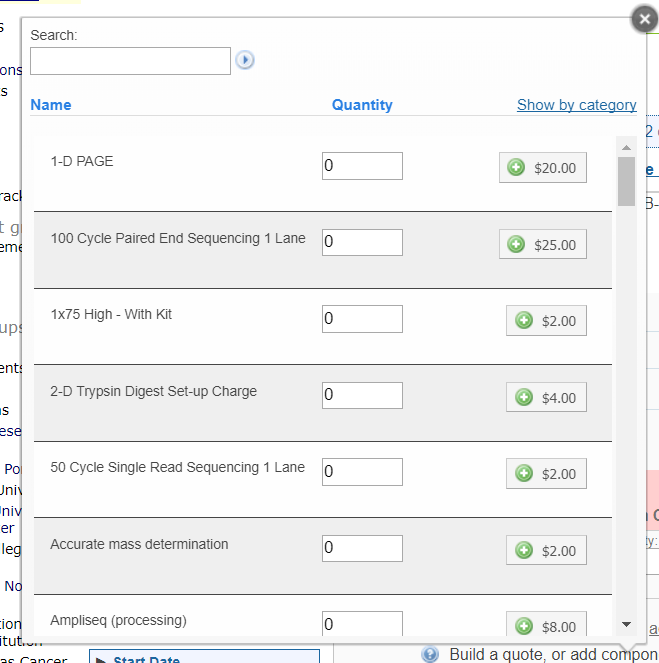
The services list will display alphabetically. To add a service, enter a quantity and click the green plus sign.
When you add a service by any one of these methods, your service will immediately be added to your service request as a line item charge.

Add a Charge
A charge can be added when a core performs a task that is not covered in the Services List. As Core Administrator, you will have the ability to add a charge to a service request if you deem it necessary. Please note that while charges as a whole can be reported on, differentiation of the charges is not possible in reporting. If a service needs specific reporting, it should be added to the Services List. To add a charge, click on the 'add charge' link within the single service request.
Here, you may add the details of your charge. The first three of the fields are free text; you may enter any information you would like. Categories can be added by selecting new category. Note: categories cannot be deleted.
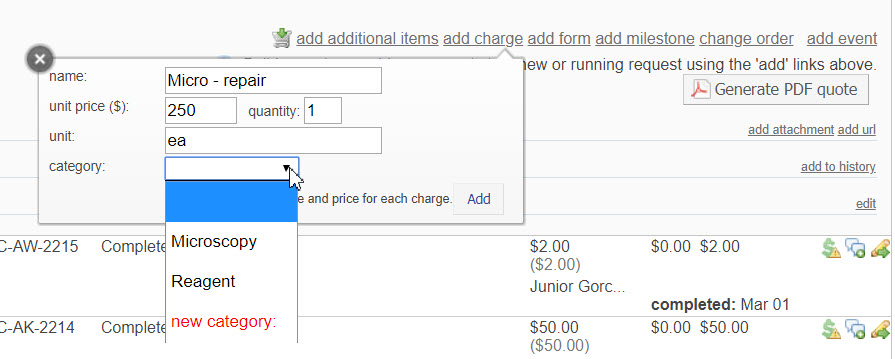
Your charge will now display in the service request. The customized name will appear along with the word (charge) before it.

Manage Forms
To add a form to an existing service request, click on the add form link. This will populate a list of all forms created within the core. If you need help with creating a form please review the Custom Forms section.

Click on the green plus sign to add the form into the request. You can then determine who the form should be visible to. Options are 'Visible' which is both the user and core or 'Core Only'. The core administrator can also mark a form as Not Started, In Progress, or Completed. Additionally, the form can be printed, emailed and deleted by core staff.

Manage Milestones
Milestones can be used to mark a stage of development within a project. Milestones can be assigned to core staff members and can contain information specific to this project. iLab Milestones are visible to both core staff and customer, allowing both sides to see the progress of the project. Additionally, auto-generated emails can be set for core staff to see when one milestone has been completed and another needs to start. To learn more about how to create and manage milestones, please refer to Using Milestones.
Manage Events
When enabled, core staff have the ability to add events to a resource calendar, directly from the View All Requests tab. This is helpful if the core staff will assume responsibility for scheduling time on behalf of the user, and has received a request to do so. To see the add event interface, click on the 'add event' link.

This will open the 'Add event' interface and allow the core to schedule on one or multiple instruments.
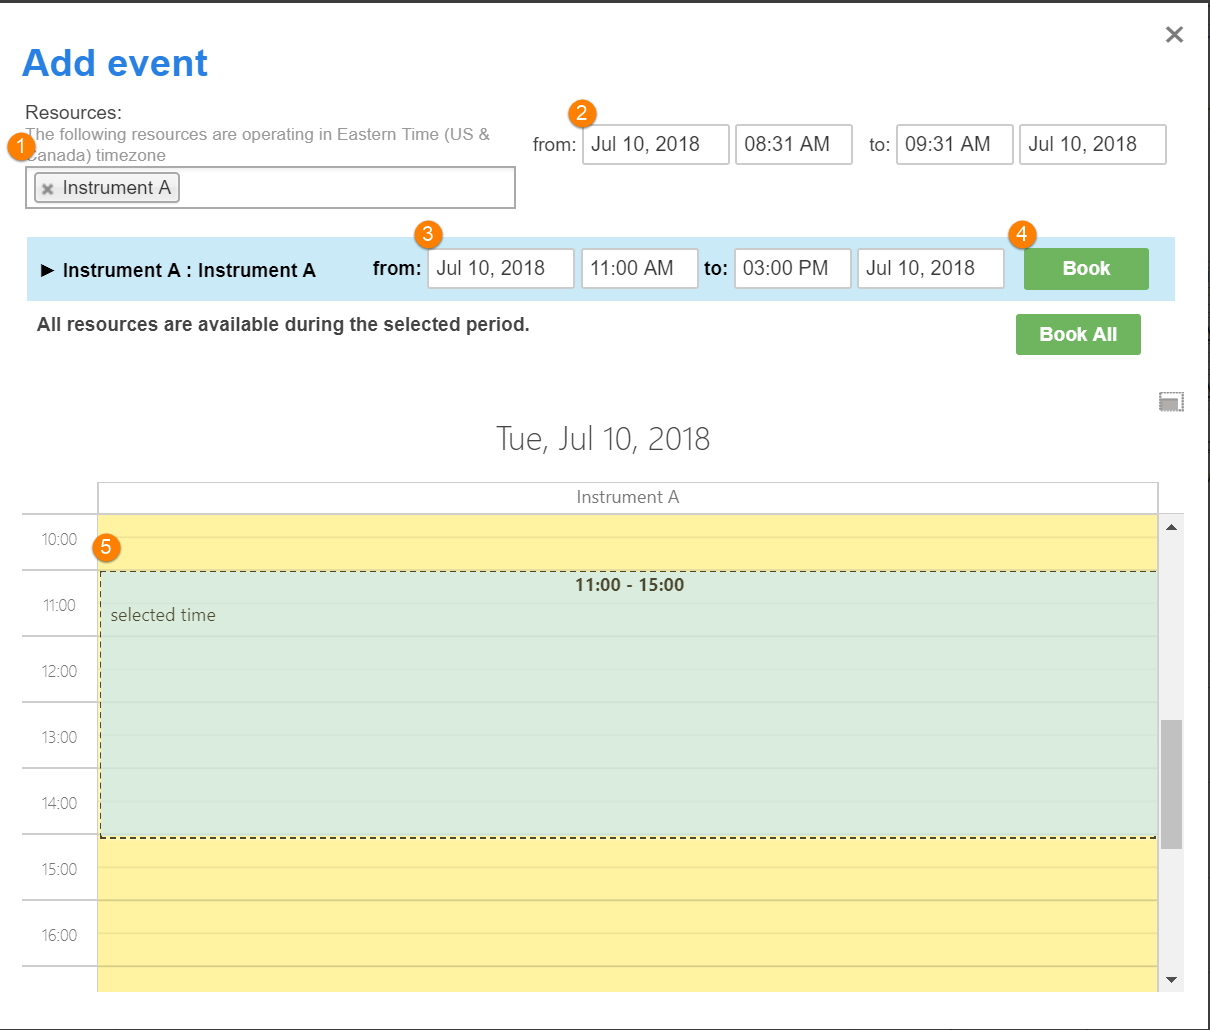
- Search for the resources you want to schedule.
- Adjust the search time to the time frame needed to schedule
- Individual resources can also be adjusted
- Click 'Book' for each resource or 'Book all' for multiple resources to save the events.
- The calendar will show all instruments selected above, availability on each instrument and the reservations that were just made.
Closing out of this interface will show the reservation on the single service request.

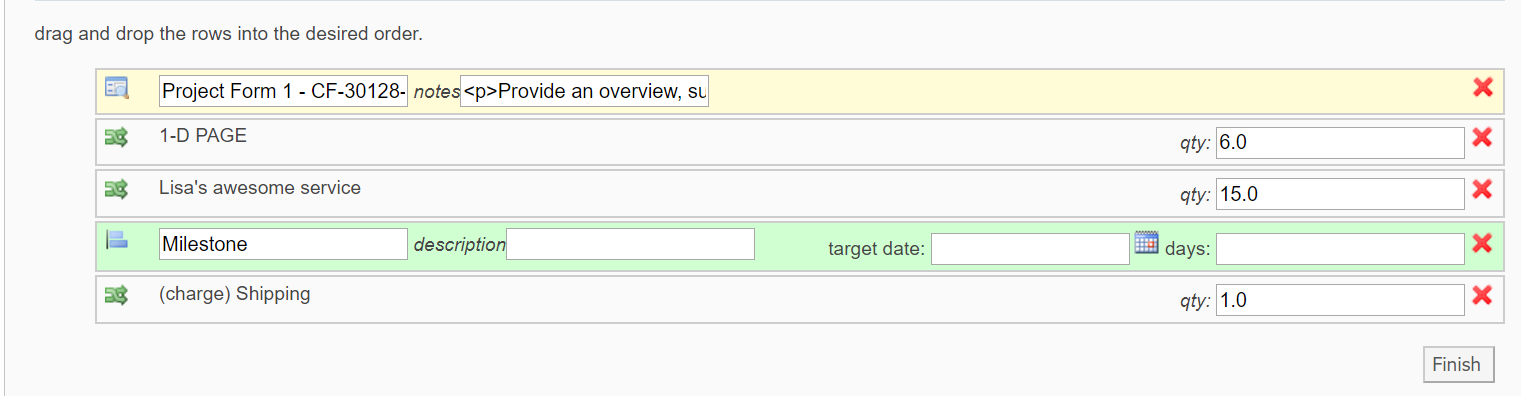
Change Row Order
There are times when the order of forms, milestones, services, and charges, and events need to be reordered. You can change the order by clicking on 'change order'.
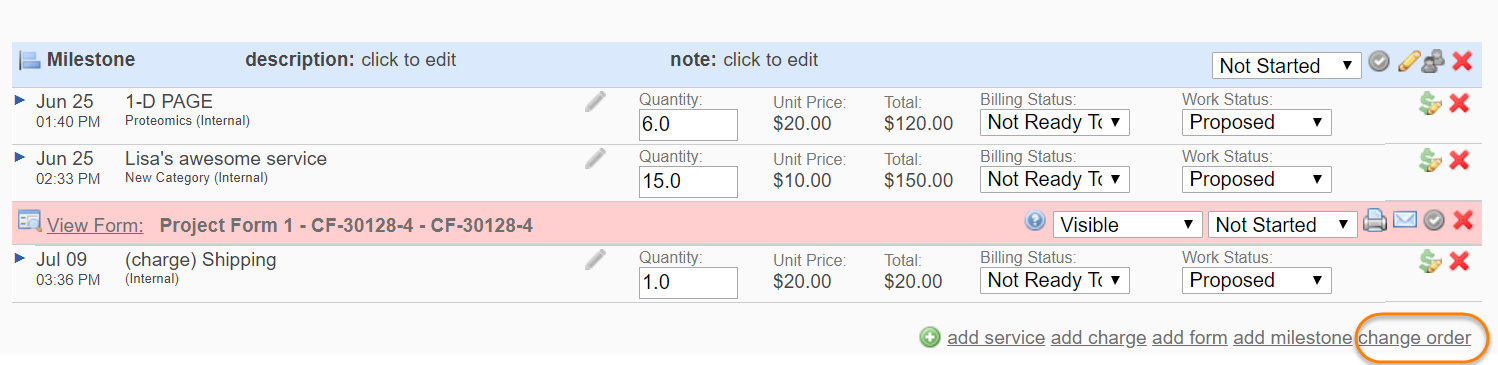
Next, click on the icon to the left of the item you wish to move, and drag it up or down to adjust the order. Click 'Finish'. You will now see the revised order.