The Schedule Equipment tab is where Core Customers can review the schedules of a core's resources and make reservations. Note: this tab may be named differently for each specific core. If your core uses the iLab Kiosk, please see Using Kiosk for more information on starting sessions.
- Layout of Schedule Equipment tab
- View the calendar
- Create a reservation
- Change a reservation
- Delete/cancel a reservation
- Create a repeating reservation
- Reserve multiple resources at once
Layout of Schedule Equipment tab
The layout of the Schedule Equipment tab is shown below:

-
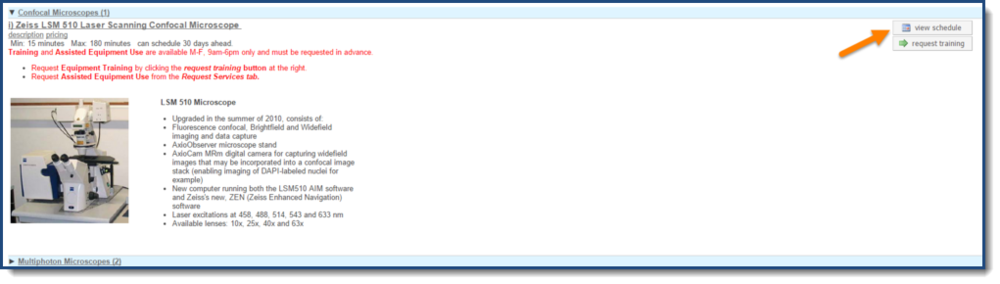
Resource header: The header shows the name of the resource. Clicking on the name will open the Schedule (same effect as clicking the "View Schedule" button"). To the right of the title are two additional links:
- description: toggle open/closed a more detailed description of the resource (may be open by default)
- pricing: toggle open/closed information about the pricing for this resource
- View schedule: click on this button to open up to view the schedule for this resource and to make reservations.
- Favorite: click on the heart icon to mark this resource as a favorite, for easy reference later
View the Calendar
Access the calendar by clicking on the resource name or the "View Schedule" button.

The schedule then opens up, as illustrated below.
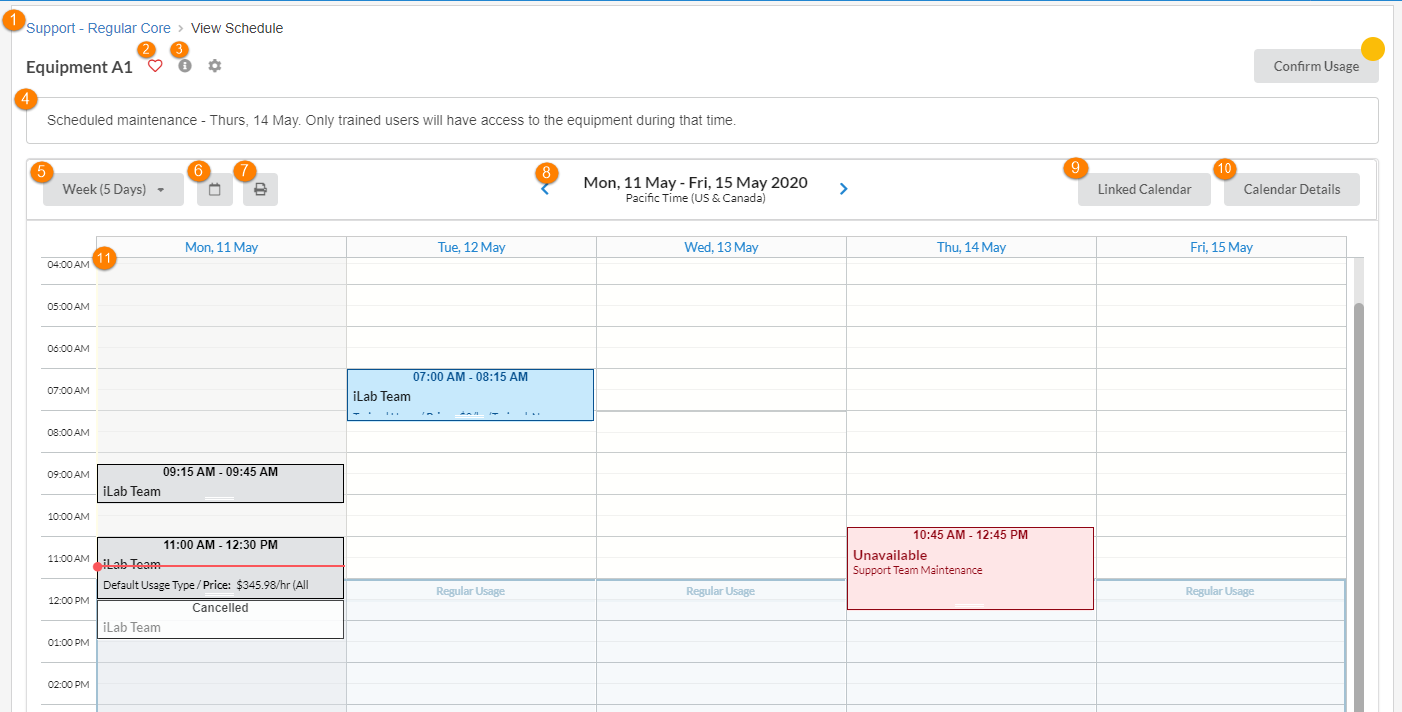
- Core Name: Click this hyperlink to return to the main Schedule Equipment tab for the core.
- Add to Favorites: Click the heart icon to add this calendar to your favorite list. Favorites can be viewed in the My Reservations tab on the left hand menu. For more information, see Managing Favorites.
- Resource Description: Click to view a description of the equipment.
- Schedule Banner: Announcements regarding the equipment will be displayed in this section, if there are no announcements the sections will not be present.
- Time Frame: Select the time frame or view in which you would like the schedule to be shown in (Day, Week, Month, or Multi View). Multi View shows a single-day view that lists all the separate instances of a resource (e.g. if a core has multiple physical instance of the same equipment, they may show them all on a single schedule and allow the user to pick a specific instance when they make a reservation)
- Calendar: Click the calendar to navigate to a specific date.
- Export to PDF: Click the printer icon to export the schedule to a PDF.
- Forward/Backward: move forward (">") or backward ("<") in time, in steps equal to the chosen time frame.
- Linked Calendar: Click the button to show other relevant schedules.
-
Calendar Details: Open up a popup with additional information on avaliabilities, pricing and event color codes.
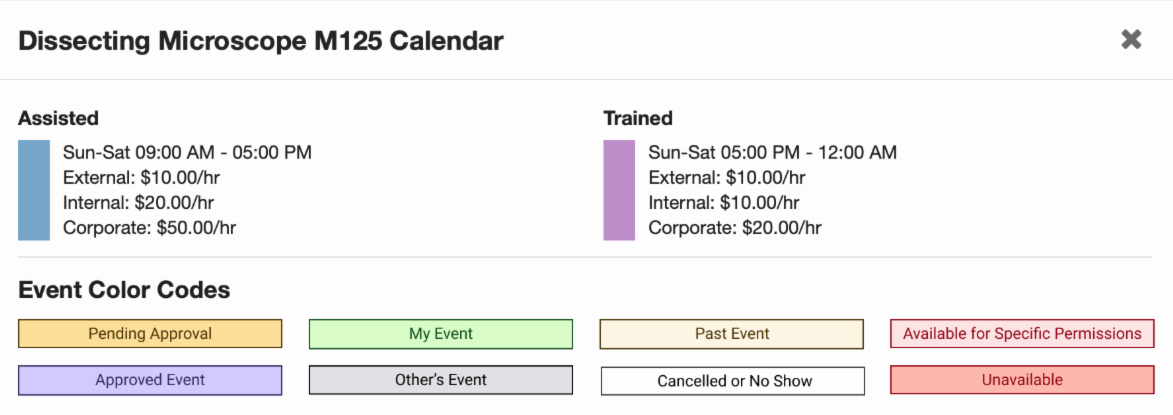
- Green Events: Your future reservations
- Blue Events: Your past reservations
- Red Events: If the equipment is unavailable for selected amount of time
- Orange Events: In some cases, cores require core approval for reservations. If you have reserved time on the calendar that requires core approval, that event will be in orange. When the reservation has been approved you may receive an email and you will see the event turn to purple.
- Grey: Reservations made by others.
- White: Reservations that have been cancelled or are no shows.
- Schedule: shows all reservations on the schedule for the currently selected resource. See the section above, Calendar Details, for an explanation of the colors. Drag and drop in this area to make a reservation.
If your schedule shows an additional set of filters at the very top of the calendar, refer to the section on configurable reservations.

Create a Reservation
To schedule an event on the calendar, click and drag on the day and time of the intended usage. If you are a member of multiple Labs/Groups, you will first be asked to select the Lab/Group this reservation will be made under. Then, complete the reservation details:

- General: The first tab that will open contains the important information that will need to be completed to create your reservation.
-
Comments: The second tab contains all comments that have been added to the reservation by you and/or the core. Additional comments can be added by clicking the Add Comment button. To view the activity that has taken place on the reservation, click on the Activity tab.

-
Contacts: This tab contains information about the group that the reservation has been made under. To view the information click on the name of the group, Billing info, or Shipping Info. If the group/lab needs to be changed click on the change lab link. Note if the change lab link is not present or has a line through it the group/lab cannot be changed for the reservation.

-
Reservation details: Verify key information about the reservation, such as the specific resource, the lab and when it was created. If there are multiple instances of a resource (e.g. if a core has multiple physical instance of the same equipment), you will be able to pick the specific instance in the "Specify the required resource" drop-down. You can also leave a note in the reservation, and indicate if it is visible to all users, or only the core staff. The check box next to the Event Notes will allow to choose if you would like your notes to show on the charge line and be displayed on the invoice.

- Collaborators: In this section you have the ability to add collaborators to the reservation. Collaborators are able to view, edit, and start the reservation, excluding the ability to edit payment information. Note: The Collaborators may not be available based on the equipment's permission levels.
- Times: Verify that the times of the reservation are correct. If you want to make any changes, click on the pencil icon, update the information, and then click the green check mark icon.
- Required forms: If the resource requires you to complete any forms, the will be listed in this panel on the right. Complete the fields, at a minimum the required fields marked with a red star (or the reservation cannot be saved)
- Reserve time on a linked schedule: If there is another piece of equipment or schedule that needs to be reserved in addition to the current one, it may show as a linked schedule. Click the check box to view and reserve a linked schedule. Refer to Reserve multiple resources at once for more information.
- Repeating event: If this option is available you have the ability to create a recurring reservation over a period of time.
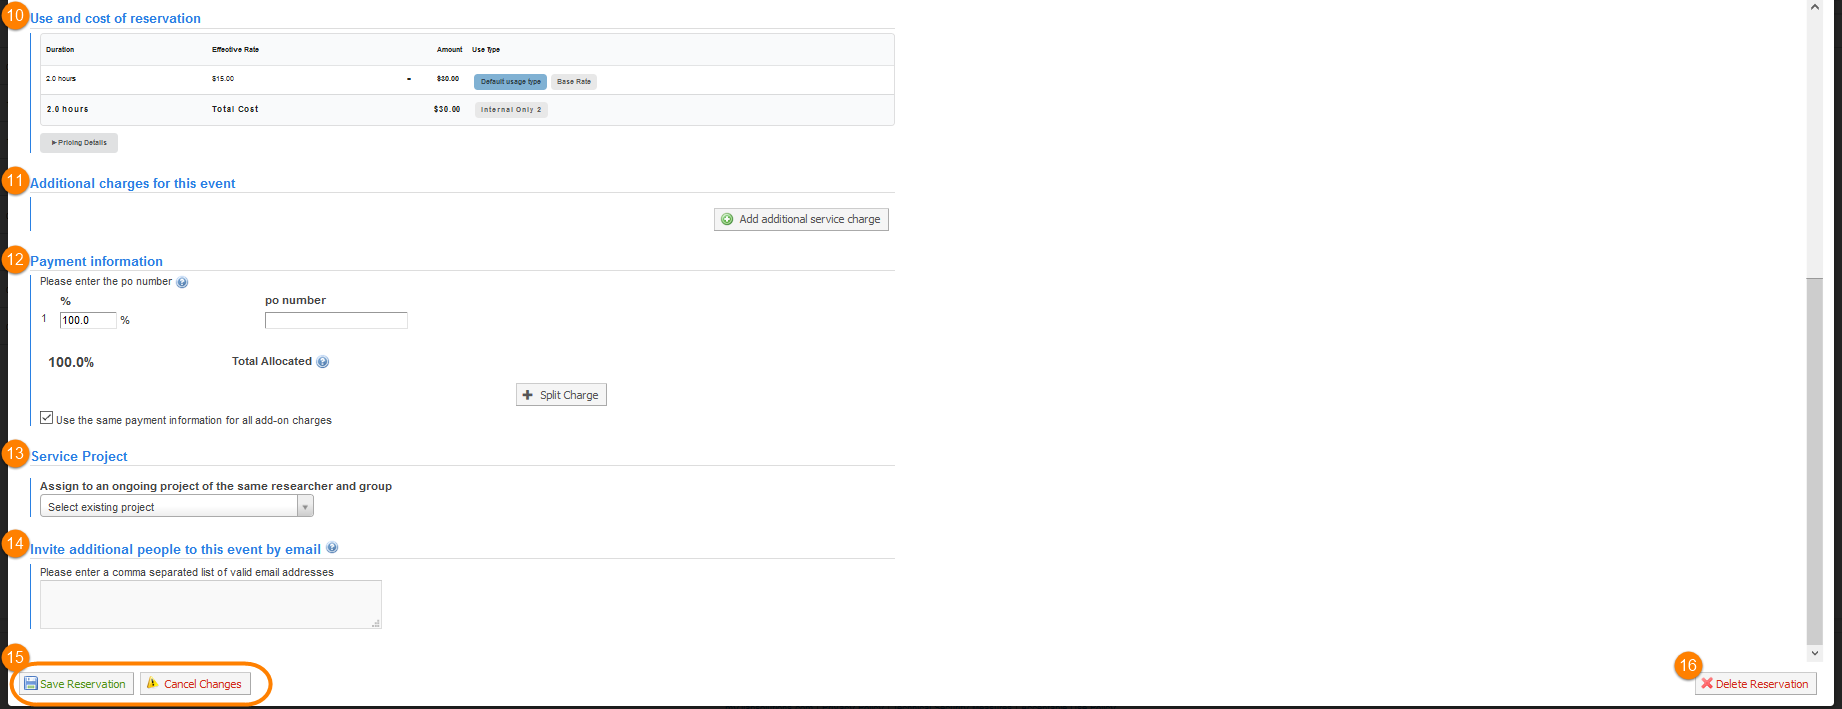
- Use and cost of reservation: Verify the usage type (e.g. assisted or unassisted) and the cost of the reservation. Note that the cost may depend on the selected usage type.
- Additional charges for this event: If you need additional services added to the reservation, click on the Add additional service charges button. This will display all the services the core allows to be added to the reservation. Note this section may not be available based on core settings.
- Payment information: Select your payment method.
- Service Project: If you have an ongoing project that is related to this reservation you may see this option to link a service project to the reservation. The service project does have to be under your name and in Processing status. Note this section may not be available based on core settings.
- Invite additional people to this event by email: If you would like to invite others, enter their email address to forward an invite to them.
- Save Reservation/ Cancel Changes: Click Save Reservation to save the reservation as currently configured. Click Cancel Changes to go back to the equipment schedule without saving any changes.
- Delete Reservation: Click Delete Reservation if you would like to completely remove this reservation from the schedule.
Change a Reservation
Users can update the reservation, within certain constraints set by the core. For example, if the core requires approval of reservations, they cannot be changed after they have been confirmed. Also, a core may have configured limits to how close to the reserved time slot the reservation can be changed or deleted.
To change a reservation, first find it on the calendar:
To make changes, you have a few options:
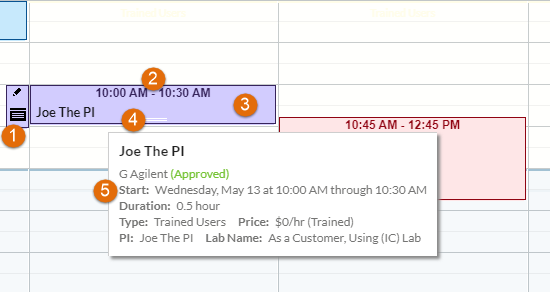
- Click on the reservation to bring up the edit mini-menu to the left. Then, click on the bottom event icon to open up the reservation detail window, as discussed in the Create a Reservation section.
- Drag the top of the reservation (title with reservation times) to move the entire reservation to another time slot (either on the same or or even another day)
- Double-click on the reservation to open up the reservation detail window, as discussed in the Create a Reservation section.
- Drag the bottom of the reservation (white handle bar) up or down to extend/reduce the length of the reservation. Note that you can only change the end time by dragging in this way.
- View additional reservation information by hovering over the reservation.
Delete/Cancel a Reservation
Depending on the time remaining to the reservation, one of two option may be available (if allowed by the core):
- Delete reservation: If this option is available, it will completely delete the reservation and release the reserved time. This can typically only be done up to a maximum number of hours before the start of the reservations as determined by the core. If you try to remove the reservation closer than this specific time, the option would change to "cancel reservation" (see below).
-
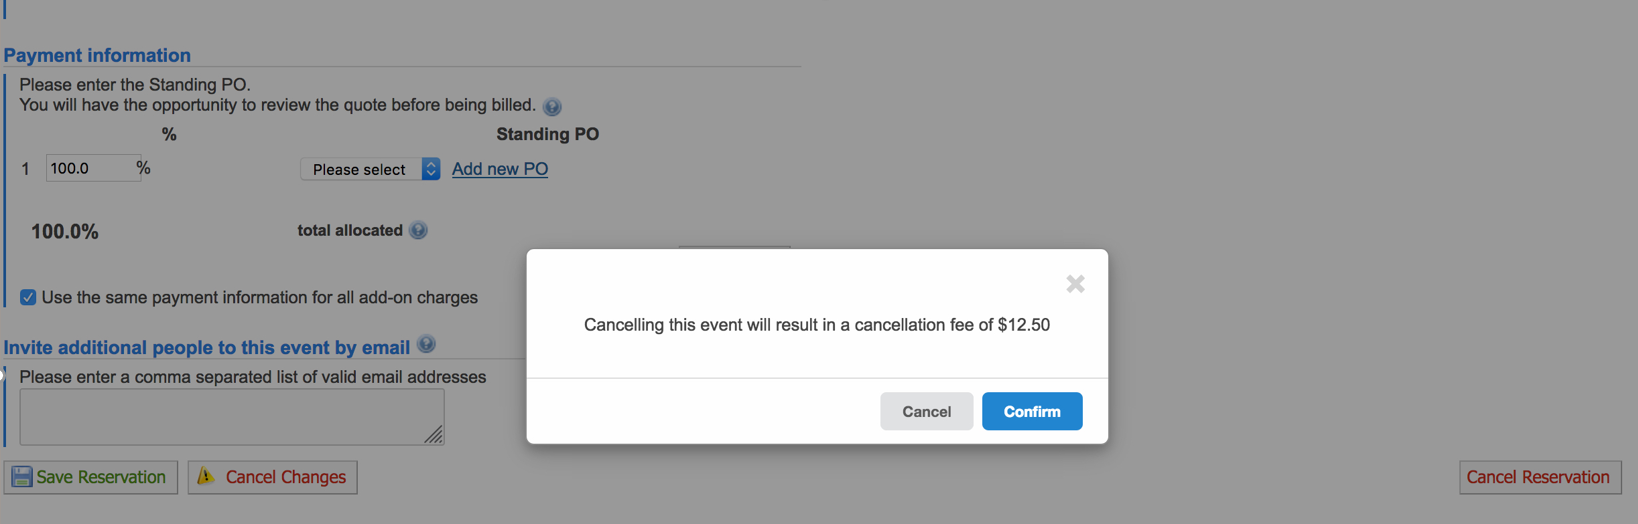
Cancel reservation: If this option is available, it will cancel the reservation and release the time slot for other users. However, if the core has enabled cancellation fees, you will need to accept the charge before the cancellation can be completed:
Create a Repeating Reservation
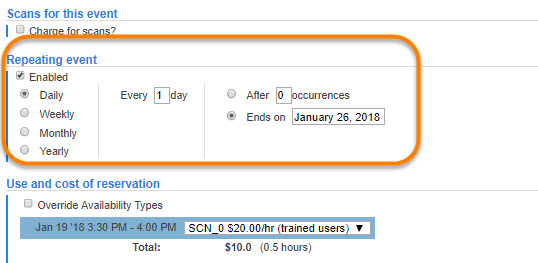
When reserving a resource, some cores may allow you to establish a repeating reservation over a period of time. If this is the case, the reservation form will show a Repeating event section. If you would like to create a repeating reservation, click on the Enabled box under the Repeating event section. This will expand the section and allow you to choose your schedule.
Reserve Multiple Resources At Once
For certain schedules, a core may have configured linked resources that can be automatically reserved at the same time. If this option is available, the reservation form will show a Reserve time on a linked schedule section. This will expand the section and allow you to select additional resources. The current reservation will also be applied to the linked resource.
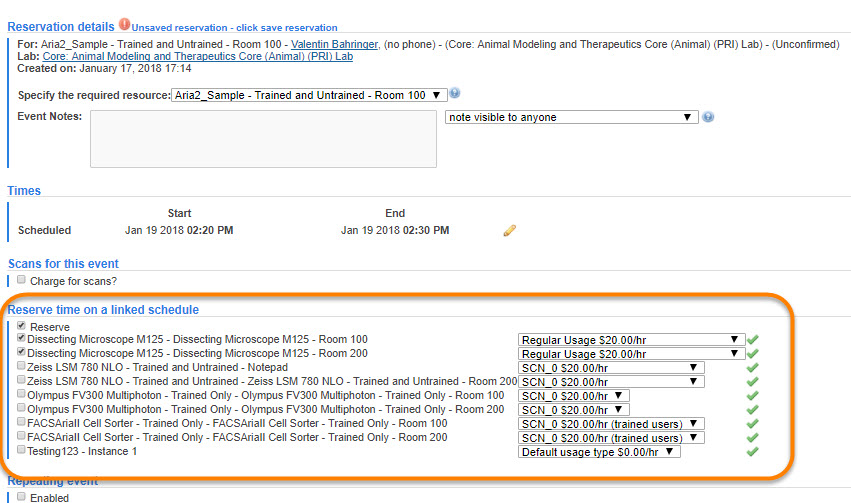
In the case above, Dissecting Microscope M125 is a required resource, and is therefore automatically selected for the reservations. You may choose to also reserve any of the others listed here by clicking on the checkbox beside the resource name.